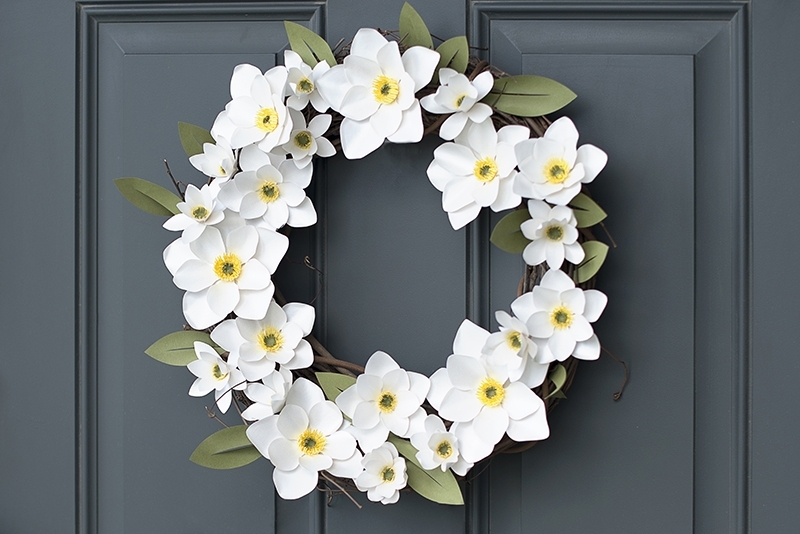
Today we are sharing with you a tutorial on how to make 3D paper flowers to decorate a grapevine wreath. Paper flowers give a unique look to any project and they never fade and these paper flowers make this grapevine wreath pop!
Want to know the tips and tricks for making your paper flowers look like the real thing? Read below to find out.
Supplies needed:
- Silhouette CAMEO® or Silhouette Portrait® or Silhouette Curio™
- Silhouette Cutting Mat
- Silhouette Cutting Blade
- Grapevine wreath (14 in.)
- Floral wire (brown)
- Super glue
- Paper for:
- Flower (81# text weight double sided paper with metallic finish, color – quartz)
- Flower center (80# text weight paper, color – sunshine)
- Leaves and flower center (80# text weight paper, color – moss)
- Tools to shape flowers and leaves:
- Silhouette Spatula Tool
- Wood skewer
- Flower shaping tool
- Embossing mat
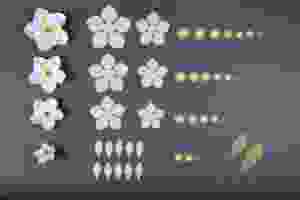
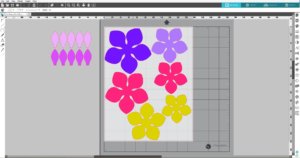
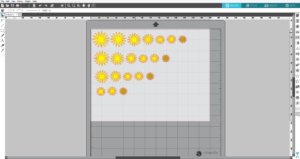
We will be using two different types of flowers: open-face flowers (which are larger and more open) and blooming flowers (which are smaller and look like they are getting ready to bloom). All of the pieces that you will need to create the open-face and blooming flowers can be seen in the image below:
Let’s get started!
Step One: Cutting Out Flower Petals
To create the open-face flower:
1. Open the 3D flower design (Design ID #210380) in Silhouette Studio® and adjust your Page Settings to fit your paper size.
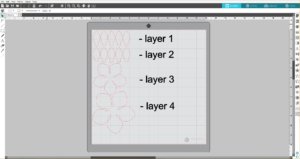
2. You’ll notice that the designs are broken-up into four different layers. Put Layer 1 and Layer 2 to the side for now.
3. Group together Layer 3 and Layer 4, then duplicate the grouped layers so that you have three copies.
4. Resize the flowers so that you have three different sizes—small, medium, and large.
To make the blooming flowers:
5. You will need 10 petals: 5 for the top layer and 5 for the bottom. You do not need to resize them.
6. Fill the empty spots on your cut space with the blooming flower’s petals (Layer 2 and Layer 3).
7. If you use paper mentioned in the supplies list, you will use the Copy Paper cut settings. Once your petals have been cut out, remove the petals from your mat using the Silhouette Spatula Tool.
Step Two: Assembling Open-Face Flower
After you cut out your petal layers, let’s move on to shaping them. We’re using a wooden skewer, an embossing mat, and a flower shaping tool to help shape the flowers. You can also use your Silhouette tools to shape the flowers, as we did below.
To shape the open-face flower:
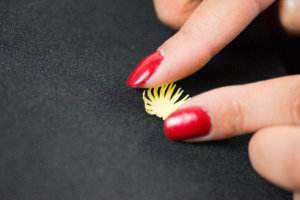
1. Wrap the petal around the handle of the spatula tool and roll to create a crease.
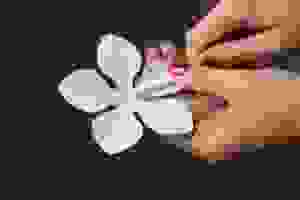
2. With the wooden skewer, curl the top edges of the petal.

3. On the embossing mat, press down on the center of the petals using the flower shaping tool; rub the shaping tool up the middle of each petal.

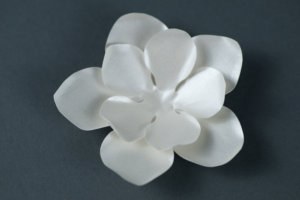
4. Glue both layers together, fitting the smaller layer over the top of the larger layer; repeat this process with each layer of your open-face flowers.
Step Three: Assembling Blooming Flower
Each blooming flower is made up of ten same-sized petals. Five petals go on the top layer and five go on the bottom layer.

1. Curl each petal around spatula as shown in the picture above.

2. Curl the top of each petal with wood skewer.

3. Bend the bottom of each petal and glue five of the petals together to create the bottom layer of the blooming flower.
4. Repeat to create the top layer of the blooming flower.
5. On the top layer, glue the sides of the petals together to create the bud of the blooming flower; the bottom layer edges will not be glued.
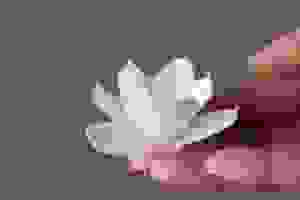
6. Glue the bud to the bottom layer of the blooming flower; repeat this for the second blooming flower.
Step Four: Adding Flower Centers and Leaves
For the open-face flowers we will need 6 yellow centers (for the large), 5 yellow centers (for the medium), 4 yellow centers (for the small). The blooming flowers will need 2 yellow centers for each. Each flower will also need 1 green center.
To assemble the flower centers:
1. Open the flower center design (Design ID #194866) in Silhouette Studio®.
2. Duplicate the flower centers, resize, and cut using your Silhouette.
The flower center for the large open-face flower will be 1.5 in and the smallest blooming flower center will be 0.85 in. The size of the other flower centers should fall somewhere in-between.
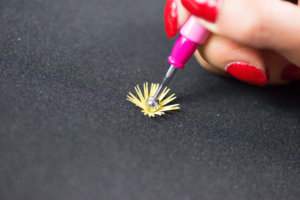
3. Place flower center on the embossing mat, pressing in the middle with shaping tool and spinning in large circles until the center curls in.
4. Using fingers curl the edges and repeat for each center piece.

5. Glue each layer of the flower center on top of each other, ending with the smallest.

6. Glue flower center on to the center of the flower.
To create the leaves for your grapevine wreath:
1. Open the leaf design (Design ID #80182) in Silhouette Studio®. You will need to use only two of the four leaves.
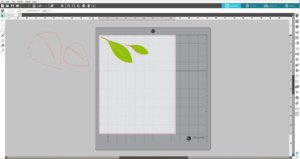
Resize bigger leaf to 2.75 in. x 3.35 in. and smaller one to 1.36 in. x 3.38 in. For this project, you will need 10 large leaves and 10 smaller ones.
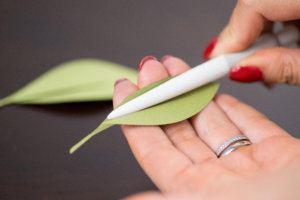
2. After they are cut out, curl each side of the leaf with spatula as shown above.
Step Five: Arranging Flowers on Wreath

1. Cut floral wire 3 inches long, bend the top and glue to the bottom of the flower using super glue.

2. Attach a 4 in. piece of floral wire to the back of your leaf, running parallel to the paper.

3. Arrange the flowers around the wreath in desired pattern, poking the wire into the wreath. To secure the flower, bend the end of the wire on the back of the wreath.
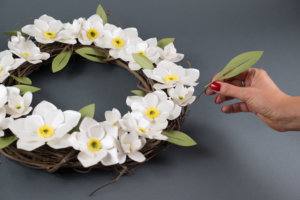
4. Add the leaves to fill out the empty spaces between the flowers. To secure the leaves, bend the wire on the back of the wreath.
Congratulations on finishing your wreath. Enjoy it as a decoration for your home or give it as a gift to friends or family!
What paper flower projects do you have in mind?
sheila_g
July 28, 2017
You gave sizes for the centers and leaves but only said small medium and large for resizing the flowers. Can you kinda estimate the flowers for us newbies?
This would be much appreciated. Your wreath is beautiful and I cannot wait to try one myself! TFS.
Silhouette
July 31, 2017
Large flower: 4.38 in. x 4.45 in. (bottom layer) and 3.36 in. x 3.41 in. (top layer)
Medium flower: 4.03 in. x 4.09 in. (bottom layer) and 3.09 in. x 3.14 in. (top layer)
Small flower: 3.6 in. x 3.65 in. (bottom layer) and 2.76 in. x 2.8 in. (top layer)
Barbara
August 22, 2017
Very nice, I have always used silk flowers, but now I will try these. I have made a couple of the doors with wreaths.