
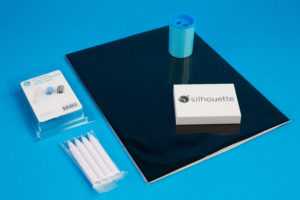
Today we are going to share with you how to create photo props using items from the Silhouette Chalkboard Starter Kit, such as chalkboard cardstock, chalk, a pen holder, a chalk sharpener, and a chalk eraser.
Supplies Needed:
- Silhouette CAMEO®, Silhouette Portrait®, or Silhouette Curio™
- Silhouette Cutting Mat
- Silhouette Cutting Blade
- Silhouette Studio®
- Silhouette Chalkboard Starter Kit
- Wood sticks
- Design ID #24865
- Design ID #122243
- Design ID #72251
- Design ID #72252
Step One: Preparing Design
1. Open Design ID #24865 in Silhouette Studio® by locating it in your library. Ungroup the design and release compound path (to do so, select shape, right-click, and select ungroup/release compound path). Delete the inner parts of the cake. Make sure that page size is a letter sized (the page size can be changed in the Page Setup panel, which is located on the right-hand side of the screen). Resize the design so that it fits the entire page but doesn’t overlap the cut border.
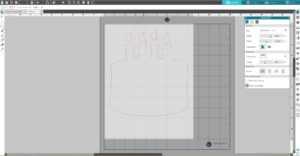
2. Select the shape, go to the Offset Panel (right-hand side of the screen), click Internal Offset tab, change the Offset distance, and click Apply.
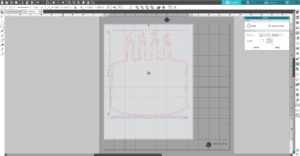
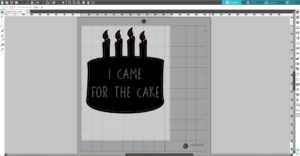
3. Download the Pencil Sketch Font (Design ID #122243). Type desired text using this font. Adjust Line spacing and Character spacing in the Text Style Panel. Go to the Offset Panel and fill the text with internal offset lines. Change the internal offset lines of the cake and text lines into white. And keep the cake design edge line red.
Step Two: Sketching and Cutting Out Design
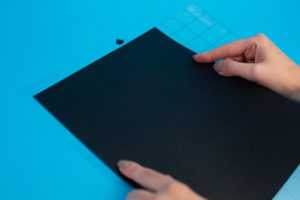
1. Place the sheet of the Silhouette chalkboard cardstock on your mat and feed it into your Silhouette machine.
2. If you use the CAMEO 3 or Curio, you definitely will want to use this opportunity to use the dual-carriage on your cutting machine. Load your first tool (chalk with the pen holder) into Tool 1 of the carriage holder (the holder farthest to the left). Repeat for your second tool (blade) into Tool 2 on the right. If you use a one-carriage cutting machine, you will need just switch chalk with blade after sketch part will be done by your machine. Make sure that your chalk is sharp enough; use a chalk sharpener if needed.
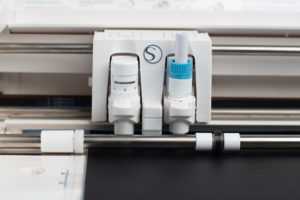
3. Go to the Send panel, click the Line tab, choose the material, action, and tool for each line color. For the white line, we choose chalkboard cardstock as the material, sketch as the action, and the pen holder as the tool. For the red line, we choose chalkboard cardstock as the material, cut as the action, and your blade as the tool. Make sure that Tool 1 is assigned to the red circle in the Send panel and Tool 2 is assigned to the blue circle. 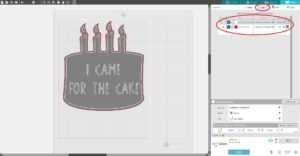
4. Adjust your blade if necessary and send your cut job to your Silhouette machine. After cutting the design, remove the design from the cutting mat.
5. Now we need to cut a base for our photo prop. Leave only the outer line of the cake on the working space. Place the sheet of the cardstock on your mat and feed it into your Silhouette machine. Choose “Cardstock, plain” as your material type. Adjust your blade if necessary and send your cut job to your Silhouette machine. After cutting the design, remove the design from the cutting mat.

6. Peel the chalkboard cardstock design from the backing and apply it on the cardstock base.

7. Glue wood stick on the back of the design and your photo prop is ready.

You can play with different props’ shapes and sayings. A good thing about chalk is that you always can erase it and write different sayings. A chalk eraser comes with the Chalkboard Starter Kit. If you run out of chalkboard cardstock, Silhouette sells it in a separate pack.

Tell us what photo props you want to make with the chalkboard cardstock!