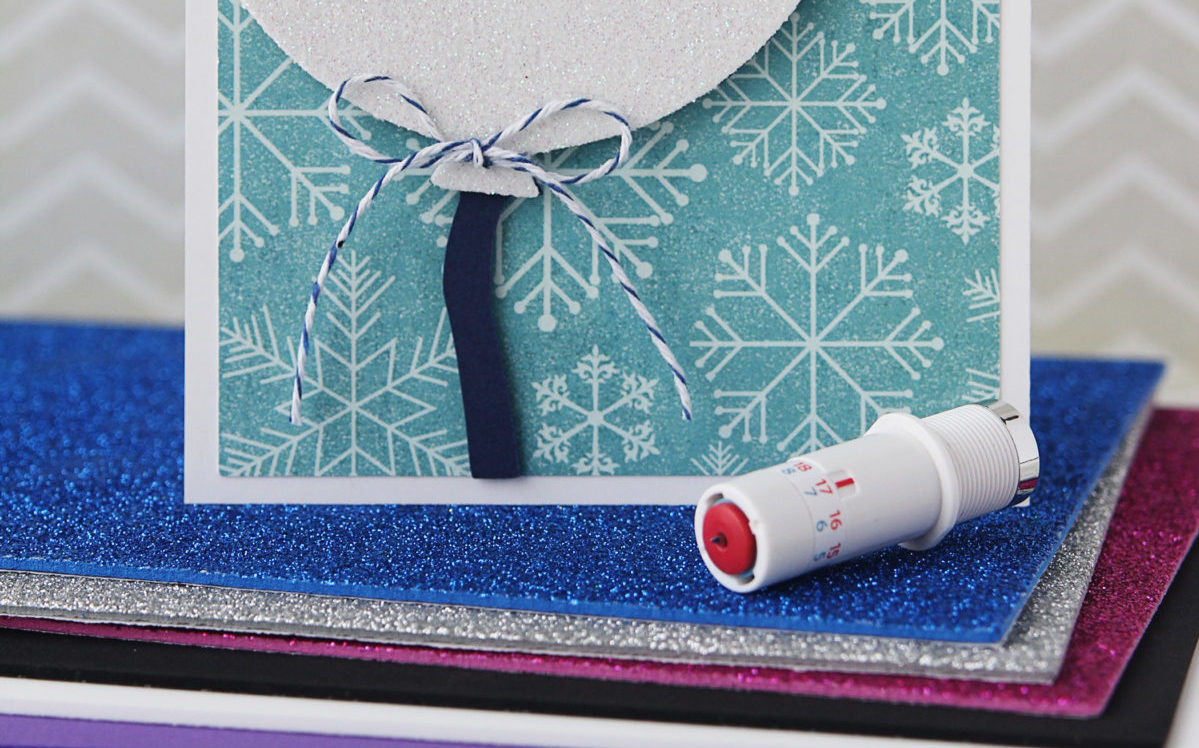
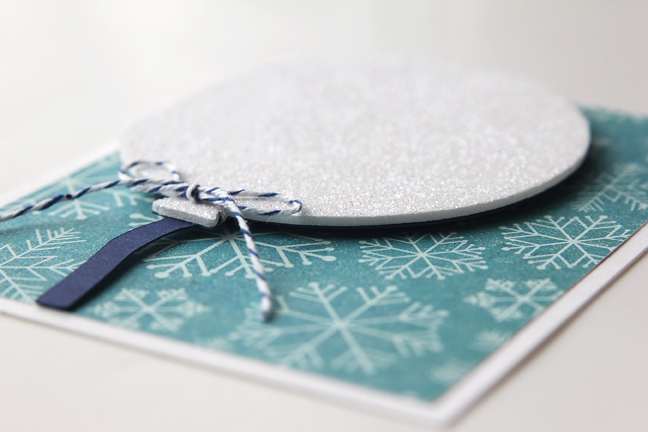
Have you tried the Silhouette deep-cut blade yet? Today I want to share with you how to use this special blade. I added a glitter foam balloon to this card for my little friend’s birthday, and I think she’s really going to like it. Extra texture and dimension on a card is always fun, and the deep cut blade on the Silhouette Curio™ is a great way to make those elements.
Here is what you’ll need to create this card:
- Silhouette deep-cut blade
- Silhouette Curio™
- Glitter adhesive-backed craft foam
- Other desired paper and embellishments
- Large balloon A2 decorative card (#61094)
How to Adjust the Blade:
As you examine the deep-cut blade, you’ll see there are two rows of numbers. One set in blue (1-10) and one set in red (11-20). Unlike the normal ratchet blade, you do not need a tool to adjust the deep-cut blade; just twist it with your fingers.
The rim immediately surrounding the blade has a red section and a blue rim. If the blue rim is showing, reference the blue row of numbers (1-10). These are the shallower settings that basically correspond to the normal ratchet-blade settings.
If the blue rim has disappeared and only the red portion of the blade housing is showing, reference the red numbers (11-20). These are your deep-cut settings that the normal ratchet blade can’t get to. (See the bottom portion of the image below to see a comparison of the maximum depths each blade can reach.)
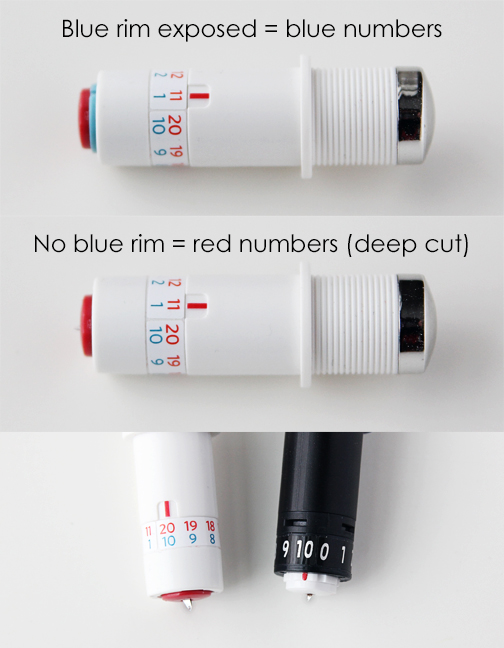
As you turn the blade to expose more or less of the blade, pay attention to the red guide mark. You don’t want to turn too far up, or too far down. (Stop turning if you feel resistance.) If the blue rim is receding as you turn, your blade depth is getting deeper/higher. If the blue rim is appearing and getting taller as you turn, the blade is getting shallower/lower.
Where to Set the Blade Depth:
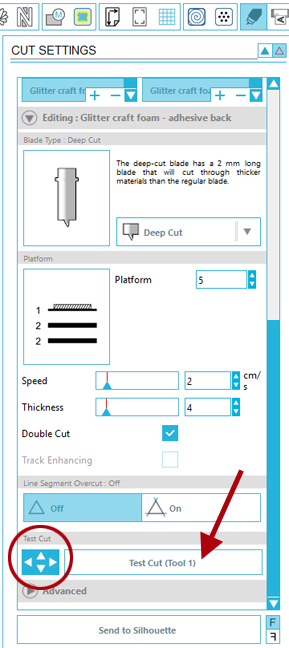
You may have noticed the deep cut blade is a choice you can access in the Cut Settings Window when adding custom materials, and it will also be chosen by default if you choose “craft foam” as your material type (Curio users). However, at the moment it doesn’t tell you at which depth to set the blade.
This is where test cuts come into play. You can use the Test Cut feature on the Curio, which will cut a small triangle and square. First use the arrows near the on-screen test-cut button to position the blade unit over a clear area of your material. You can test cut for either tool, so be sure to position the center rectangular portion of the tool holder (see the image below) over the area of your material you wish to test cut. Either tool on the Curio selected for a test cut will cut under the rectangular center of the blade housing unit. This will give you an idea as to how well your chosen blade settings will cut. You can read more about the Test Cut feature here.
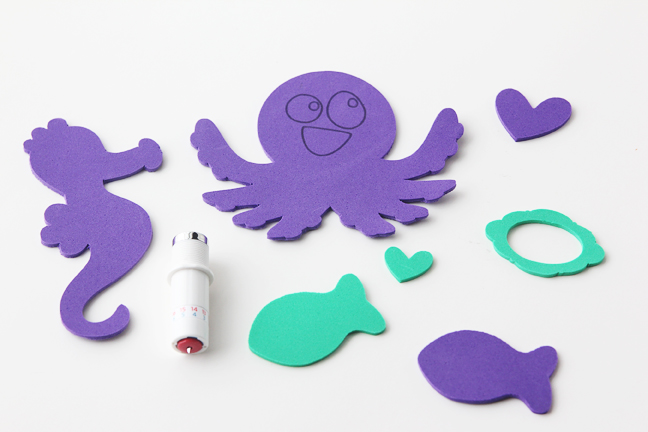
An alternative to the built-in test-cut feature is to choose your own shapes to cut as trials. I like to choose shapes like stars, hearts, fish, etc. in a spot of my material that won’t be needed for the main design. I adjust all my settings, cut one of these shapes, see how it does when actually cutting, and adjust from there. Note: I generally use the basic cut settings and choose “no cut” for any design I’ve already cut as I move on to another test cut, just so I know where I’ve already cut and don’t waste material or cut in the same place again.
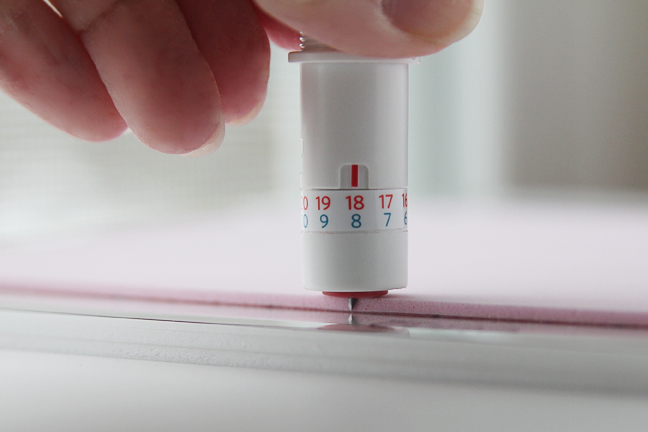
A good starting place to choose an initial blade depth is to choose a depth of blade that will cut all the way through the material but not deeper. I hold my blade against my material and see if it touches the mat as I rest the red rim on the edge of the material. Often several combinations of blade depth and thickness will work (see Silhouette’s test-cut FAQ).
You can set custom material settings in the Cut Settings Window (click on the plus symbol to add a material), but as I mentioned before, you currently can’t set a deep-cut blade depth (I understand that feature is still to come). You will need to write down a list of your successful settings for each material and keep it as a reference. Keep track of the following settings for each material:
- Curio platform number (generally a 5 for thick materials that can be cut with the deep-cut blade)
- Deep-cut blade number (1-20)
- Speed
- Thickness
- Double cut or not
Settings for Foam:
I’ve tried a few thicker materials, some more successfully cut with the deep-cut blade than others. Both of these materials below used a platform level of 5 (2 + 2 + cutting mat) and a speed of 2.
- Plain craft foam cut with my blade set between 16-18. One combination that worked was blade 16, thickness 28, double cut. The other combination was blade 18, thickness 4, single cut. Notice that with the deeper blade setting I could get away with a small thickness (a.k.a. pressure) setting and a single cut. With a shallower blade I needed a higher thickness setting and a double cut.
- Glitter adhesive-backed craft foam cut with my blade on 19, thickness 4, double cut. I also reversed the image and flipped the material face-down on my mat so I was cutting through the backing first. This actually got me a much cleaner cut than glitter-side-up, so don’t be afraid to try cutting some materials upside down as you experiment.
I made quite a few test cuts with various shapes, and even used a sketch pen in combination with the foam for some of my trials.
Do’s and Don’ts:
- DO: Test cut to find the best deep-cut blade settings for each material. (And write down successful settings for future reference.)
- DO: Use the deep-cut blade with the Silhouette Curio™. It was created for cutting thicker materials, which are not recommended in the CAMEO or Portrait.
- DO: Use a double cut for denser materials if one pass doesn’t quite cut all the way through. (Have you ever tried to cut a box with a knife and found that scoring and then cutting several passes in the same spot will get the job done better than trying to force the knife through in one pass? It’s the same principle. Less force is required to get the same job done.)
- DON’T: Cut really dense materials. Anything that would be tough to cut with scissors is probably too dense (metal, thick plastic, wood, etc.)
- DON’T: Cut any material thicker than 2 mm.
- DON’T: Twist your blade too far (above a 20 or below a 1). Stop turning if you meet resistance.
- DON’T: Set the blade deeper than necessary. If it cuts all the way through and is lightly scoring the mat beneath, that’s perfect. If it’s cutting deeply into the mat below, try lowering the blade and/or thickness setting.
I hope this helps you use your deep cut blade more effectively. I’ll continue to try new materials and will be sure to share my success here on the blog. What thick materials have you successfully cut, and what were your settings?
Cari
January 11, 2016
Awesome tutorial Kelly. I’ll definitely be using this as a guide for myself! 🙂
Kelly Wayment
January 11, 2016
I’m glad to hear it, Cari! 🙂
Dawn E
January 11, 2016
Thank-you so much for the tutorial! Do you have a weekly or monthly challenge?
Kelly Wayment
January 11, 2016
You’re welcome, Dawn. 🙂 No challenges at the moment, I’m afraid, but that’s a good idea.
Efrat S.
January 11, 2016
Great tutorial. Thank you! Do you know if we can use the deep cut blade in the cameo? will it hurt the machine?
Kelly Wayment
January 28, 2016
I have seen it used in the Silhouette Cameo but it’s not recommended because thick materials are not recommended in the Cameo. Anything that would need to be cut at a blade level higher than 10 is likely too thick to run smoothly through the Cameo (due to its clearance level and rollers). Basically, use it at your own risk in the Cameo as it has been designed for the Curio.
María
January 11, 2016
I have a long experience using the Silhouette SD and the Cameo and I am not new to this type of machines. Even so, I have had lots of issues cutting 2 mm plain craft foam and after about 6 hours of trying this and that depth-speed setting, 5 or 6 depth matts, blade setting, etc… I have not got perfect cuts with craft foam.
The blade tears slighty the foam in the angles (even if I choose to pass the angle with the cut) and if I use less pressure and double cut the double pass will crumple the foam with the second pass. I also found out the blade always leaves a mark the moment it gets into the foam and breaks into it and starts the cut, and that mark cannot be cleaned, is like a little circle a little bite in the edge. The Curio never cut as perfect as that photo with the funny octupuss shows (is that adhesive backed foam?) and I am disappointed because cutting eva foam was, for me, the most interesting feature the Curio advertised it had. The results are far from satisfying, specially in the lightest colored foams which were more difficult to cleanly cut than dark colored foams. THis machine does not really give what it promises about cutting foam. Other things it does, perfectly, but not craft foam and this is very disappointing for me, it took me too much tries and too much foam to get a decently cut foam figure to give it a thumbs up.
Kelly Wayment
January 28, 2016
Maria, I’m sorry you’re disappointed in the foam cuts you are getting with the Curio. I found that I could not cut sharp angles very well with the brands of craft foam I tried, so I opted for designs with mostly rounded corners instead of angles. The octopus has no backing. It definitely takes some experimentation. You may want to contact Silhouette Support and see if they can help.
María
January 29, 2016
Thank you, I have heard it cuts foam much better when it has some sort of backing. I have recently tried the metal engraving with the Curio and that I am quite happy, it takes many passes and a good card around the metal shape to hold it in place while engraving but after many passes I got a decent and cleanly engraved text.
Marilyn
January 12, 2016
This is such a great tutorial and I appreciate the time you took to put this together! I love your card, so simple but yet such a great looking card to give! thank you!
Kelly Wayment
January 12, 2016
Thanks, Marilyn! 🙂
Melanie Lashua
January 12, 2016
Maybe a silly question… Can you use the deep cut blade in the Silhouette Cameo?
Kelly Wayment
January 12, 2016
Melanie, I have seen it used in the Silhouette Cameo but it’s not recommended because thick materials are not recommended in the Cameo. Anything that would need to be cut at a blade level higher than 10 is likely too thick to run smoothly through the Cameo (due to its clearance level and rollers). Basically, use it at your own risk in the Cameo as it has been designed for the Curio.
Lois
January 12, 2016
Can the deep cut blade be used in the Cameo?
Kelly Wayment
January 28, 2016
I have seen it used in the Silhouette Cameo but it’s not recommended because thick materials are not recommended in the Cameo. Anything that would need to be cut at a blade level higher than 10 is likely too thick to run smoothly through the Cameo (due to its clearance level and rollers). Basically, use it at your own risk in the Cameo as it has been designed for the Curio.
Maritza
January 13, 2016
Thank you, thank you, thank you for this tutorial, Kelly! Love it!
Kelly Wayment
January 13, 2016
You’re welcome, Maritza! 🙂