
These little stickers or seals will be perfect for adding a fruity touch of summer to your pretty packages or planners. Read on to make your own sweet watermelon stickers!
Supplies Needed:
- Silhouette CAMEO®, Silhouette Portrait®, or Silhouette Curio™
- Silhouette Cutting Mat
- Silhouette Cutting Blade
- Silhouette Studio®
- Printable White Sticker Paper
- Printer
- Design ID #138518
Step One: Prepare Design
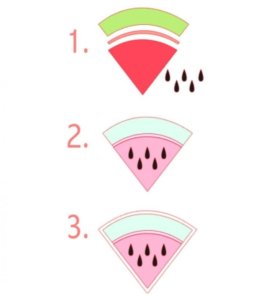
1. In Silhouette Studio®, open your watermelon design (Design ID #138518) in a new document.
2. Ungroup the design and change the colors if you choose to.
3. Assemble your watermelon pieces, group them together, and resize them to the sticker size you will cut.
4. Use the offset tool to make a white border around the image. To apply an offset, select your image. Then go to the Offset panel or right-click your image and select Offset. You can choose to make your offset image either have a sharper corner appearance or have a softer, bubblier, round appearance. Clicking the offset action button provides a starting point. You can fine tune the offset effect to be as wide or as skinny as you’d like with the slider bar or by typing in a specific measurement. Once your offset looks how you want, click “Apply.”
Step Two: Print & Cut
1. Click on the Page Setup panel along the upper right-hand tool bar and select the registration marks icon. Then choose the style of registration marks to add.
2. Arrange your sticker images onto the page and group everything together. (Note: Make sure your watermelon designs do not overlap the registration marks or the crosshatch area. If they do, the Silhouette may not read the marks correctly.)

3. Once your design is ready to go, print your job to your regular printer by clicking on the Print icon in Silhouette Studio®.
4. Load your printed material into your Silhouette using a cutting mat. Select “Sticker Paper, White” from the material list in the Send panel, and adjust your blade accordingly (unless you use the CAMEO 3 or the Portrait 2 with the AutoBlade, which adjusts automatically).
5. Make sure that you group all of your watermelon designs together or select them all and select “Cut Edge” in the Send panel.
6. Click “Send” and your Silhouette will begin scanning the page for the printed registration marks. After the registration marks are found, the Silhouette will proceed to cut as usual.
7. Unload the sticker paper and remove it from the cutting mat.

All you need to do is get your package or planner and start decorating! What colors did you use for your stickers?