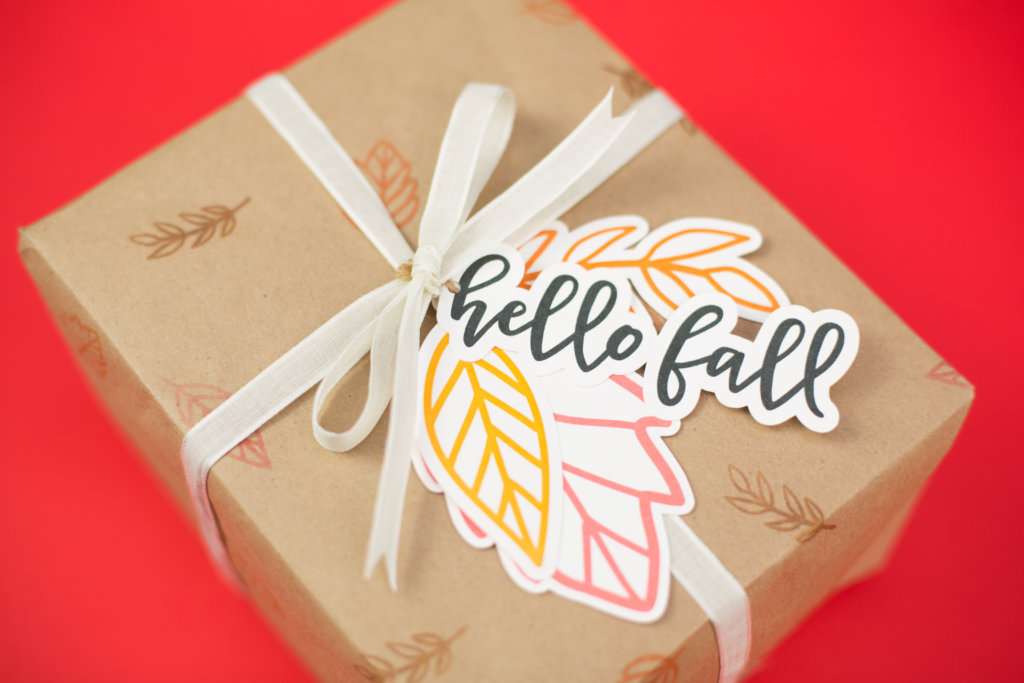
Who doesn’t like a beautifully wrapped gift? This fall, you can be the hostess with the mostess and impress your guests with your beautifully wrapped party favors!
Supplies Needed:
- Silhouette CAMEO® or Silhouette Portrait® or Silhouette Curio™
- Silhouette Cutting Mat
- Butcher Paper (We chose brown).
- 8.5 x 11 Card Stock (white)
- Ribbon
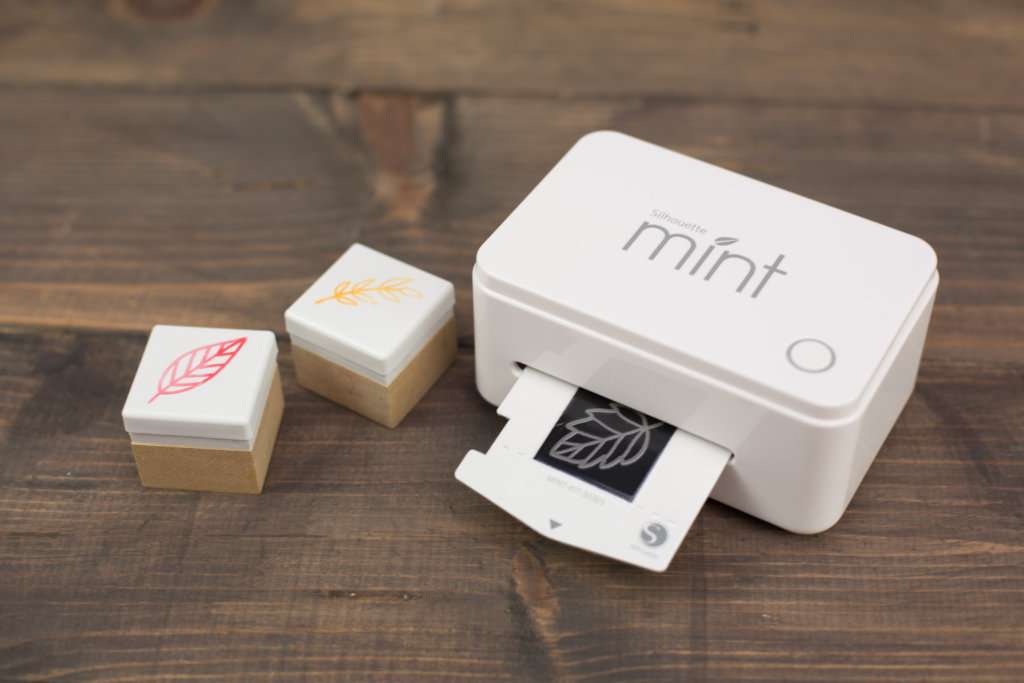
- Silhouette Mint
- 1- 30 x 30 Mint Stamp Kit
- 1- 30 x 30 Mint Stamp Sheet Set
- Mint Ink (Orange, Brown, Red)
- Design ID #215503
Step One: Designing The Gift Tag
- Select the Page Setup Panel (this icon can be found on the toolbar on the right-hand side of your page) and adjust your page to 8.5 x 11.
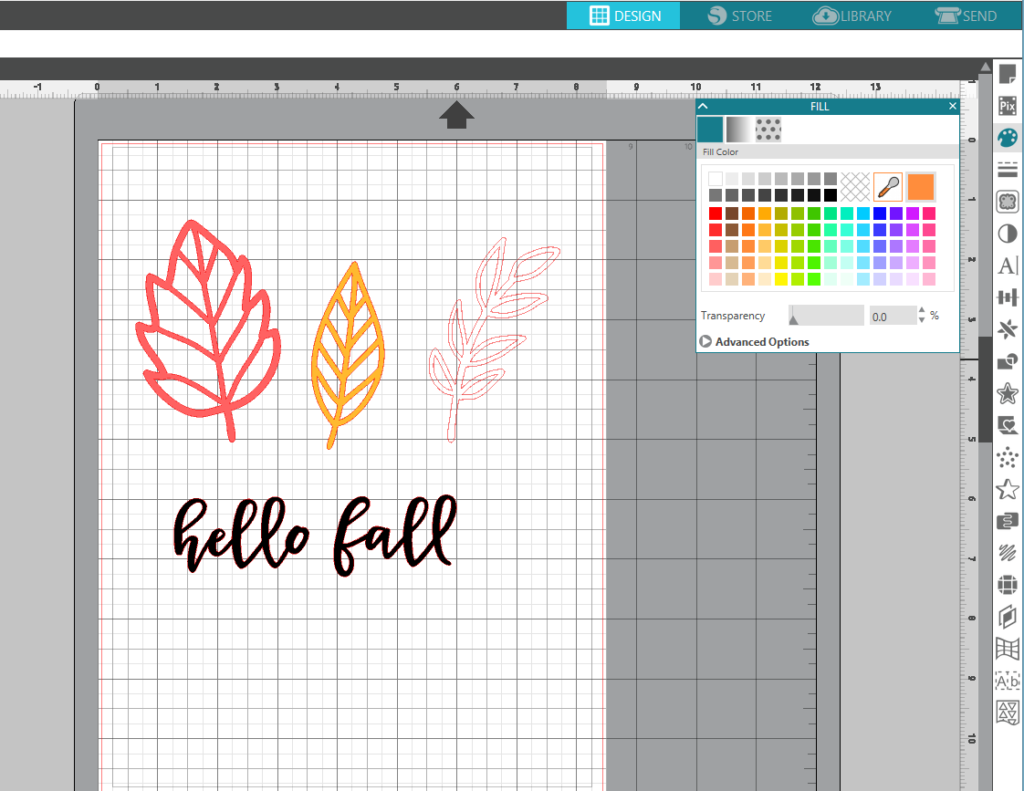
- Open Design ID #215503 in Silhouette Studio® by locating the design in your library.

- Select your design by clicking on one of the images. After you have your design selected, right click and select Ungroup. This will allow you to move each shape independently.
- Now select each individual design and resize them to the size you want them to be. Adjust the size of the design by selecting it and dragging the outer corner to make it larger or smaller.
- After the designs are the size you want, it is time to fill in the colors. Select one design at a time by clicking on the design, open the Fill Panel on the top right-hand side, and choose a color. If you can’t find a color you like, click Advanced Options at the bottom of the Fill Panel window. This will allow you to see a lot more color options.
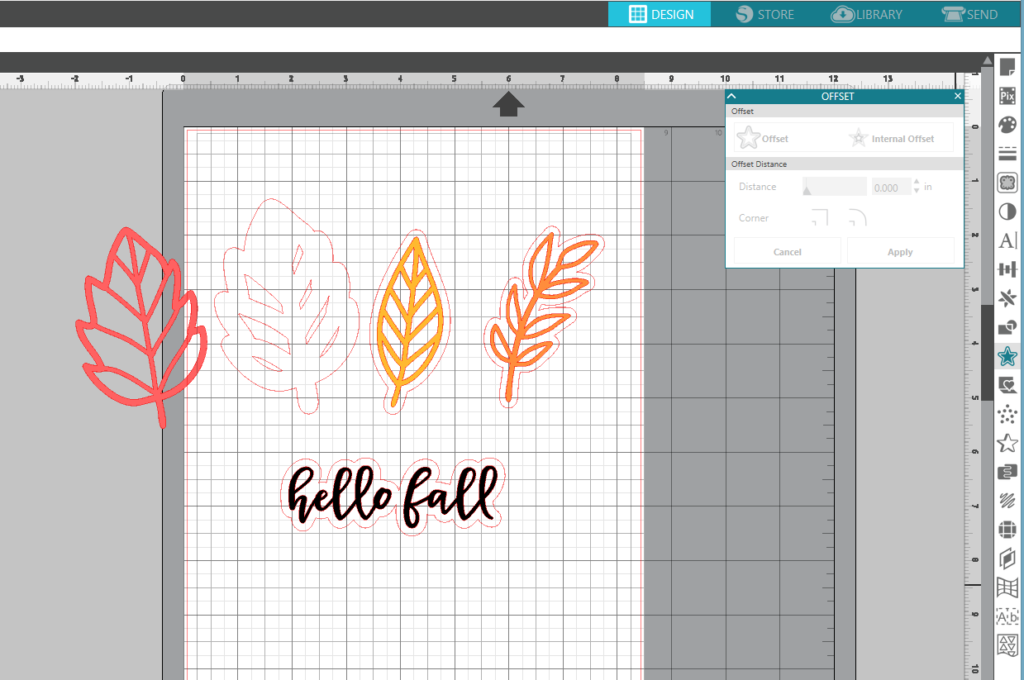
- To create the actual tag, you are going to select one design at a time. With the design selected, open up the Offset Panel located on the right-hand side (looks like a star with an outline). Click Offset; this will create a cut line on the outside of your design. You can adjust the size of the outline by changing the distance, and you can use the arrows or the slider to change the distance.

- If any of your shapes have lines that showed up in the middle of the design, you will just need to select your design, drag it off to the side, and with the Eraser tool (located on the left-hand side), erase the lines in the middle. After you have erased the lines, move your design back over and center it in the offset shape.
- The final step in the design process is making little holes to allow the string to go through. To make the circles, hover over the rectangle tool (located on the left-hand side) and then select the Ellipse shape. Once that tool is selected, hold down your mouse and drag it out to create a small circle. If you wish to have a perfect circle, you can hold down Shift when you are dragging your mouse. That will make all of the sides even.
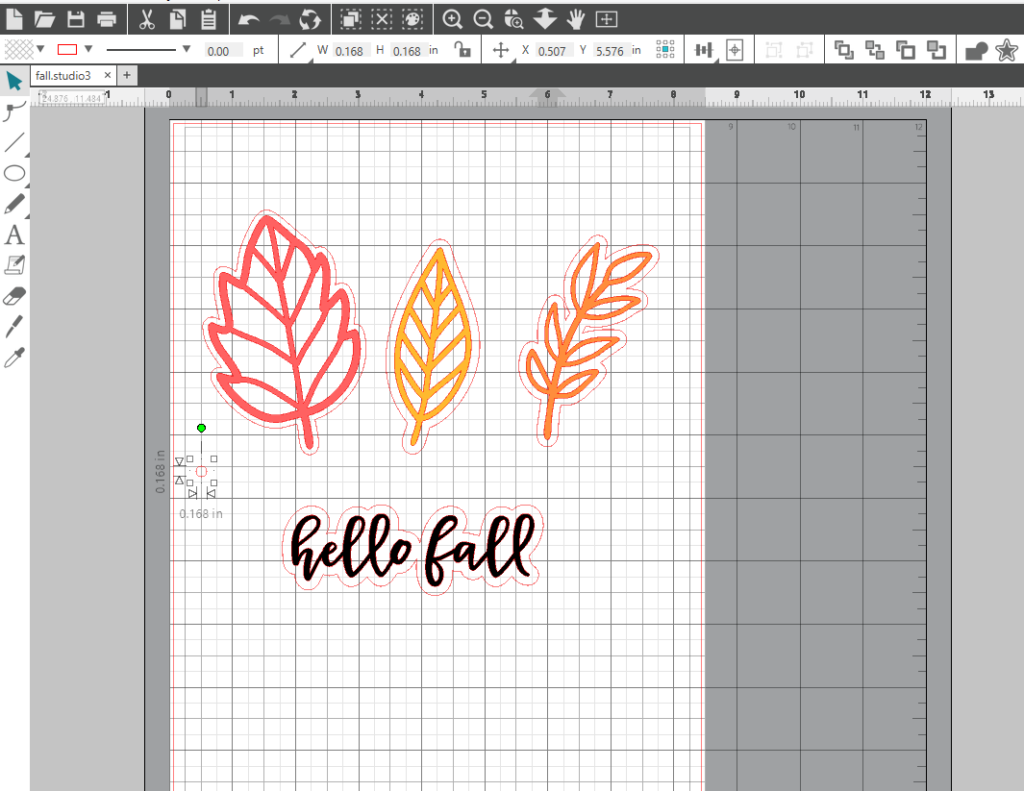
- After you have created one ellipse or circle, select it, right-click, and duplicate it. Do this 3 times to get enough for all of your tags. Drag each of the 4 circles to the bottom of the stems in the leaf designs and the H in “Hello Fall.”
- In the Page Setup Panel, turn on the registration marks by setting the style to Type 1. Adding registration marks is important because your machine reads these marks in order to cut your shapes out perfectly.
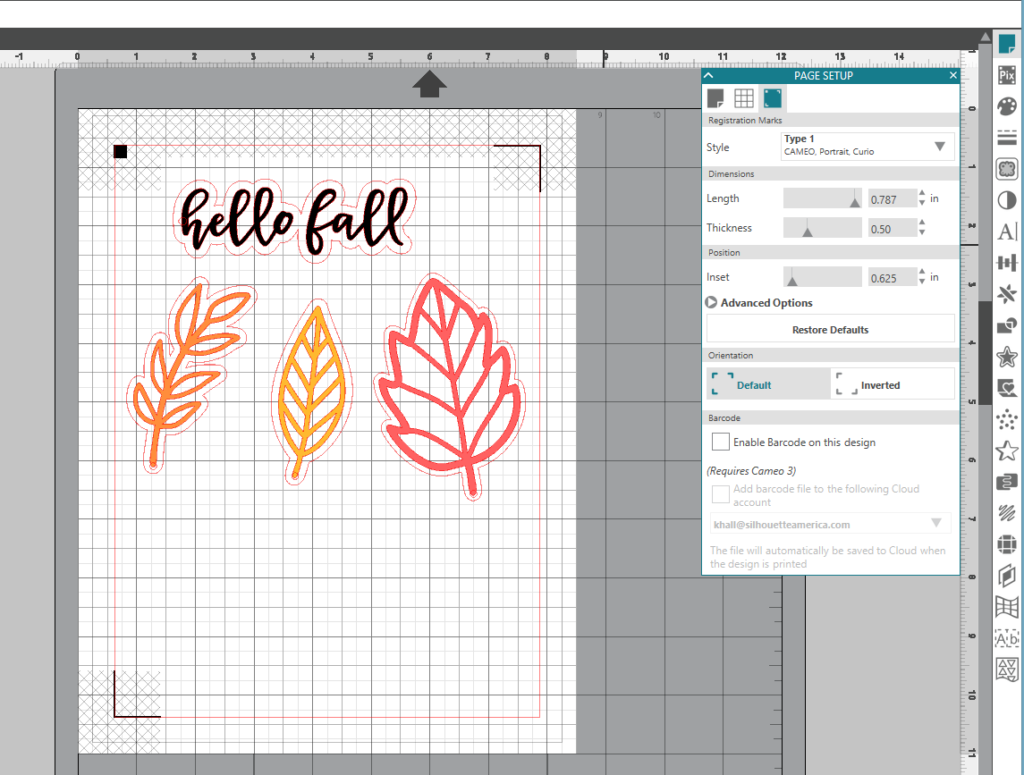
- Arrange your designs so that they fit within the added registration marks.
- In the Send tab, select each of your designs and make sure that the text and all the leaf designs are all switched to No Cut. The only cut lines should be the Offset line we created and the little circles.

- After you have the correct cut lines, print out your design on the white card stock by selecting the printer icon.
- Once it has been printed, place your printed design on your cutting mat. Load the cutting mat into your machine.
- In Silhouette Studio®, select the Send panel in the top right-hand corner. Select the Cardstock cut setting and select Send. (Remember that if you don’t have an Autoblade, you will need to adjust your blade settings.)
- Your machine will read the registration marks and then cut out your design (Tip: If your machine is having trouble reading your registration marks. Try manually moving the blade directly over the square registration mark. You can do this by moving the blue arrows in the send window in Silhouette Studio®).
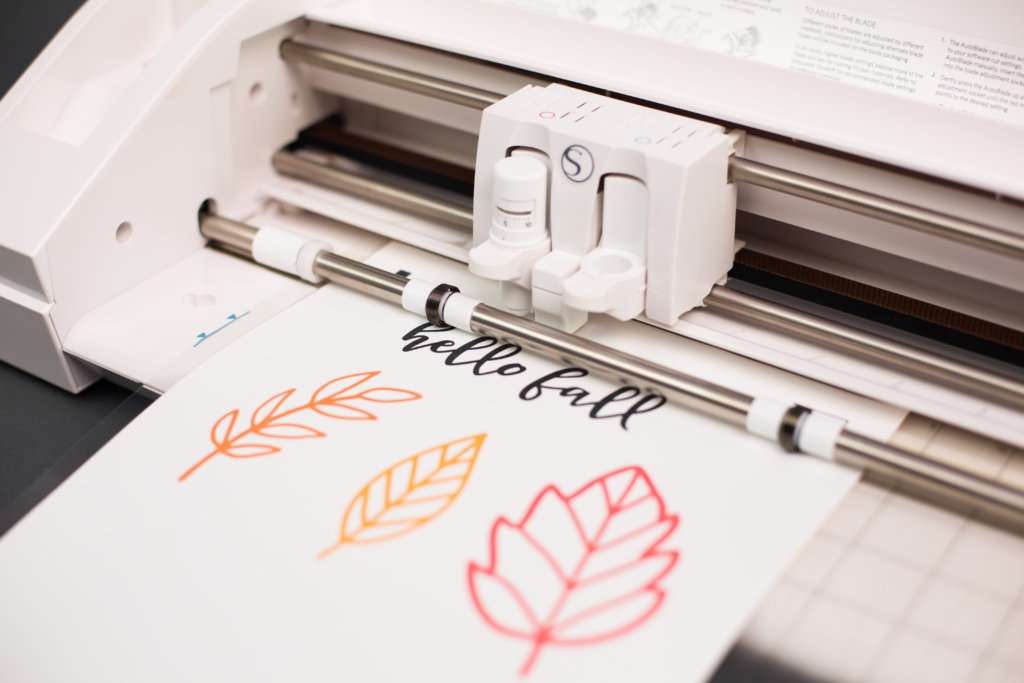
- Carefully remove your cut gift tags from your cutting mat and set them aside.
Step Two: Creating the Stamps
- In Silhouette Studio®, using the designs we just created, delete all of the offset lines and little circles so that just the basic color designs are left. Save this file to your desktop.
- Open up Mint Studio. Find the file we just saved and open it in Mint Studio™. (If you don’t see the designs at first, zoom out; you should see them then.)
- Adjust the size of the stamp sheet to 30 mm x 30 mm. You can do this by selecting the 3rd icon from the right on the top; the icon looks like the stamp sheet.
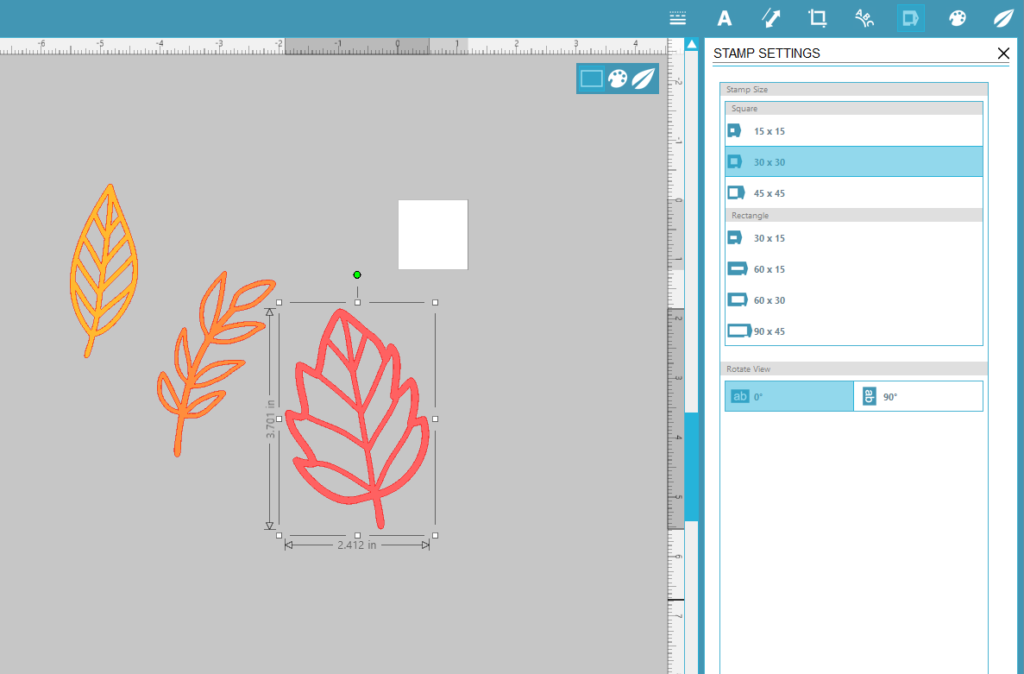
- Adjust the size of one leaf design by selecting it and dragging the outer corner to make it smaller to fit within the 30 x 30 square. You can rotate the design by clicking the green circle at the top of the design and turning it from left to right.

- Once your Leaf Design is adjusted to the size of the square, Click the 2nd icon on the top right that looks like a paint palette. This is where you can select the design of your printed stamp. For this design, we stuck with the Standard option.

- To send your design to get printed, click the Send to Mint icon in the top right corner. Select Start Mint. You will notice the power button on your machine flashing blue. Take your stamp sheet, do not remove it from the white cardboard, and load it into the back of your machine by inserting the arrow first.
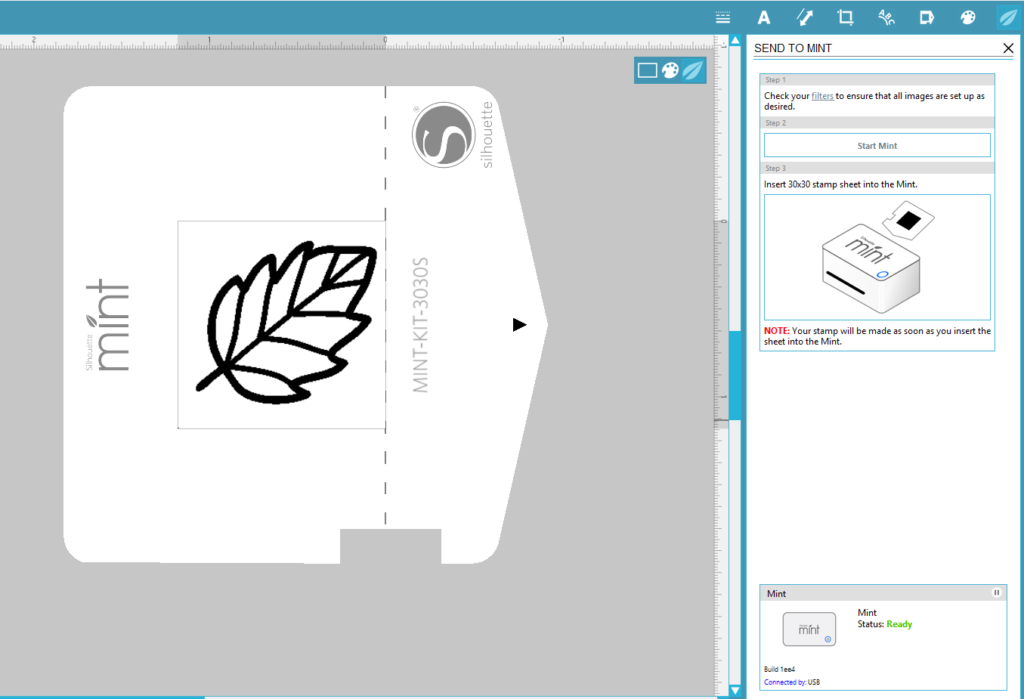
- Once your machine is done printing your stamp, you can remove it from the cardboard and apply it to the plastic stamp housing included in the set.
- Repeat this process with all three leaf designs.
- After you have printed all of your stamps, it’s time to add the ink. You will place the ink directly on to the design. Let it soak in for 5 minutes or so and then stamp out the excess ink until you get a clean image. Now your stamp is ready and is good for about 50 stamps before it will need to be reinked.
Step Three: Assembling The Tags
- Cut your butcher paper to the size that you are needing for your gift.
- Stamp your butcher paper with your three leaf stamps. We did ours in a randomized pattern.
- Wrap your gift and attach your ribbon and gift tags.