
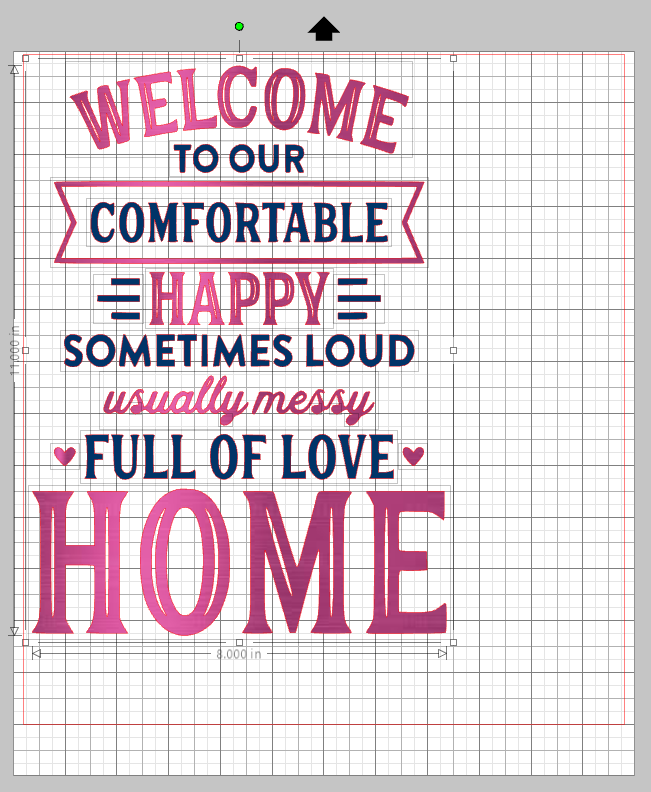
We just love this farmhouse style design from Jillibean Soup, and we thought it would make the perfect reverse canvas sign. It turned out pretty cute, don’t you think?! Follow along if you would like to see how you can make your own.
Supplies Needed:
- Silhouette CAMEO®, Silhouette Portrait®, or Silhouette Curio™
- Silhouette Heat Transfer – Navy
- Silhouette Metallic Heat Transfer – Pink
- Silhouette Hook
- Thin towel or parchment paper
- Canvas wrap frame
- Wood stain or acrylic paint
- Paintbrush
- Scissors
- A flat-head screwdriver
- Iron or heat press
- Stapler
- Design ID #267810
Step One: Create Your Design
- Open up Silhouette Studio®.
- Select the Page Setup panel and adjust your cutting mat size to none (or select the size of mat that you are using if you want to use a cutting mat).
- Download and open Design ID#267810
- Adjust the design to fit the inside section of the frame. To measure the inside section, flip the canvas so that the front is facing down, and measure the inside of the frame.
- If you are using multiple heat transfer colors, adjust the colors of the design to match the Silhouette heat transfer you will be using. Here is a more detailed tutorial on cutting by line type or line color.
- When cutting any design with heat transfer, you need to MIRROR YOUR DESIGN or else design will be reversed. In order to mirror the design, select the design, right-click, and select “Flip Horizontally.”
Step Two: Cut Your Design
- Load the heat transfer material into your machine, with or without a cutting mat, shiny-side down.
- In Silhouette Studio®, select the Send tab in the upper right-hand corner.
- If you are using multiple colors of heat transfer, go to Action by Fill and select the color you wish to cut first.
- Choose the correct material type and select the blade you are using.
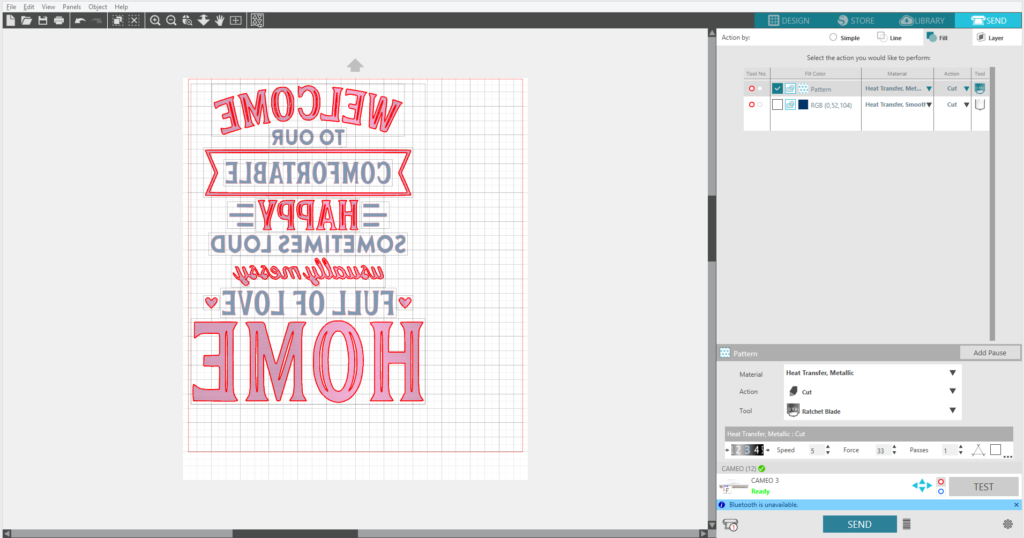
- Select “Send” to initiate the cutting.
- Once the image is cut, unload the heat transfer from the machine.
- Remove the excess heat transfer from your design by weeding it with your Silhouette hook tool.
- If you are using multiple colors of heat transfer, repeat the steps above and select a different fill color to cut out.
Step Three: Assemble Your Reverse Canvas
- Remove the canvas from the frame by either cutting the canvas on the outside section of the staples or by removing the staples with a flat-head screwdriver.
- Once the canvas is removed from the frame, feel free to gently sand the frame if needed.
- Paint or stain the frame in your chosen color.
- While the frame is drying, apply the heat transfer to your canvas. Place the canvas, with the white side facing up, on a flat hard surface. Place the weeded design on top of the canvas.
- Cover your design with a thin, clean towel or parchment paper and apply firm pressure with your heated iron all over the design to ensure the heat transfer adheres properly.
- Once the design has cooled and has fully adhered to the canvas, you can remove the clear carrier sheet and discard it.
- If you are using more than one color of heat transfer, line up the remaining heat transfer with the design already on the canvas and repeat steps 5 and 6.
- Once the paint or stain on the frame has fully dried, attach the canvas to what is now the backside of the frame, and staple the canvas to the frame with a staple gun. (Tip: The tighter you pull the canvas the better it looks in the frame.)
- Cut away the excess canvas with scissors.

And that’s all there is to it! Display your new sign proudly and prepare yourself for all the compliments you will receive!
What color of heat transfer do you want to use on your reverse canvas sign?