
As you might know, Silhouette has a partnership with ORAFOL to offer 12 colors of Oracal 651 vinyl and Oratape, or transfer tape. Today we will use the Oracal vinyl to decorate a mug using a layering method.
Supplies Needed:
- Silhouette CAMEO® or Silhouette Portrait®
- Silhouette Cutting Mat
- Silhouette Cutting Blade
- Silhouette Studio®
- Oratape – transfer tape
- Design ID#271644
Step One: Preparing the Design
1. Download the “Can’t Touch This” design (Design ID #271644) from the Silhouette Design Store. Open it in Silhouette Studio® by locating it in your Library. Resize it so that it fits your mug.
2. Our design has three colors of vinyl, and we need to make sure we can line everything up after cutting the vinyl. To do this, we’ll create registration marks. Registration marks for a vinyl cut design are simply a couple of shapes that we’ll put above the design to cut with every layer. We will type a lowercase x and make a duplicate by holding the Alt key while clicking and dragging a copy of the x over to the other side. Select both of the x letters and line them up by going to the Transform panel and clicking on the Vertical alignment option.

3. Group both of the x letters together and make a copy of them. Place copied x letters on top of the original ones. Holding Shift, select the copies of the x letters and the “Can’t touch this” text, and then place all those pieces aside. Repeat the same steps for cactus flowers and cactus body. Group each set together.
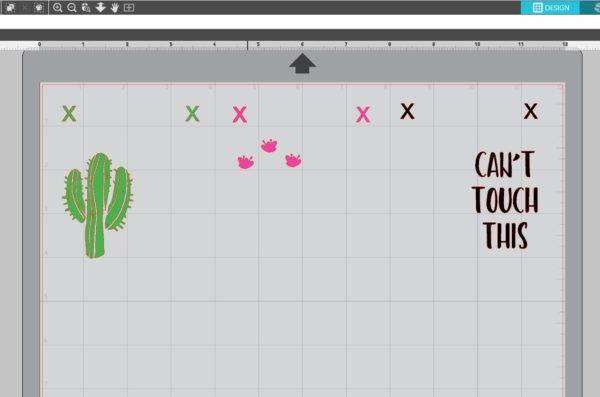
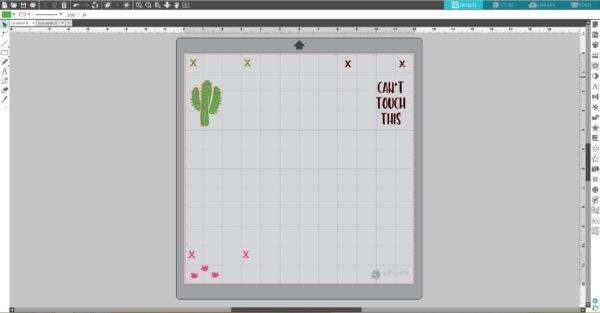
4. Place each set in the corners of the working space.
Step Two: Cutting the Vinyl
1. Place pieces of green, pink and black Oracal vinyl on the mat on the same spots as you placed designs on the working space in the Silhouette Studio®. Make sure the pieces of vinyl are not smaller than your designs. Adjust the rollers if needed, and feed the mat into the cutting machine.
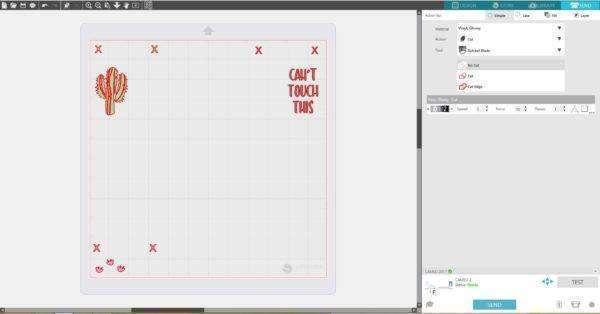
2. In Silhouette Studio®, go to the Send tab, choose “Vinyl, glossy” as the material, adjust the blade as indicated (unless you use a machine with an AutoBlade) and click “Send.”
3. Weed (peel away) the negative space so all that remains on the vinyl backing is your design.

Step Three: Applying the Vinyl
1. We’ll use the Oratape to pick up the top layer first, including the registration marks. Now place it back on the vinyl backing to cover everything but the registration marks, and this lets us place our design on the next layer without accidentally touching it to the layer below it before we’re ready.

2. Line up the registration marks, and then peel the backing away. Repeat for each color.

3. Now our design is ready to apply to the mug. You can remove the registration mark cutouts before applying it since we don’t need them any more.

Our project is ready!

This is just one of the many uses for the Oracal 651 vinyl! Check it out and tell us what you think!
What do you want to try making with this new vinyl?
Veronica Deevers
August 8, 2018
I have never had much luck with vinyl on cups. It comes off even with hand washing and the dishwasher is a definite no no.
Cute pattern though.
Kelly Wayment
August 9, 2018
Have you tried the Oracal vinyl for your mugs? Make sure the surface is smooth and clean before applying it, and let it sit at least 24 hours before getting it wet. That might help. 🙂
E
August 8, 2018
Adorable! Can mugs that have a vinyl put on them go through the dishwasher?
Kelly Wayment
August 9, 2018
Putting them in the dishwasher is a do-at-your-own-risk kind of thing. I’ve got a mug with vinyl that I’ve washed in the dishwasher for 2 years and the design is still all intact. But if you’re concerned about it, either hand wash your mugs or use a sealant that’s dishwasher safe. Be sure to let your vinyl design “cure” at least 24 hours before attempting to wash it.
Denisse
August 31, 2018
Where can I find the sealant and how is it applied?
Kelly Wayment
September 4, 2018
Hi Denisse. There may be others, but I know Mod Podge® makes a dishwasher-safe sealant. You can find it at craft stores or online. Look specifically for the dishwasher-safe Mod Podge®.