I love planning, do you? It’s a good thing, too—if your life is anything as hectic as mine is with kids, deadlines, appointments, and trips, we both need an efficient method of keeping track of all that good stuff!
I’ll tell you a secret: you don’t need one of those big fancy planners. You can make everything you need with the Silhouette Portrait®. There are so many stickers, flags, dividers, pages, and templates available in the Design Store. It’s super easy to build yourself a custom planner to suit your needs.
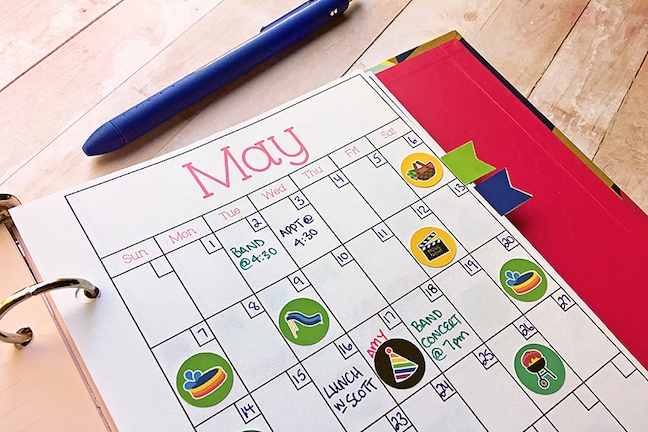
I’m big on taking notes, so for everyday planning for the fam-jam I use a mini binder. It’s filled with a mixture of lined paper and monthly spreads, and today I’ll tell you how I put it together.
Supplies Needed:
- Silhouette Portrait®
- “Calendar” (ID #64668)
- “Cliffhanger” font (ID #180145)
- “Summer Bucket List” stickers (ID #144776)
- “Rainbow Flags” (ID #109027)
- Good quality copy paper
- Silhouette Sticker Paper – White
- 7¼ in. x 9 in. Mini binder and filler paper (available at your local department or office store)
- Your favorite pens
- Hole punch
Step One: Create Planner Page
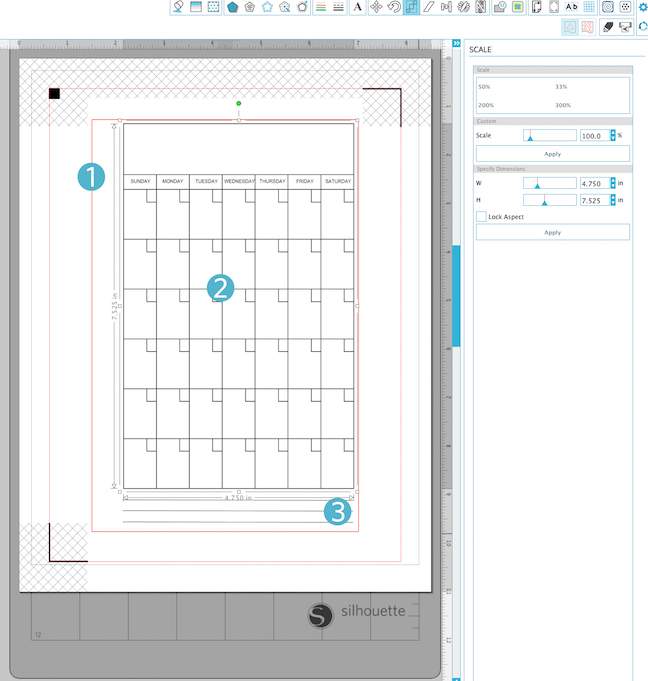
Open up the “Calendar” design (ID #64668) in the Silhouette software. Select the entire thing, then right click and choose Ungroup from the menu.
Then:
1. Select the outer cut line and resize it to a 5½ in. width and an 8½ in. length in the Scale tool.
2. Select the calendar and days (leaving out the cut line we just resized), and adjust the width of the calendar to 4¾ in. When you do this, be sure the Lock Aspect box is checked, and the length will adjust accordingly.
Now, use your grid (in case your grid isn’t showing, you can turn it on under the View menu) to align the calendar about ⅛ in. from the top right-hand corner (see above).
3.With the Line tool, draw three 4¾ in. lines below the calendar as shown in the picture above. Don’t forget to use the Alignment tool now and then to keep everything properly lined up.
Step Two: Add Headings
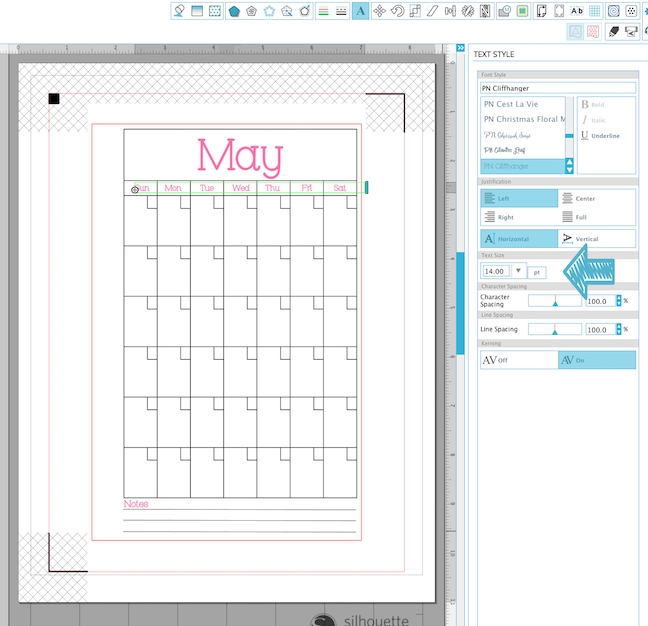
One of my favorite parts of making planner pages is choosing the font. For this project, I picked out Cliffhanger (ID #180145) for the headings. The month is 72pt, while “Notes” on the line below the calendar is 14pt. I decided I would switch out the day headings as well.
To change the headings:
1. Select all the headings and Ungroup if necessary so you can delete them.
2. Using the Text tool, type out the days in the order and font you like best (16pt for the Cliffhanger font), and use your spacebar to space them evenly in the boxes.
Once you have all your text finished (and recolored to match your planner!), turn on the Registration Marks if you haven’t already, and print your design. Next, open the Cut tool and make sure only the outer cut line is active. Adjust your settings and blade to match the paper you are using (mine was a nice copy paper), load your sheet, and send the job to your Portrait.
Step Three: Make Stickers
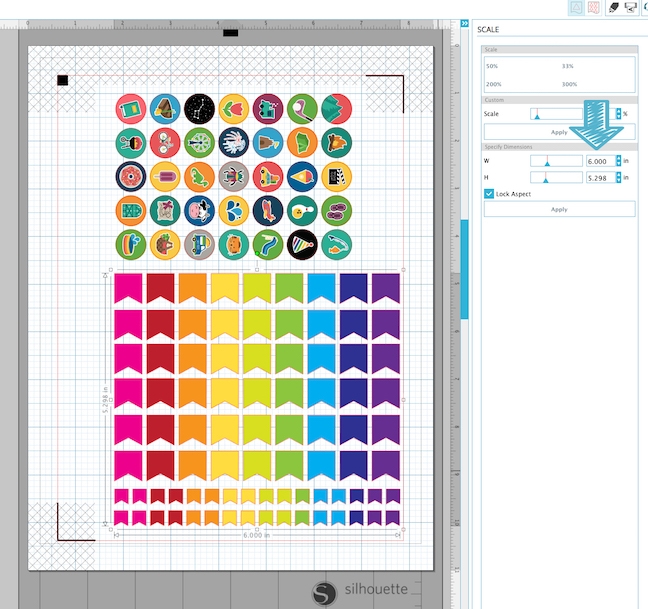
On to the easy part! Open the Summer Bucket List stickers (ID #144776) and the Rainbow Flags (ID #109027). Resize the summer stickers to a width of 3½ inches in the Scale tool, and then change the size of the flags to a width of 6 inches. You’ll need to rotate the summer stickers on your page, but all of them will fit on one sheet of Silhouette Sticker Paper.
Once again, turn on your Registration Marks and send the design to your printer. Then, load your printed page into your Portrait, change the cut settings to the appropriate selection for sticker paper, and cut your stickers.
Step Four: Putting It Together
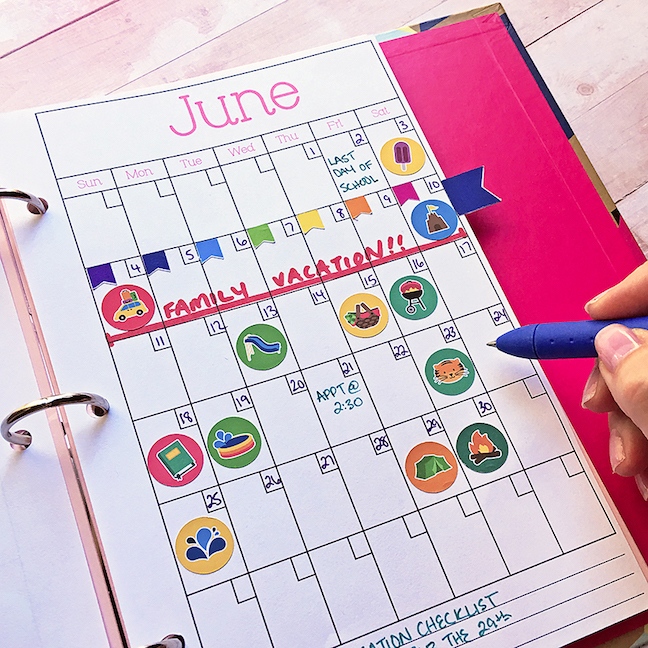
Almost there! To make sure your new monthly planner pages will fit nicely into the binder, use one of your lined filler pages as a template. Mark where the holes need to go and punch them with a regular hole punch. Pop your new planner pages in your binder—be sure to add some lined paper between each month for note taking and reminders. Now, use the stickers on your monthly pages to plan out a summer to remember!
Do you keep a paper planner? What kind of stickers do you find yourself using the most? Comment below and tell me what your favorites are!
❤️ Niki
Gail Scott
July 3, 2017
I keep a planner and have purchased stickers and print N cut from Silhouette store thank you for the tutorial
Niki Coursey
July 5, 2017
You’re welcome, Gail! Happy planning!