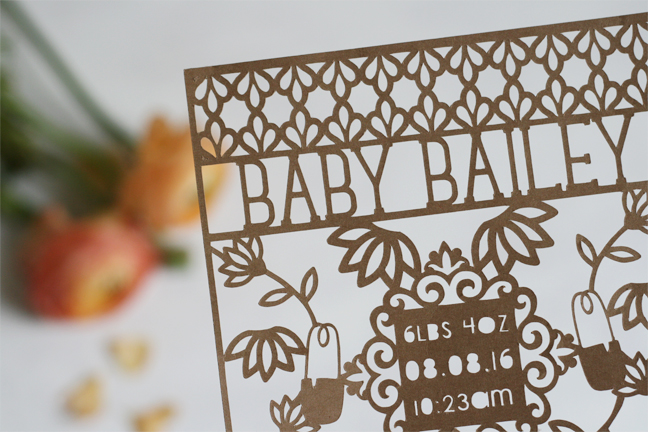
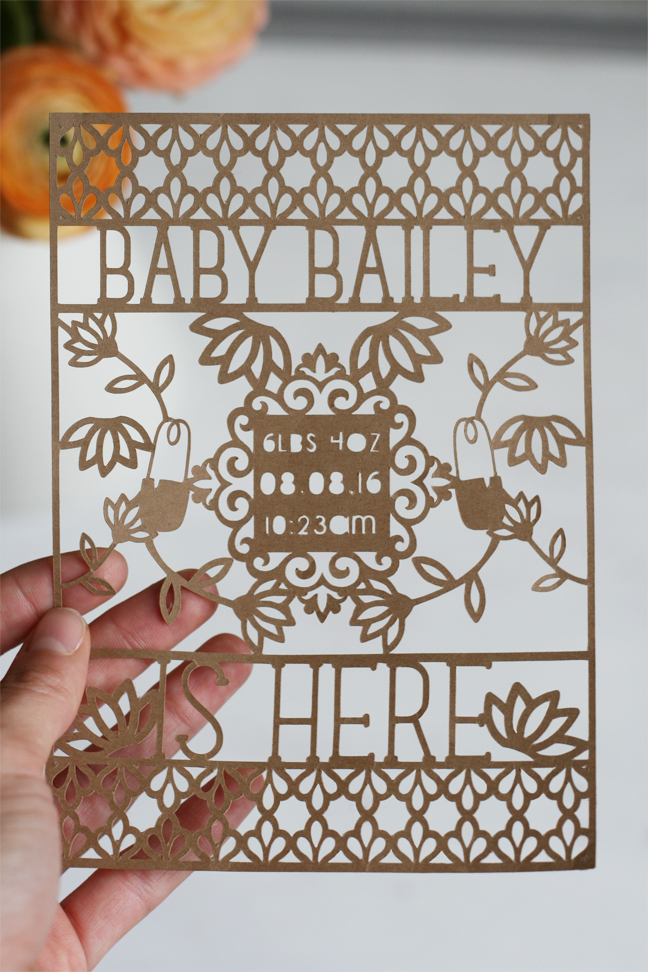
Friends! HELLO! It’s been a minute, huh? So glad to be back at it– sharing more tips, tricks and projects with you. By adding thickness to my favored thin lettering, I was able to cut out this intricate invitation with more stability than the very thin font alone would allow and I’m so happy with the results.
Picking A Font
As many of you already know, I’m a big fan of fonts. I tend to gravitate towards the thinner, more delicate typefaces, but that sometimes leads to issues in certain projects. What if there is no bold option for that font? Well, today I’m going to take you through how to manually thicken any font you may need.
To begin, let’s pick a font.
If you haven’t perused the Silhouette Design Store for fonts, you’re missing out. I have plenty of favorites– but you can pick your own here. Once you have a font chosen, type out whatever wording you want. Here I’ll be using “Baby Bailey” for sample text, but the same guide will apply for your own creation.
Manually Bolding Your Font
There are two different ways to manually “bold” or thicken a font:
- Adding a line
OR
- Using the Offset Tool
1. Adding A Line

Adding a line to your font is the easiest way to add width to a font that doesn’t offer a bold option. By adding a line, you will be able to achieve a bold look for both print, and cut.
- Open the Line Styles panel
- Increase Line Thickness to desired width
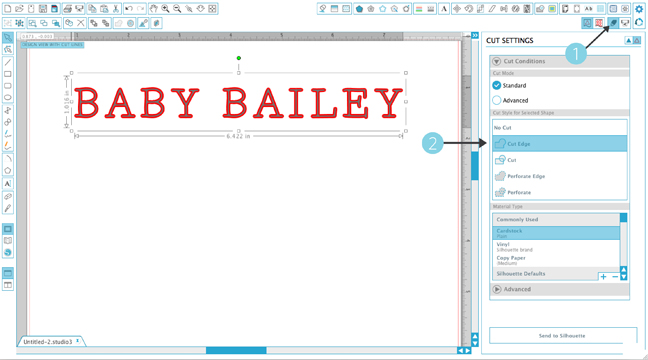
You can also use the adding a line method to cut out your thicker lettering. This is both helpful for designs like the one above, as well as stencil designs that may not allow enough room for paint, etc. To assure that your lettering is properly set up:
- Open the Cut Settings window
- With your wording selected, choose Cut Edge in the Cut Style section. This moves the cutline from the outside of the original font, to the outside of your added line.
To print the thickened font, be sure to check the Print Lines of Selected Shapes box before sending it to print!
2. Using The Offset Tool
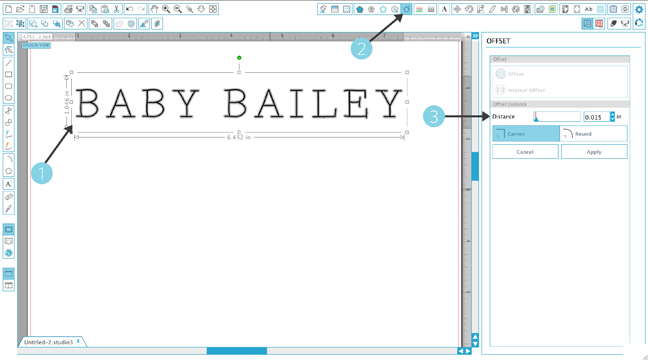
Another option in adding thickness to a thin font is by offsetting the letters. To offset your wording:
- 1. Select your wording
- Open the Offset Window
- Choose the offset distance. This will determine how thick your final lettering will be.
Offsetting essentially makes an outline of each letter, so after the offset distance is applied you will need to fill in the the lettering for print.
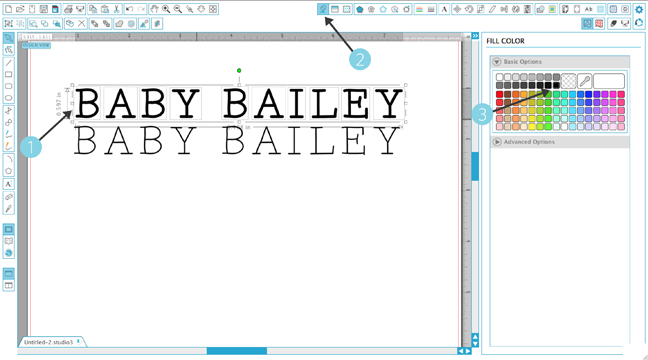
- Pull the new offset shapes to separate them from the original thin font.
- Open the Fill Color window
- Select your desired fill color
The fill color will only matter for printed designs. For mine, the thickness of the lettering mattered for cut purposes, so the color didn’t make a difference.
Using Other Silhouette Studio® Tools
Once I had my wording all set, it was a matter of utilizing a variety of other in-Studio functions to create these beautifully intricate birth announcements. By combining all those functions, with the thickening of my lettering, I think I was able to create a stable, yet dainty design that feels light and legible. LOVE.
From cutting bits of designs with the knife tool, to perfecting your cut quality– there are a lot of other helpful guides here on the blog to get you even more acquainted with all Silhouette Studio + the machinery have to offer.
- Learn how to use the knife tool to customize designs, here.
- Learn how to get perfect cuts with your Silhouette cutting mat, here.
- Search: Weld on the blog for a variety on utilizing this function. It’s a little hidden magic maker.
Keep learning, keep creating, and I’ll do the same. Happy Crafting!
Pat Hines
September 15, 2016
I love the new format of the blog and how much more informative it is. Thank you!!!
Marilyn
September 15, 2016
Thank you for sharing such great information! I will give it a try!
Nicole Lensen
September 15, 2016
This is such a beautiful announcement! I LOVE it! What paper did you use for this project, maybe I missed it but didn’t see that info in your post. Just wondering because I would love to try out this project! Thanks for sharing!
Rachael
November 2, 2016
This is just what I was looking for! Can this be done in Photoshop? I’m looking, but the control panel has a different set-up than the one you’re using here. Any ideas? Thanks!! 🙂