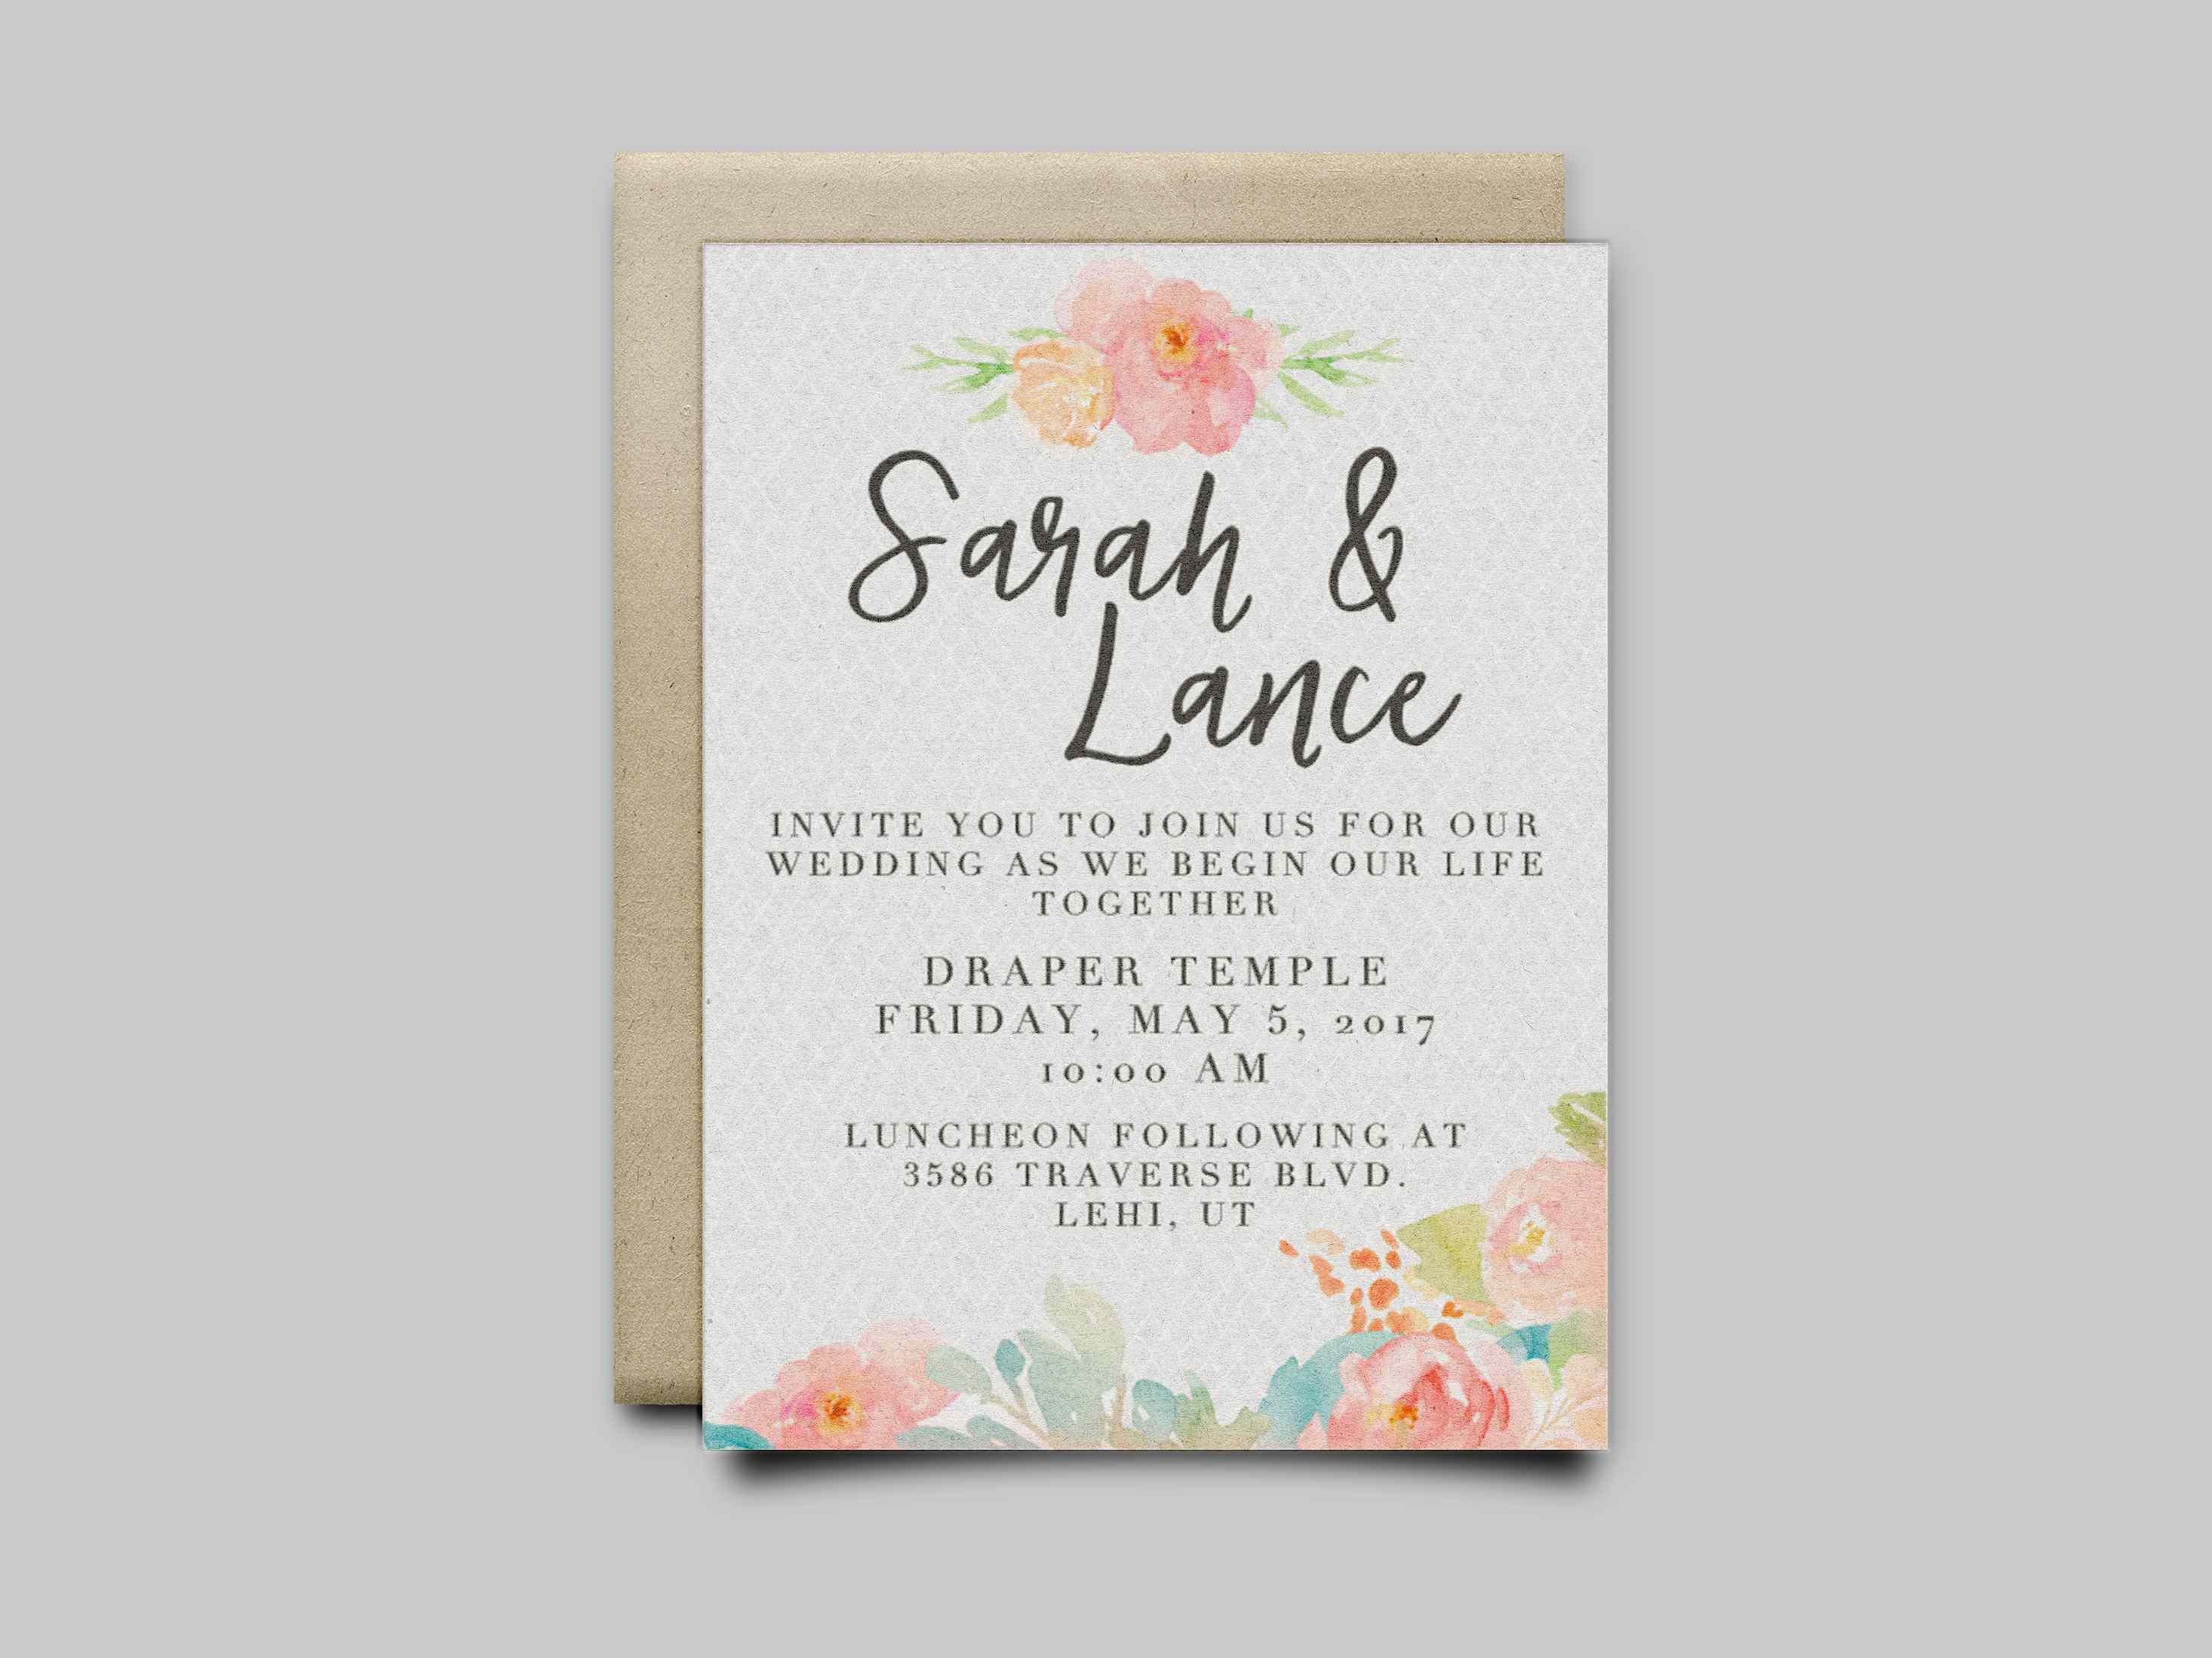
A lot of people don’t realize how much you can do in Silhouette Studio®. It’s a powerful program that can do more than just send your cut files to you Silhouette machine. For example, did you know that you can design your own Print & Cut projects? Today I’ll show you how I designed this wedding announcement, which was a piece of cake with designs from the Silhouette Design Store and the capabilities of Silhouette Studio®.
Choose your basic layout
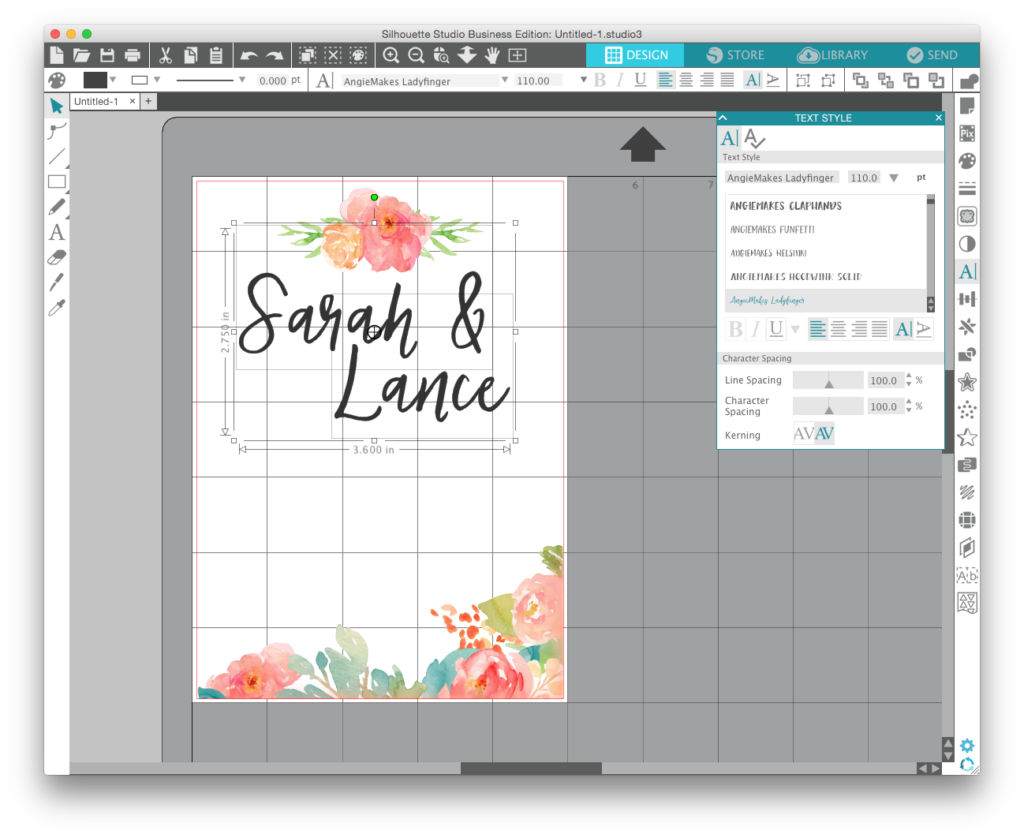
I’m a big fan of AngieMakes and used her designs for this announcement. I chose one corner of the “hand painted floral cross (Design ID #190132),” used the knife tool to separate it, and then deleted the rest of the design. I found a floral design that matched well (Design ID #188653) to put at the top. I chose the font “Ladyfinger” (Design ID #190735) and arranged the names at the top.
Add information
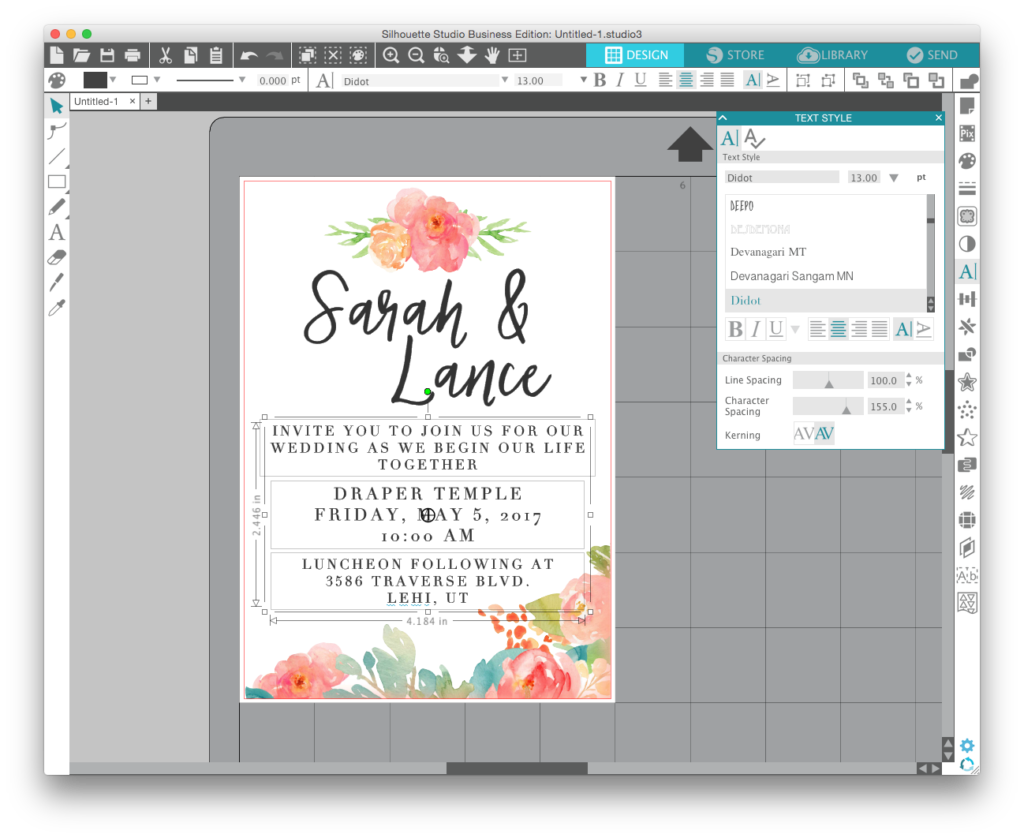
After typing out all the necessary information, I chose a nice looking serifed font that complimented the rest of the design. I chose to increase the character spacing to 155% to give it a less cramped look. Next, I made sure that my text boxes were centered on the page by selecting them and going to Object > Align > Center.
Add patterned background
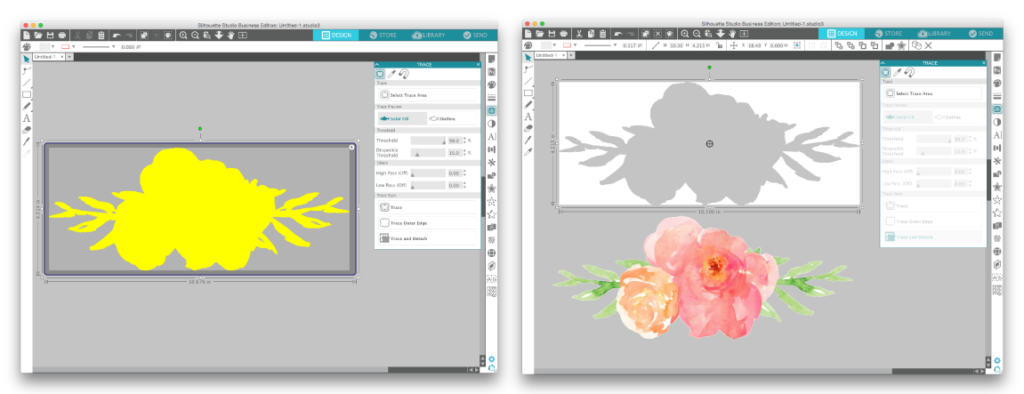
I wanted to add a patterned background to give some more visual interest, but first I had to remove the white background from the floral elements. I’ve found that the easiest way to do this is to use the trace tool. Select the trace area and play around with the threshold toggle until the design is completely covered in yellow. Then, choose “trace and detach,” separate the background from the flower, and delete the white part. I used this method for both floral elements, and it worked great!
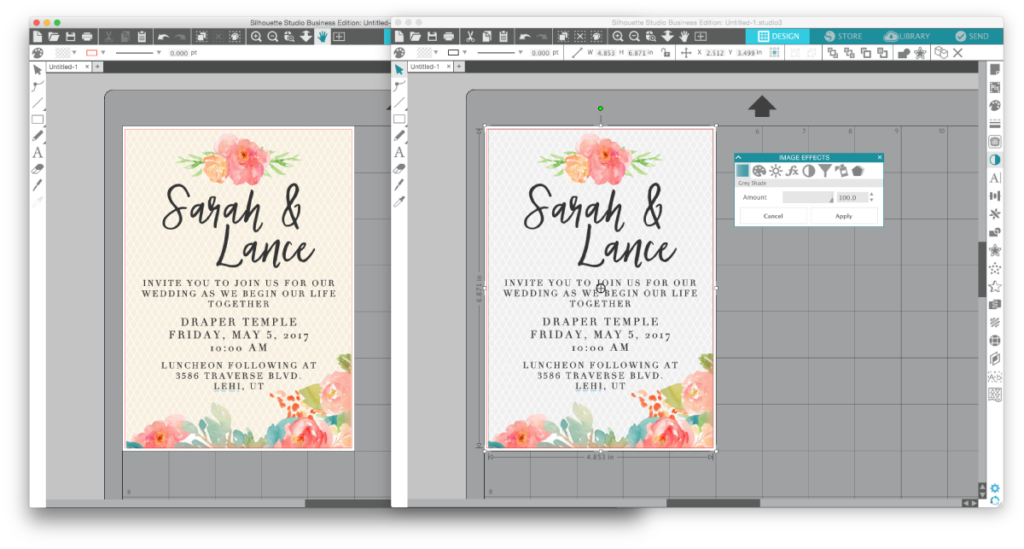
I found a pattern I thought would work well (Design ID #130922) and sent it to the back by selecting it, right clicking, and choosing “send to back.” I liked how it looked, but the color of the pattern didn’t quite match how I wanted it to look. I went to Panels > Image Effects and brought up the “grey shade” slider until the color was where I wanted it. There are more tabs within this panel that you can mess with to change the colors of an image. They’re pretty fun to play around with!
Print & Cut

Prepare to Print & Cut by setting your paper size to letter (8.5 in x 11 in) and turning on registration marks. I was able to fit two invites to a page. Then, simply print however many you need, load them on to your cutting mat, and let your Silhouette machine do its thing!
If you’re a visual learner like I am, here is a time-lapse video of me designing the invite. It will give you a quick walkthrough of the entire process.
Marilyn
July 7, 2017
Beautiful!
Yes I recently completed my niece’s wedding invitations, which were done in Silhouette Studio Design. I did not add a graphic as I used a design from Lori Whitlock which was edited and then cut. Design Studio made it so much easier and the end results were perfect!
Thank you for sharing your beautiful project!
Denise
July 7, 2017
Yes, I recently did the wedding invitation, program and reception invitation for my nephew. It was very contemporary with lots of fonts and dingbats. It was challenging, yet very gratifying to see what the Silhouette Designer Edition can do. Prior to owning my Silhouette I was a “novice” Photoshop user. While Photoshop is capable of more, for my needs Silhouette is much easier to use. I really enjoyed watching your method and picked up a lot of tips after I slowed it down and watched it a second time. (Did you know you can slow down a YouTube video? You can!) Great tutorial!
Susan Banks
July 8, 2017
Yes all the time … as someone who started in 2005 with the basic Craft Robo software which had no weld function and no automatic trace (!!) in the last twelve years the program has gone through many twists and turns to become the amazing program it is today. I use other cutting and graphics programs as well but have found that for 80% of my work SS Business Edition is quite sufficient. I started using beta version 4 in February and like how it has evolved to become more user friendly, I’m very much looking forward to version 4.1 which promises more special effects and text manipulating tools . Keep up the good work!
Kim
July 21, 2017
Hi! Beautiful invitations! I’d love to do more print and cut but I have a hard time with the resolution being too low. When it prints, my designs end up being really grainy. Is there a way to fix the resolution? Do I need Designer Edition? Thanks!
Kelly Wayment
July 24, 2017
Hi Kim. You don’t need Designer Edition to print & cut. I suggest first checking your Preferences to see what your printing resolution is set at. (Find the gear icon in the lower right corner or go to Edit > Preferences.) Look for the “general” tab and check to make sure your print resolution is set to 300 ppi or higher. If that doesn’t help, please send an email to support@silhouetteamerica.com and they can help you troubleshoot.
Erixa
September 7, 2017
So I actually print with my silhouette machine or I have to use a printer? Super new to the invitation world of silhouette. I haven’t ventured much past HTV and 651.
Kelly Wayment
September 7, 2017
Erixa, Print & Cut requires the use of a printer. The Silhouette will read the registration marks off the page you design in Silhouette Studio and send to your printer, and then the Silhouette does the cutting.
lynda
October 7, 2017
fabulous tutorial please may i ask which font you used
lynda
October 7, 2017
sorry ive just re read and noticed the font