The Silhouette Alta® Plus is a great machine for turning regular designs from the Silhouette Design Store into 3D printed projects. But something you might not have considered before is combining your 3D projects with creations made with your Silhouette Cameo® or Portrait®.
In this tutorial, I’ll show you how to use Silhouette Studio® and Silhouette 3D™ together to create these cute summer cupcake toppers. These are a great option for adding a little theming to dessert tables at your upcoming parties. You could even customize them by using different designs for holidays or birthdays!
Supply List
- Silhouette Alta® Plus or Silhouette Alta®
- Silhouette Cameo® or Portrait®
- Silhouette Studio® software
- Silhouette 3D™ software
- PLA filament – I used Red, Blue, and Sky Blue
- Printable sticker paper – I used the white glitter sticker sheets
- Inkjet printer
- Design ID #350176 by Carina Gardner
- Design IDs #349093, #346517, #349094, and #350180 by Carina Gardner
Step One: Create Pick Designs in Silhouette Studio®
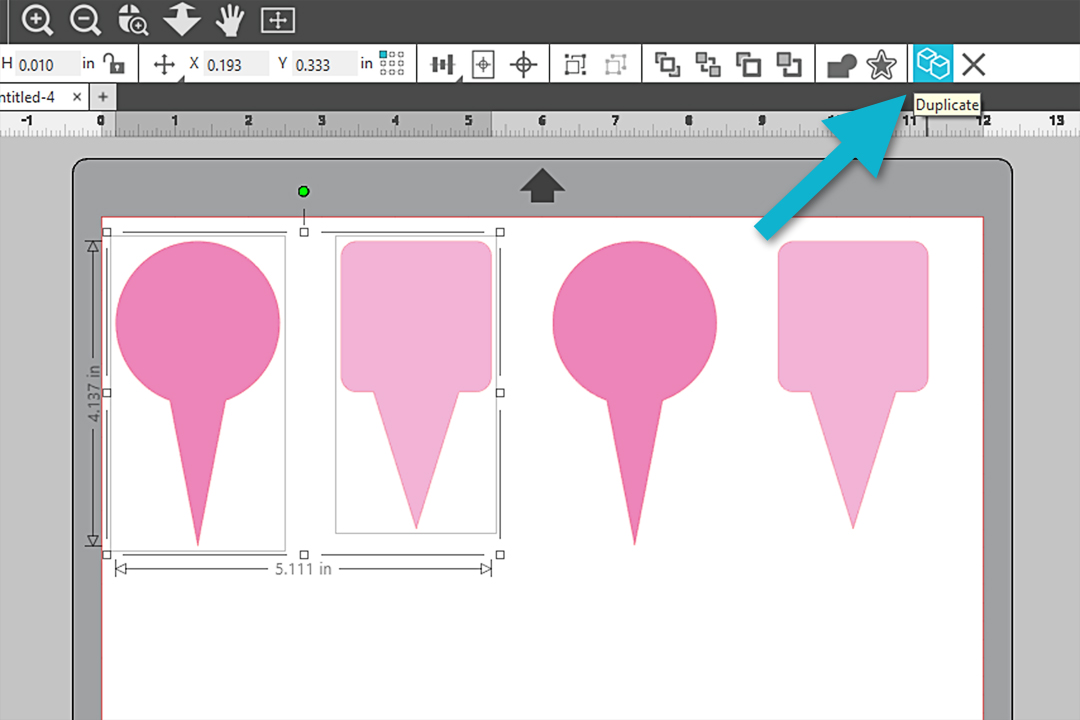
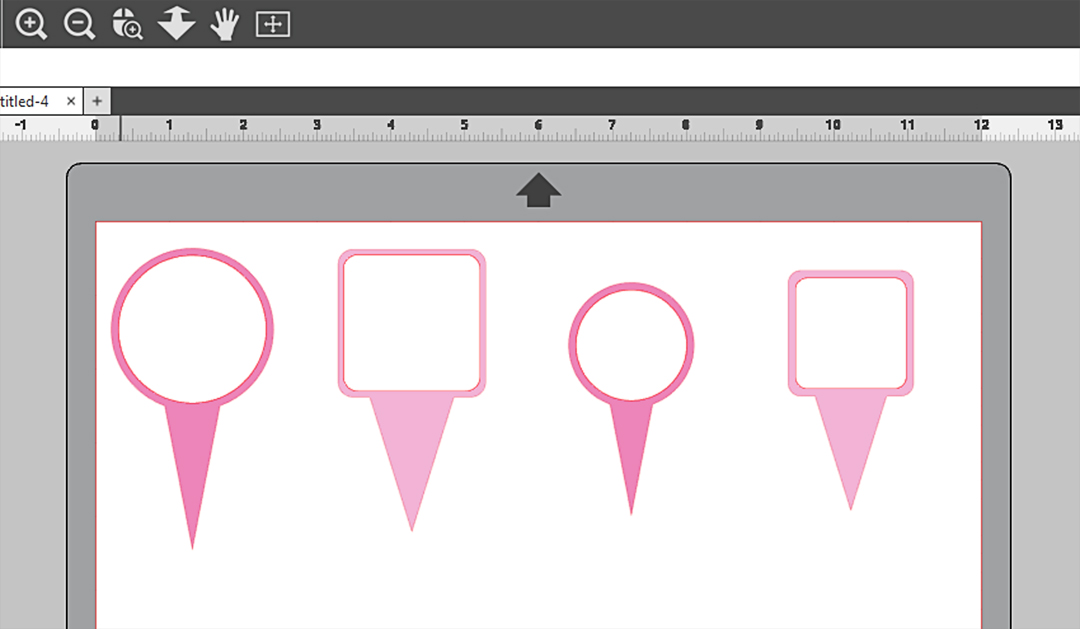
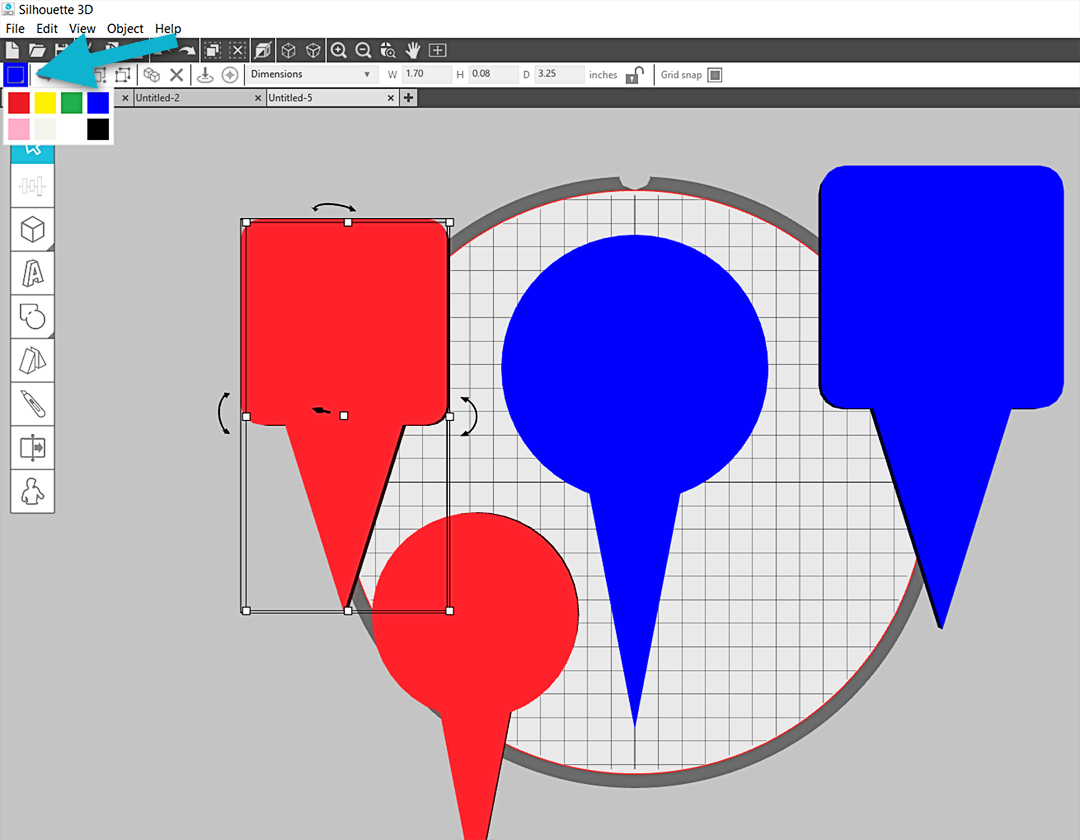
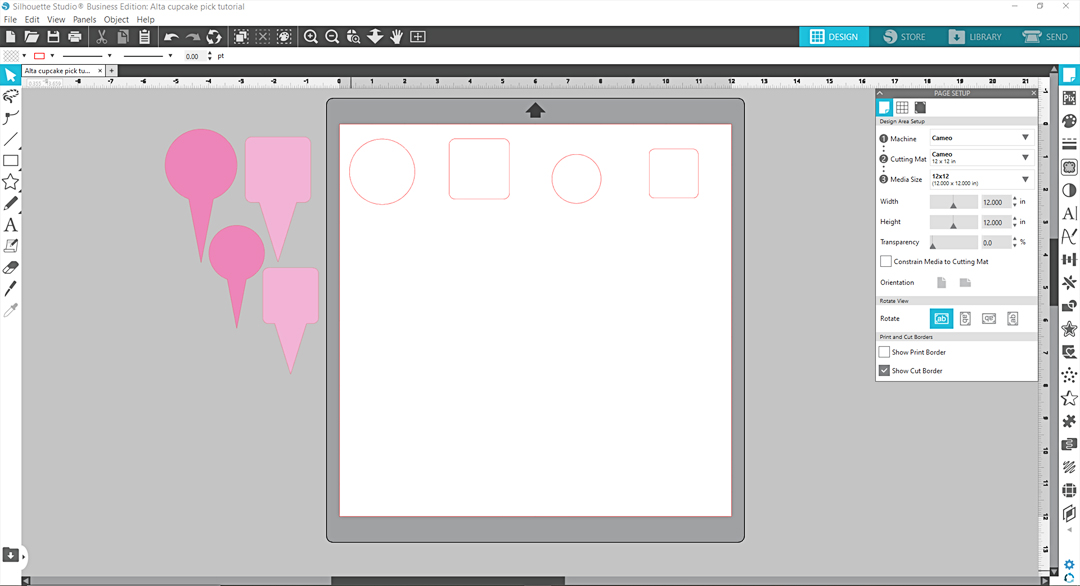
Open both Silhouette Studio® and Silhouette 3D™. We’re going to start in Studio for now, but you’ll need both programs for this project. In Silhouette Studio, open the cupcake topper picks (Design ID #350176). Make a duplicate of each so you’ve got two circular picks and two square picks. Feel free to leave the picks pink for now, as you’ll be able to preview them in your chosen filament color in Silhouette 3D later.
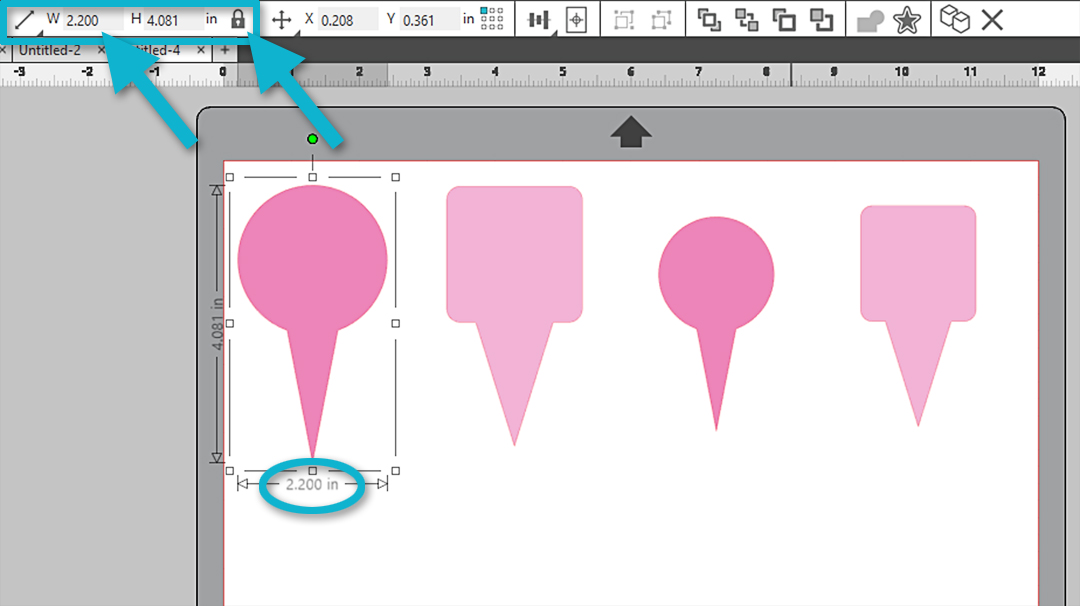
Using the Scale input on the Quick Access Toolbar (QAT), lock the aspect ratio and resize the designs as follows:
- First circular pick to 2.20 in. wide
- First square pick to 2.0 in. wide
- Second circular pick to 1.70 in. wide
- Second square pick to 1.70 in. wide
I recommend cutting these four sizes out of paper now with your Cameo or Portrait to get an idea of the final size before 3D printing. It will save time now if you resize them to your preferred size for your cupcakes before moving on. The 3D printed version will be exactly the size you choose here. I will use all four picks for variety, but you can choose the picks you wish to continue with.
Use the drawing tools to create circles and rounded-rectangle shapes for sticker backgrounds. Hold Shift while drawing (dragging with your mouse) to create perfect circles and squares.
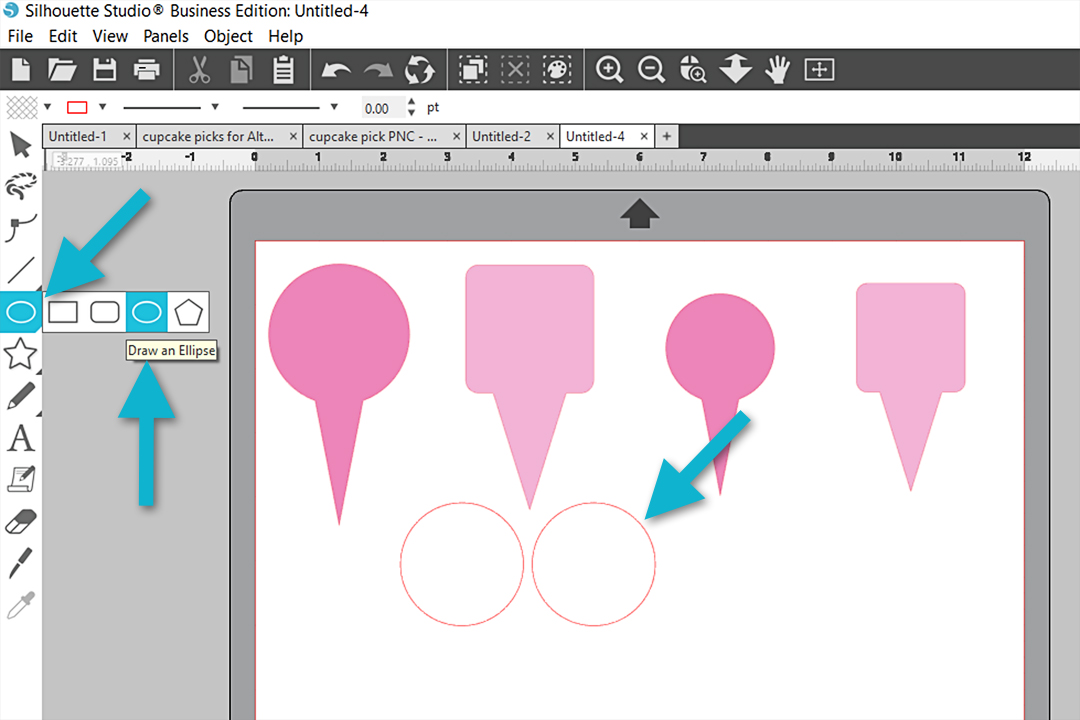

Using the scale input again on the QAT, lock the aspect ratio and resize the circles and squares as follows:
- First circle = 2.0 in. wide
- Second circle = 1.50 in. wide
- First square = 1.85 in. wide
- Second square = 1.50 in. wide
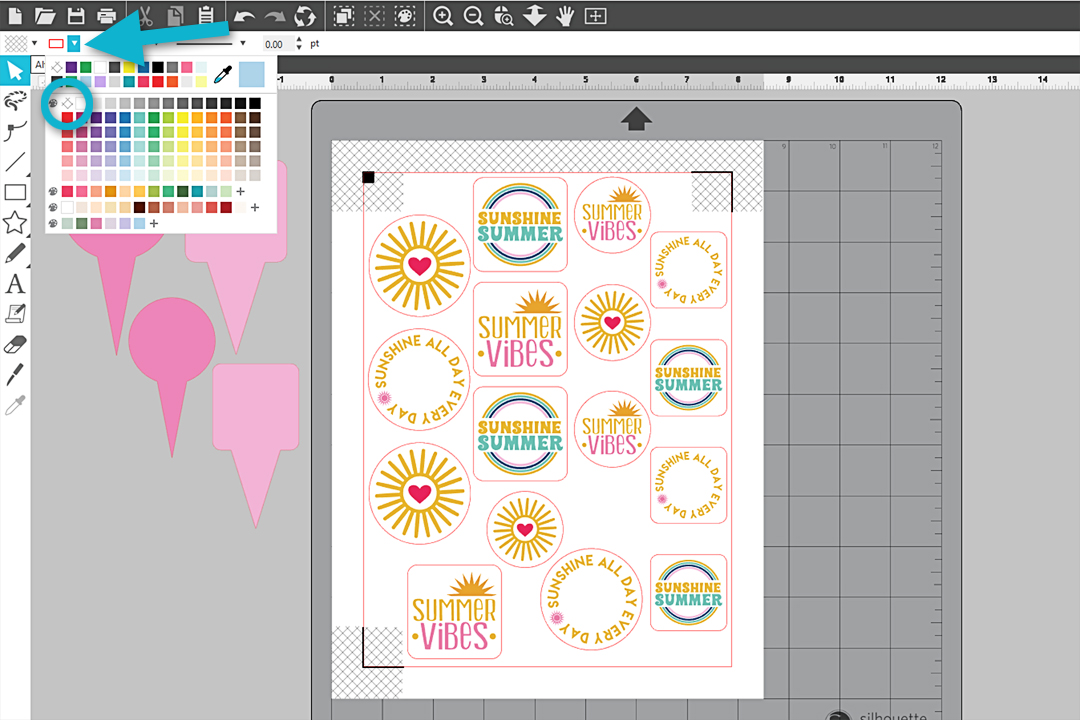
Select all the circles and squares and fill with a white fill color.

At this point, you can drag the circles and squares over the top of the colored picks to see if they look good and fit well.
Note: If you’re making your picks using dimensions other than mine, you’ll need to resize your sticker background pieces to fit your custom pick sizes. Select the shape, then drag a corner handle to resize proportionally. Or, use the Scale input to make the sticker width 0.25-0.5 in. smaller than your picks’ width. If you’re using a custom size, be sure to double-check how your stickers look on top of your picks before finalizing your sizes.
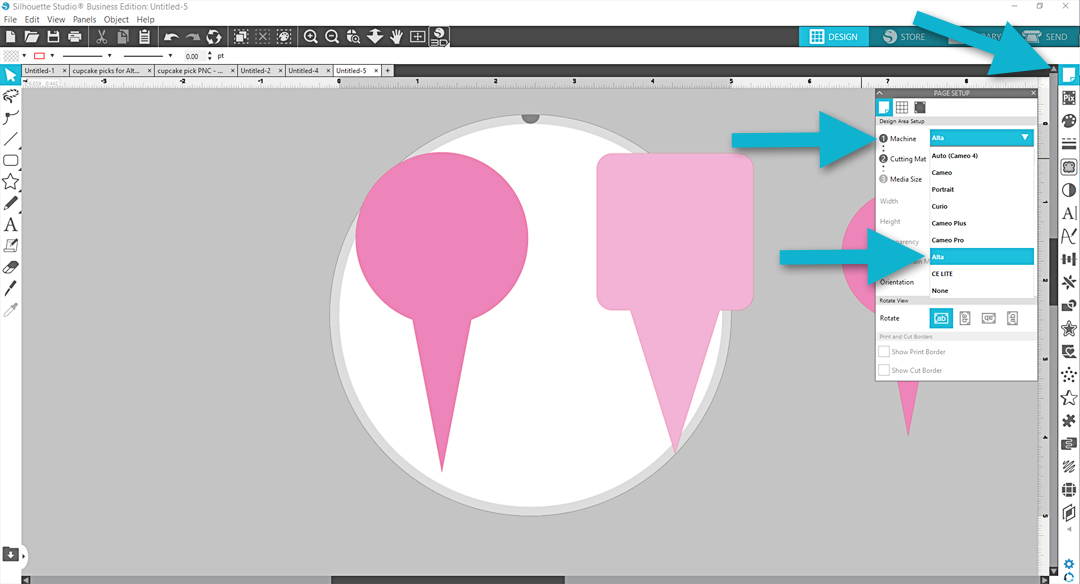
Save this Silhouette Studio® document to your hard drive to create the stickers in another step (File > Save As > Save to Hard Drive). Next, select just the colored cupcake picks (hold Shift while clicking on each tail with your mouse) and make a copy (right click > Copy).

Open a new document in Silhouette Studio and paste the picks into the new document (right click > Paste). In the Page Setup Panel for the new document, set the following settings in this order:
- Media Size (custom) = 5.0 in. width, 5.0 in. height
- Machine = Alta
The virtual mat should turn into a virtual Alta print bed, and the Cutting Mat selection should automatically change to “Alta Print Bed”.
Select all the pick sizes, and on the QAT, choose Center, then choose Center to Page. This will lump them all to the center of the print bed. Don’t worry if it’s a jumble right now—we’ll rearrange the picks in Silhouette 3D™ in the next step.
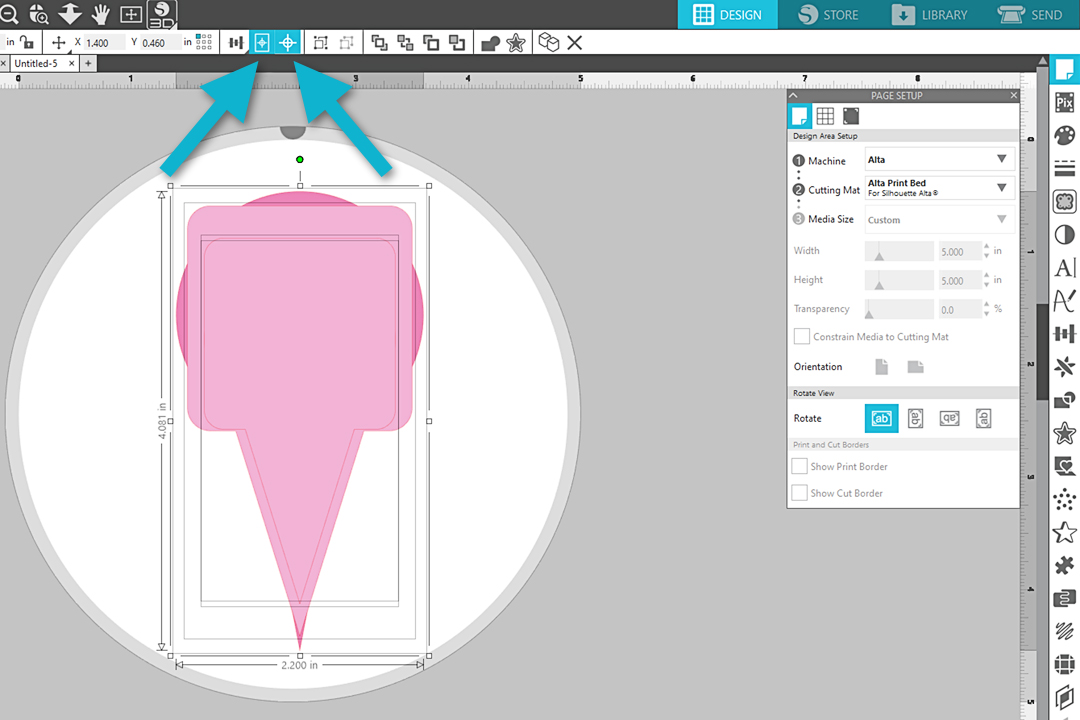
Note: Make sure all your designs to be 3D printed here are smaller than the print bed, or they may automatically resize smaller when sending to Silhouette 3D. As long as a shape is 4.5 in. maximum at the largest dimension, it will convert to exactly the same size in Silhouette 3D in the next steps.
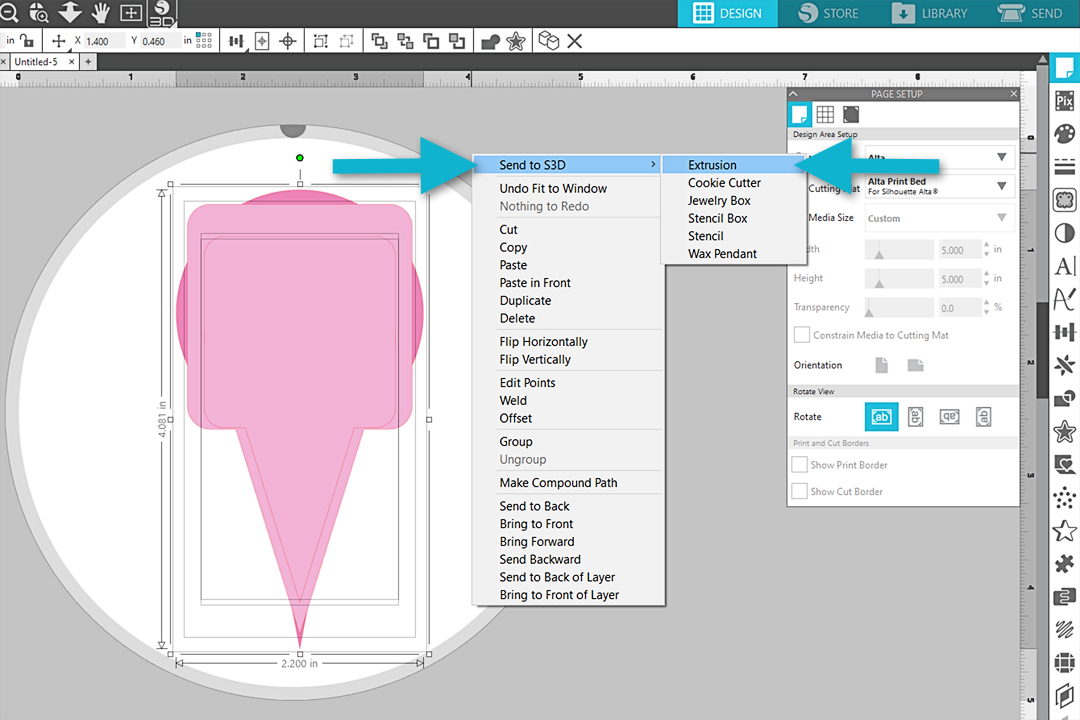
Select all the picks, right click, and choose Send to S3D > Extrusion.
Step Two: Print Designs in Silhouette 3D™
Now your designs will open in Silhouette 3D™ to be printed with filament. (If you are using an outdated version of Silhouette Studio®, this may not happen automatically.) Ungroup the designs and drag them apart. You may need to click off to the side then click on them to reselect before Ungroup shows as an option.

Select all the designs with the QAT tool “Select All.” Then, choose “Level to Bed” in the QAT so none are hovering above the print bed.

As an optional step, you can recolor the designs to keep track of sizes, if you are using multiple sizes like me. I’ve changed the smaller picks to red and the larger picks to blue.
Note: the colors you use for the picks in Silhouette 3D™ does not have to match the color of filament you use. The colors you use in the software are only for previewing your projects, and you can choose whatever filament colors you’d like.
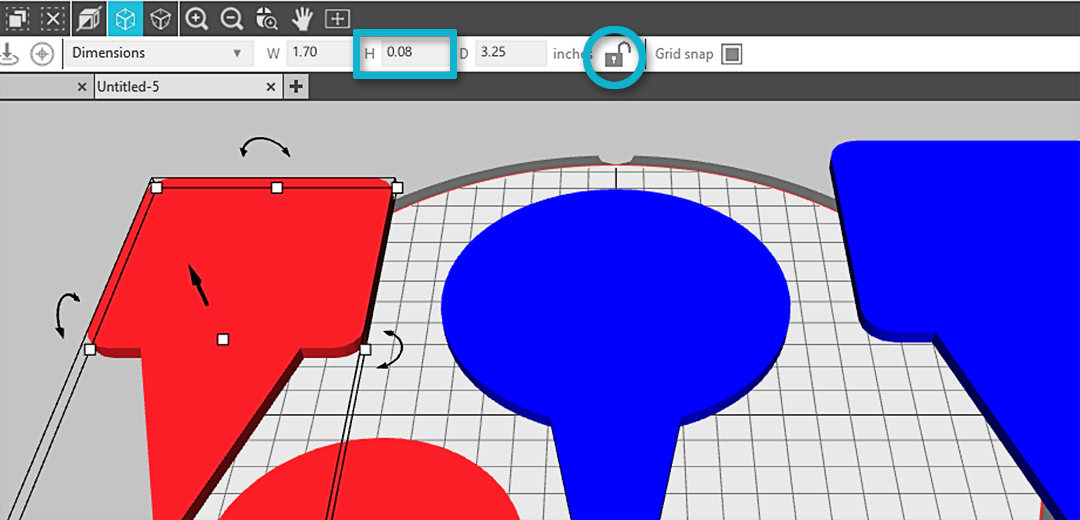
You can adjust the thickness of each pick by selecting it and choosing a different height. I prefer the default 0.08 in. (2.0 mm) thickness for cupcake picks, but you may wish to go as low as 0.06 in.
Tip: You can easily switch between inches and millimeters in S3D by going to Edit > Preferences and change it in “Unit of Measurement”.
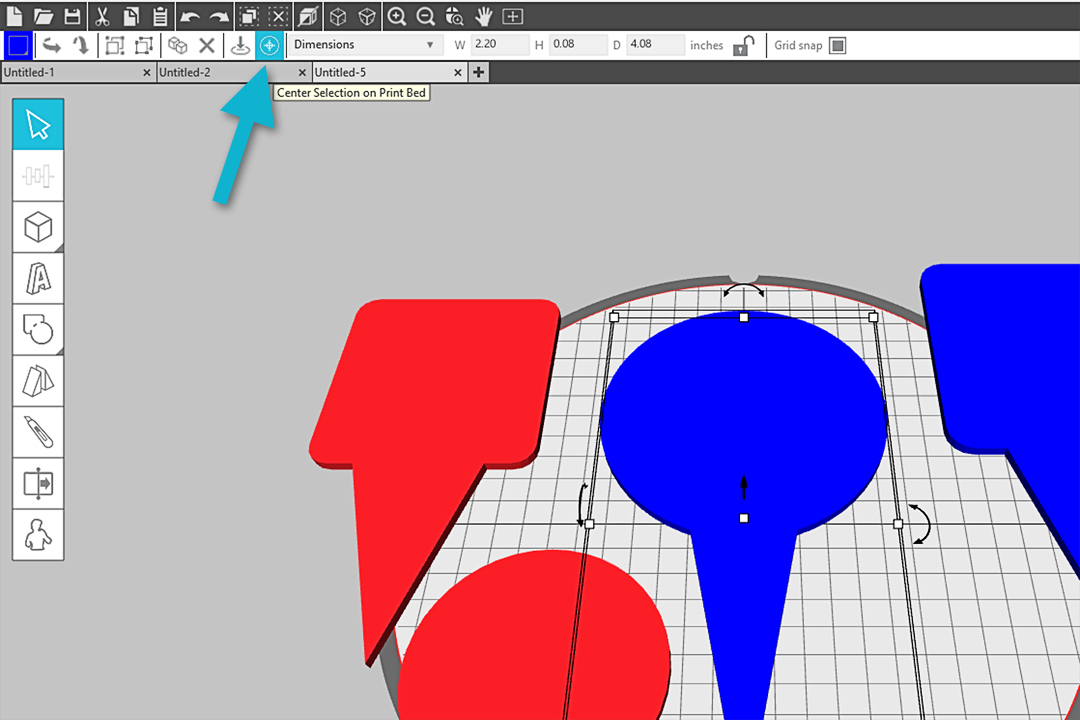
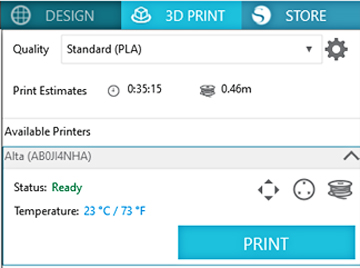
Select the pick you want to print first, and choose “Center Selection on Print Bed” in the QAT. In Silhouette 3D, it does not matter if you’ve got other shapes on the virtual print bed; only one shape will print at a time, if they are ungrouped.
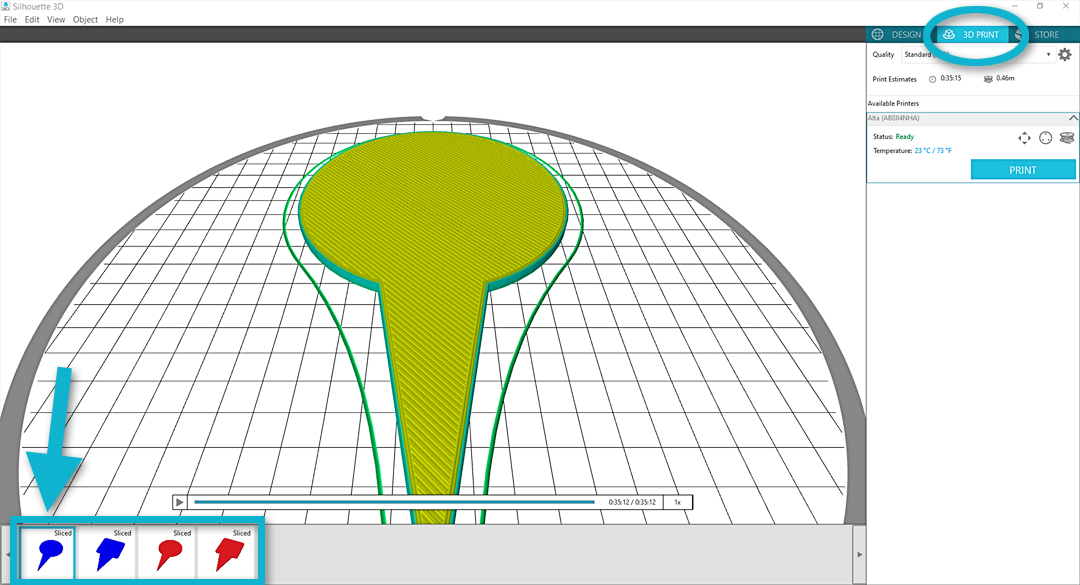
Go to the 3D Print tab and choose that same design in the Print Queue at the bottom of the screen. (This is when the color is helpful, since the preview shows everything in shades of green, blue, and yellow based on print speed.)
Make sure your Alta is connected and ready with the filament loaded, and the print bed with platform tape in place. Also calibrate your Alta, if necessary.
Tip: I do not calibrate every time I print. Usually I calibrate whenever I have moved my machine, whenever the prints do not seem to be printing evenly, or if I haven’t used my Alta in a long time.
I used the default Standard (PLA) quality settings for these picks because they do not need to be robust, and that gives a smooth enough surface for stickers to be applied. When ready, click Print to send your job to the Alta. Depending on pick size, my four variations took between 20-40 minutes per pick to 3D print. That leaves time to create the Print & Cut stickers while your Alta is 3D printing.
When the print is finished, give it a couple minutes to cool, then carefully use a spatula tool to remove the print from the print bed. If your Alta platform tape tears, replace it with a new piece before printing again so imperfections do not show up on subsequent prints. Bubbles in the platform tape can usually be smoothed down without replacing the tape.
If you’re using multiple filament colors, print all of your picks with one color before switching colors of filament through the unload/load process. This saves time and filament. Simply choose which “Sliced” thumbnail you want to print next from the Print Queue while in the 3D Print Tab.
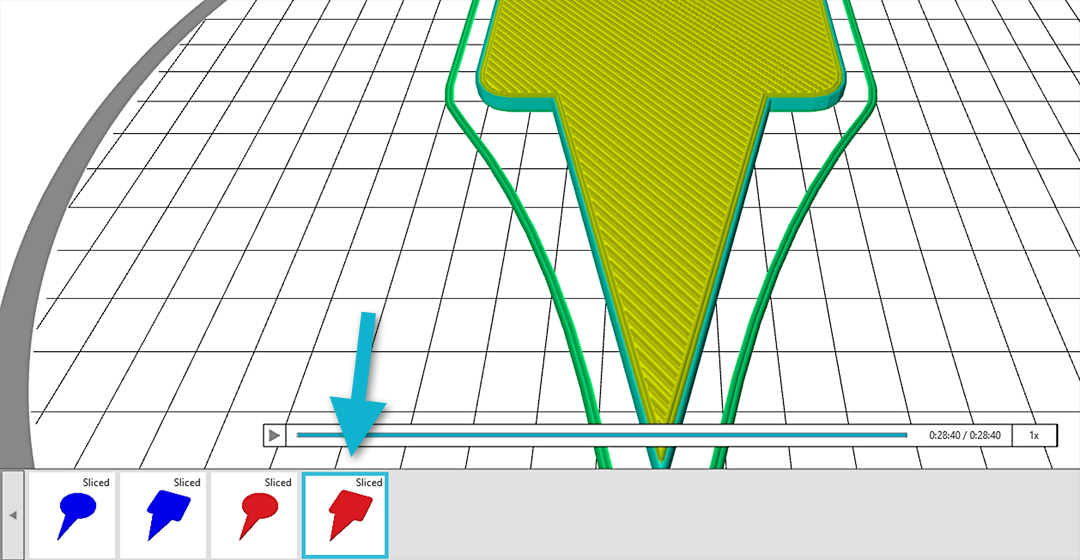
Note: If the shape you select from the Print Queue is fully on the print bed in the Design Tab, it will print in that position. Shapes that are not fully on the print bed in the Design Tab will automatically print as centered on the print bed. The print preview in the 3D Print Tab shows exactly how the design will print on the real print bed.
If you are a beginner to the Silhouette Alta®, I recommend watching our free video class 3D Printing Basics.
Step Three: Create Print & Cut Sticker Labels
Back in Silhouette Studio®, return to the first document you saved with the colored cupcake picks and white circles and squares. Move the colored picks off to the side of the mat; we won’t use these anymore.
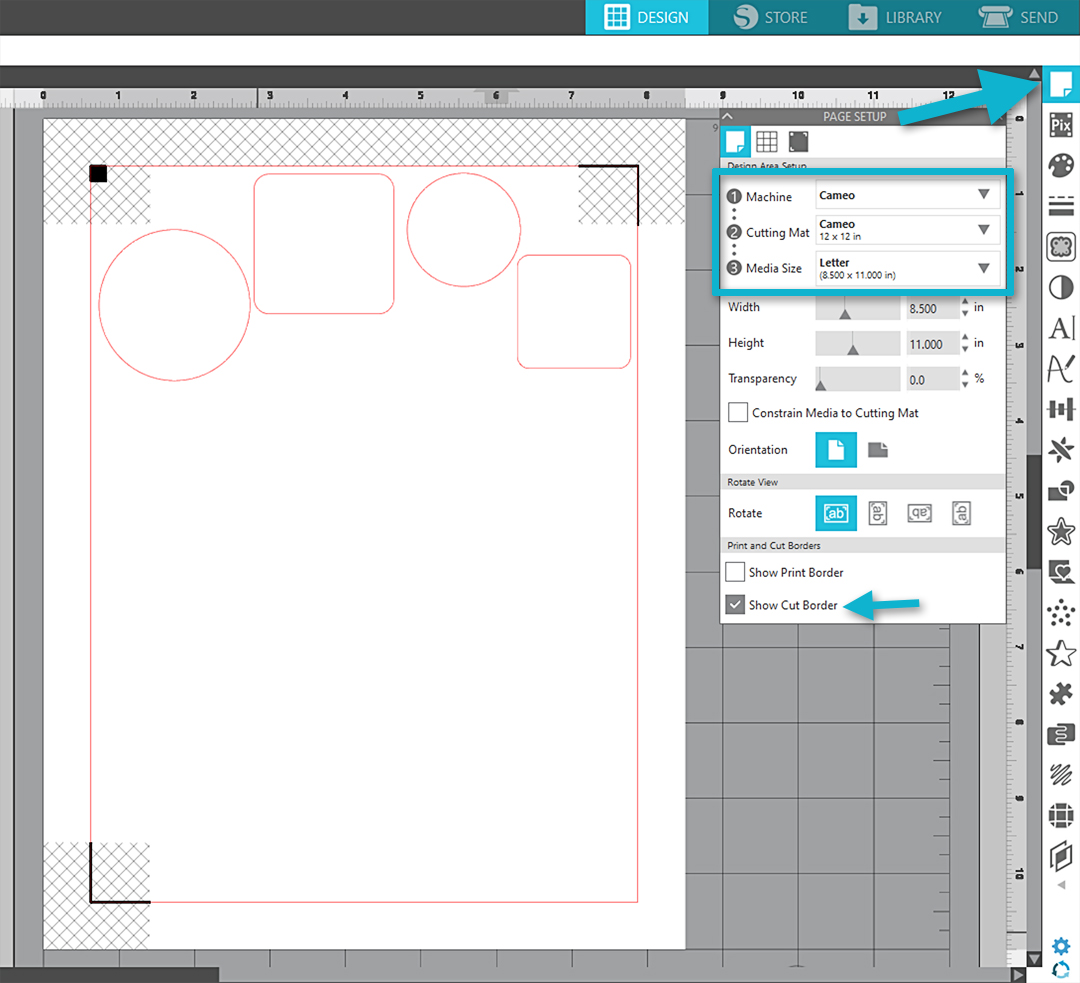
In the Page Setup Panel, use the following settings:
- Machine: Cameo (or Portrait)
- Cutting Mat: Cameo (or Portrait)
- Media Size: Letter
- Check box to Show Cut Border
- Press letter M on your keyboard to turn on Registration Marks (or go to the third tab of the Page Setup Panel to turn them On).
Arrange the circles and squares so they are not within the crosshatch areas and are fully within the red cut border.
Open one or multiple colorful designs to resize and place over the sticker backgrounds. I used Design IDs #349093, #346517, #349094, and #350180, some fun summer designs by Carina Gardner.
Note: You may need to group some of these designs as you open them before moving or resizing. You may wish to choose an invisible line color on the designs just for visual purposes, although the red cut lines will not print by default.
Resize with a corner handle and duplicate as necessary, based on your own selection of how many picks and what size of picks you’re 3D printing.
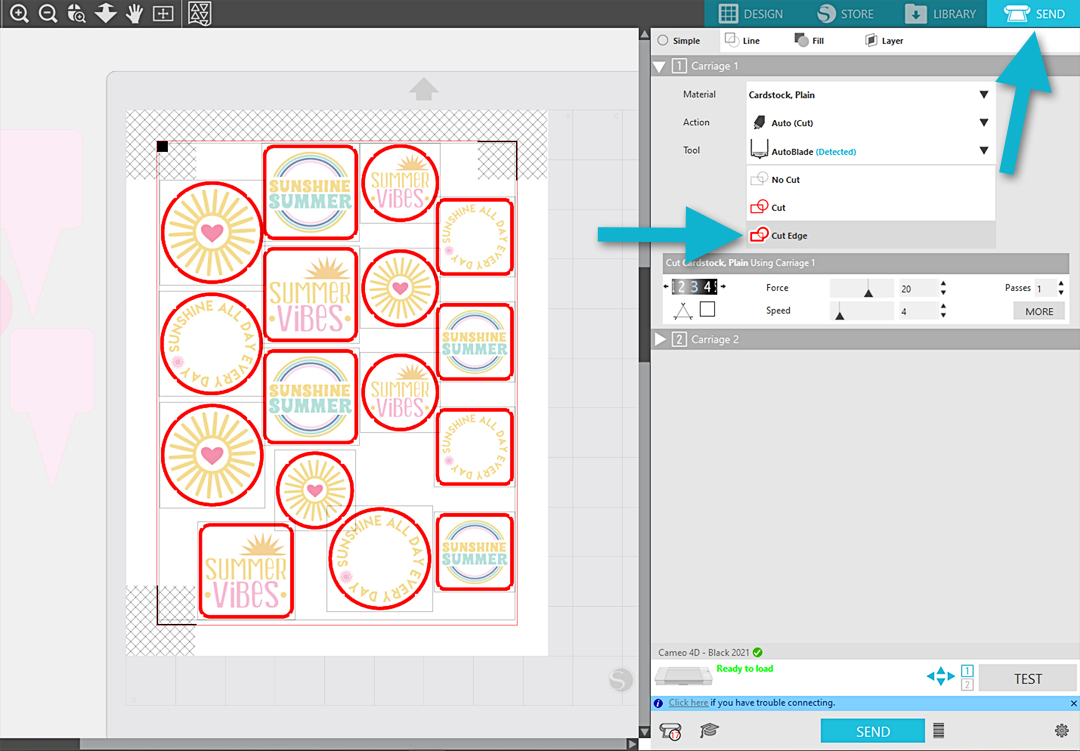
Once you have your selection of stickers ready, go to the Send tab.
Select all the designs and choose Cut Edge so none of the inner pieces cut. We only want to cut the outline of each circle or square sticker border.
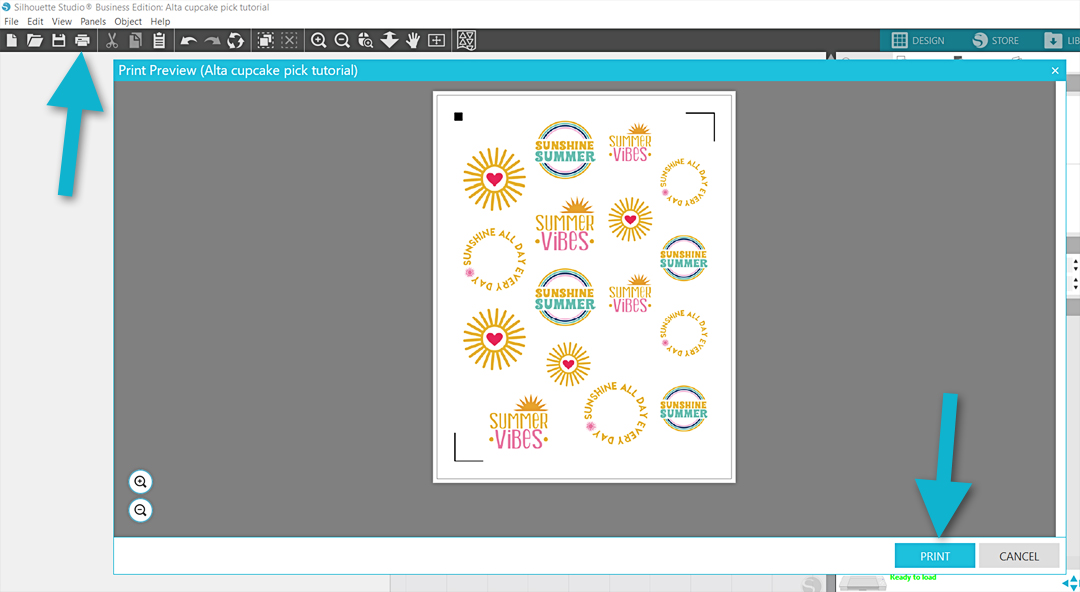
Print your document using an inkjet printer with your choice of sticker paper.
Note: The automatic print preview that pops up will not show line colors, including those around the circle and square borders. If you do see line colors here, they will print as shown. When you click Print from this preview, your printer options will pop up so you can adjust quality, paper feed options, etc. before actually printing.
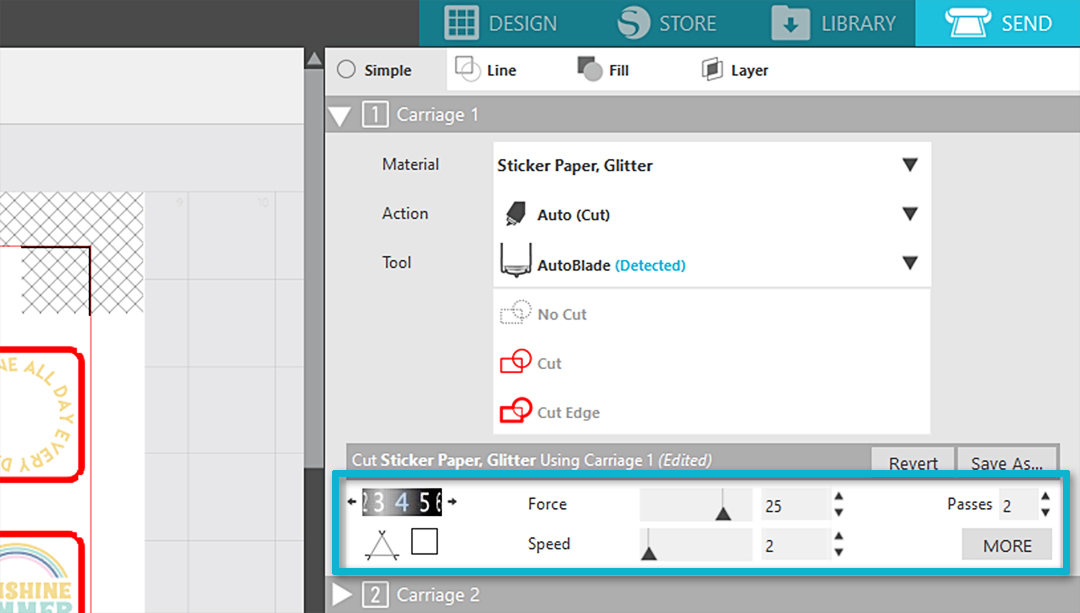
With your machine connected and ready, choose the appropriate cut settings for the sticker paper you’ll be using. For white glitter sticker paper on my Cameo 4, I use Blade 4, Force 25, Speed 2, Passes 2. If your blade is new and sharp, you may only need one pass or a lower blade setting. (Always make a practice cut to test settings for a new material.)
When your printout is placed on your mat as shown in the virtual preview, load your mat into your machine and press Send. As long as you have enough USB connections available, you can cut with your Silhouette cutting machine and 3D print with your Alta at the same time.
Your machine will read the registration marks and then proceed to cut your sticker designs.
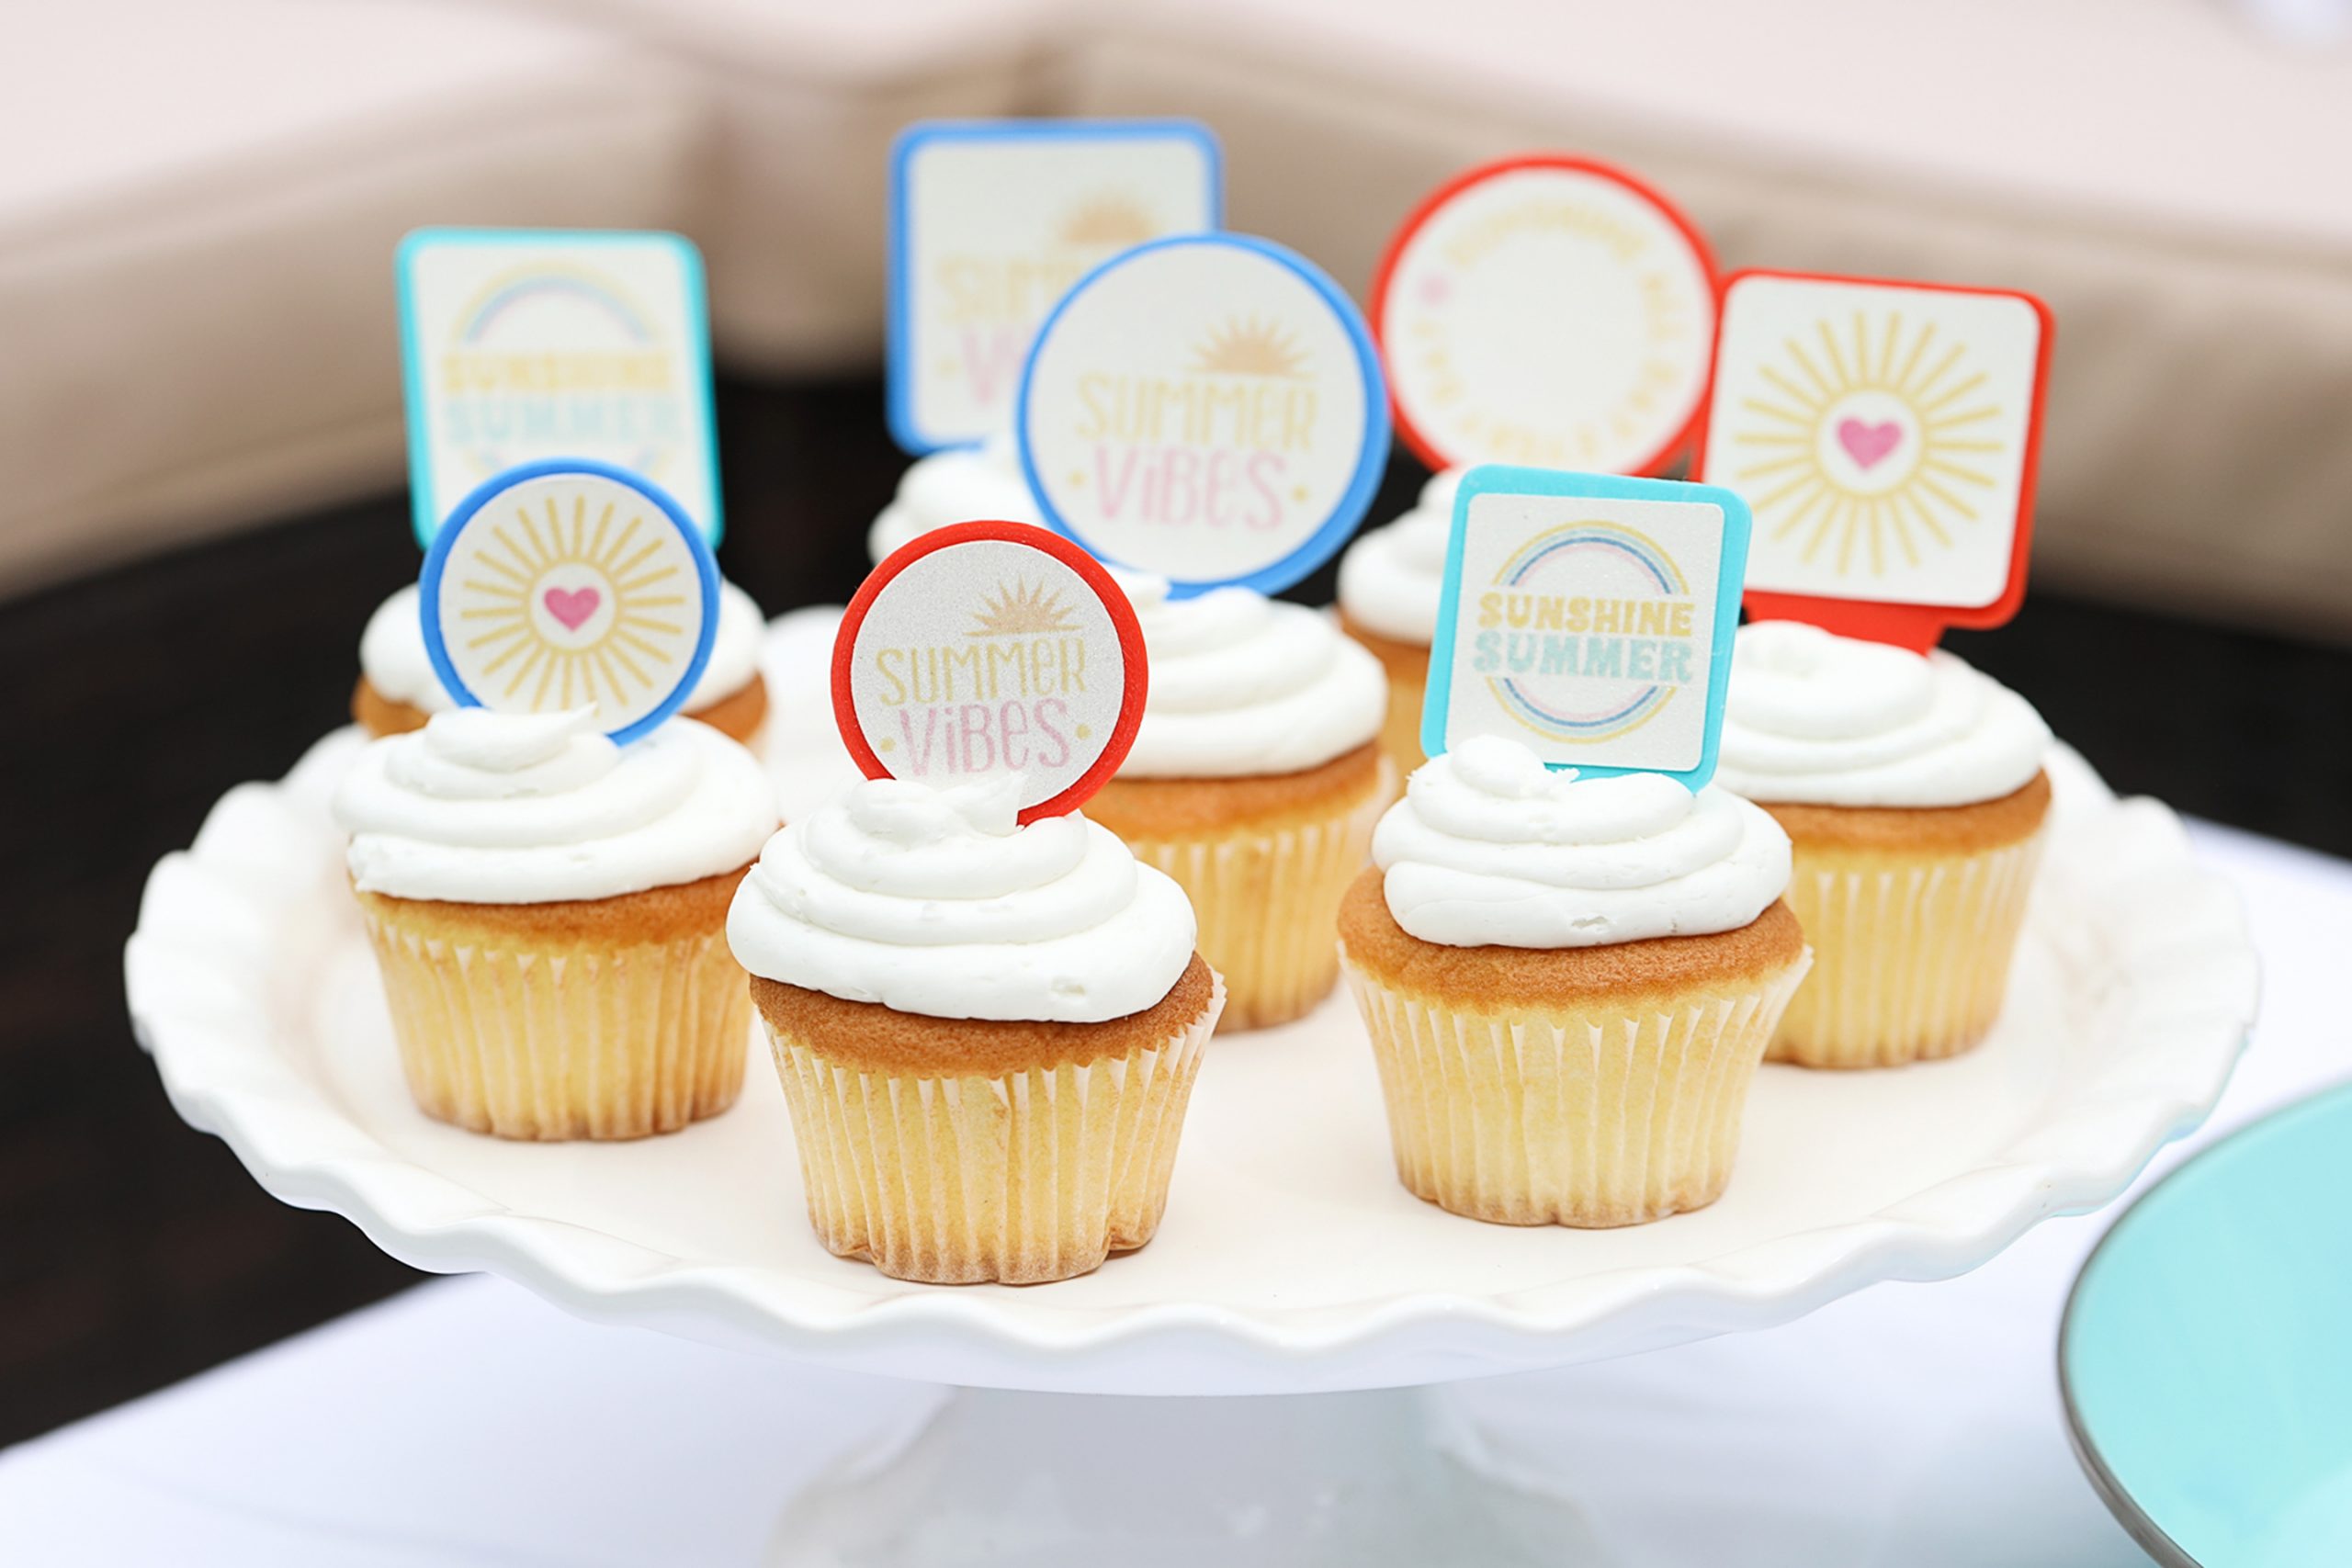
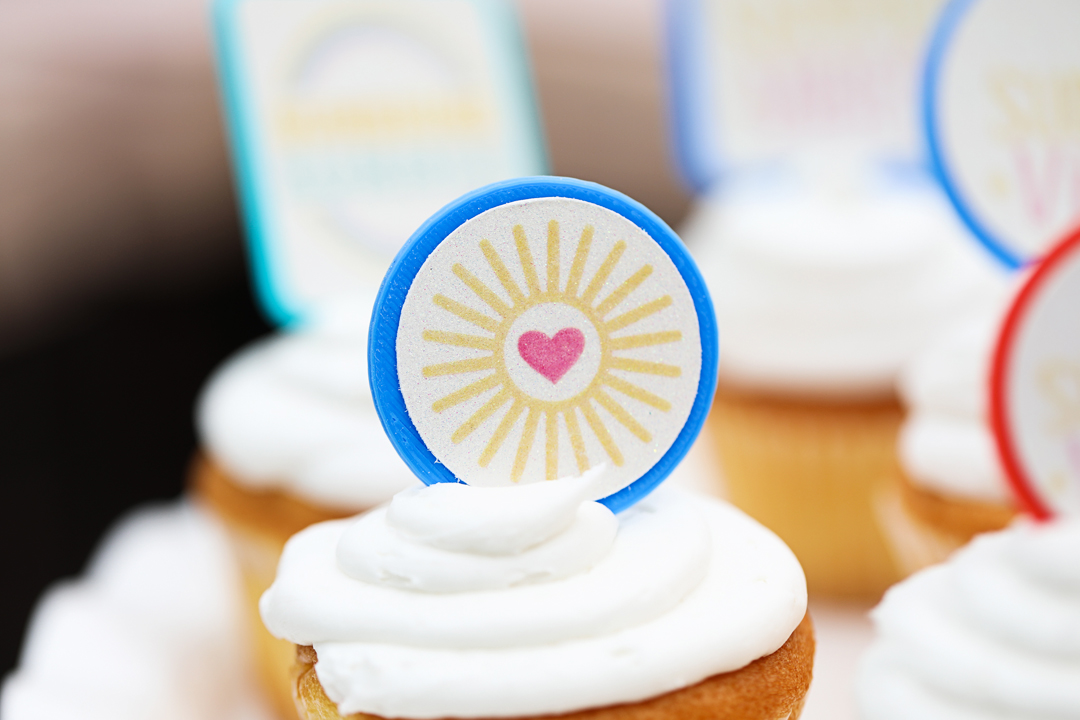
Step Four: Assemble Cupcake Picks
Once you have your multiple cupcake picks 3D printed, place the corresponding stickers on the finished, top side of each pick. Add to the cupcakes and enjoy!
 Get to Know the ES Mat
  Layered Card with PixScan
Cupcake Toppers - 3D Printed - Finding Time To Create
July 21, 2021
[…] you know it’s super easy to make 3D printed cupcake toppers? I’ve got a tutorial on the Silhouette Blog for using 2D files to create 3D printed cupcake picks, then create cute Print & Cut stickers to […]