
Ahh, the Mint. So cute. So perfect. It does one thing, and it does it well. The rest of its awesomeness is up to you. Kelly here today, to share how to make a multi-color Mint stamp. Because everything’s better with pops of color, right?
For this project you need the following:
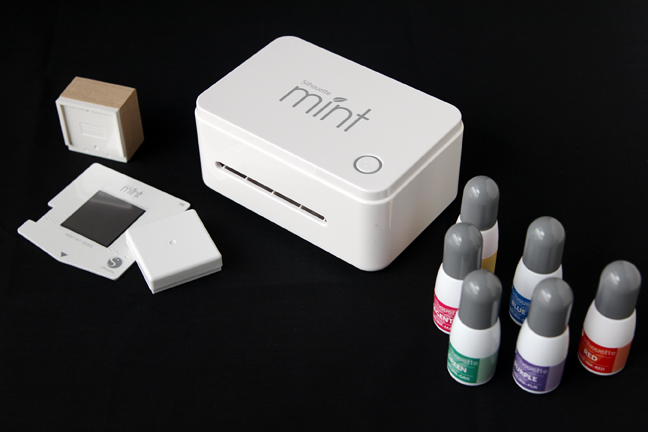
- Silhouette Mint™ custom stamp maker
- 30 mm x 30 mm Mint stamp kit
- Mint ink in yellow, red, blue, green, magenta, and purple (optional, but use at least 2-3 colors)
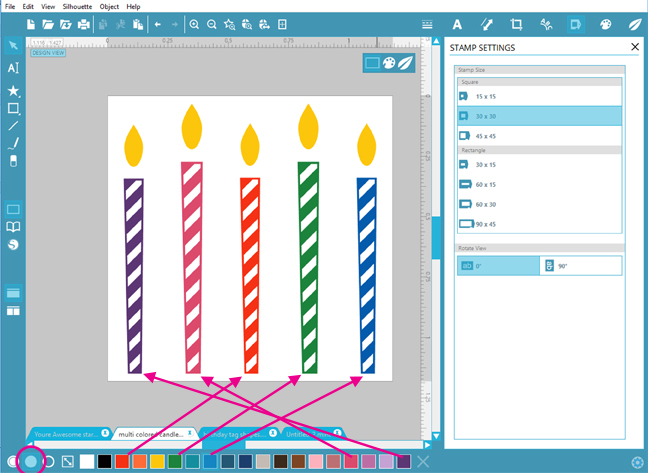
- Birthday candles design (ID #42533)
Let’s go!
1- PREPARE YOUR DESIGN
The first step is to prepare your design.
You can start the design in Silhouette Studio® or in Mint Studio™, depending upon which library contains your purchased design. If you start in Silhouette Studio®, just save it as a .Studio file, then once in Mint Studio™ you can go to File>Open and navigate to where you saved it.
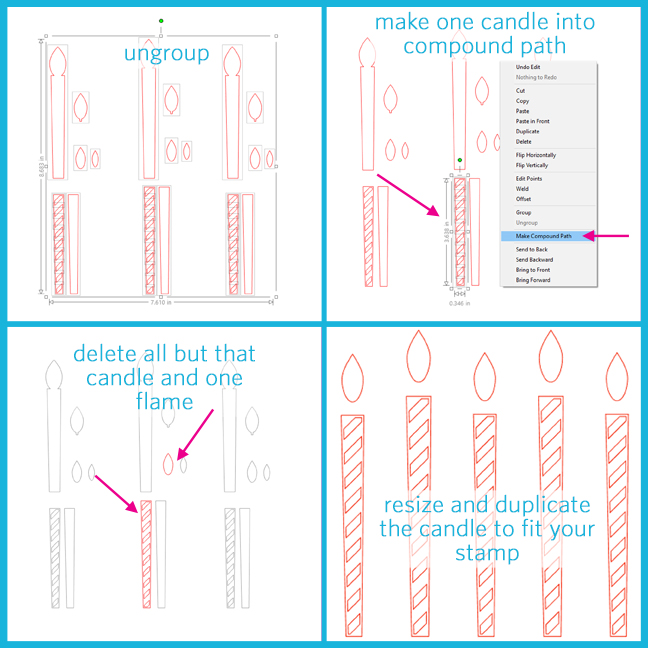
The key to a multi-color Mint stamp is this: Choose a design where the elements you want as different colors DO NOT TOUCH. Once the inks touch, they will start to migrate and you can lose control of where the colors go.
I chose this birthday candle design so I could position the colors separately with low risk of them touching.
- Ungroup the design.
- Select one candle with all its pieces and make it a compound path (right click – Make Compound Path).
- Delete all the extra pieces except that one altered candle and one flame.
- Duplicate the candle (right click – Duplicate) and resize some of the duplicates (drag a corner handle) to fill up your selected stamp size until you’re happy with it. Allow enough space so your separate ink colors are easy to apply without touching.
TIP: Some helpful menu functions when arranging designs on your stamp are in the Object>Align drop down menu. You can click on your favorites if you are familiar with what they do, or if you choose Object>Align>Align Options it will bring up a full window with visual choices familiar to Silhouette Studio® users.

If you want to see a visual representation of how your stamp will look with your ink colors, all the Mint ink colors are at the bottom of the screen.
- Select all the shapes and click the solid circle so they all receive a solid fill color.
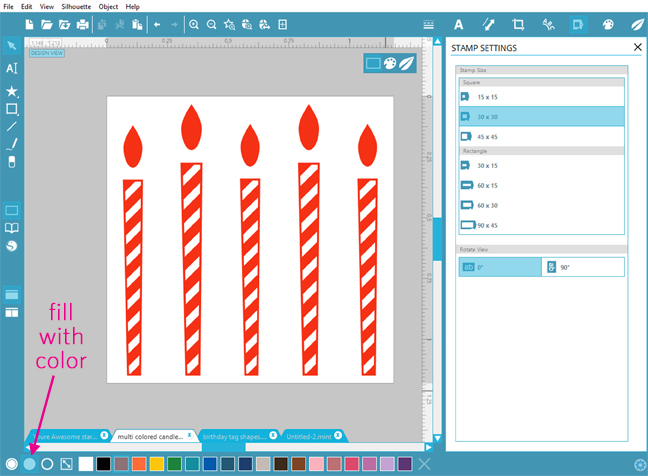
- Now you can choose individual shapes and click on the various colors to see what your chosen inks will look like. Note that the colors on your screen do not affect how your stamp is created. Adding the ink to the stamp after you “Mint” the stamp is where the real color comes from.
2- SEND TO MINT
Now comes the fast and easy part.
- Click on the Mint leaf icon to send the stamp sheet through your machine. The image on screen will be black & white and mirrored.
- The instructions will tell you to check your filters (we’re not using any for this design).
- Click on Start Mint and the machine’s light will start to flash.
- Insert the correct stamp sheet face up into the back of the Mint machine.
- In less than a minute, your stamp will be created and you can break it out of its sheet holder and apply it to the stamp mount.
3- APPLY MINT INK
We’re ready to apply those multiple colors of ink. Depending on the design, you can apply each color separately and blot the excess away between colors, or you can apply all the colors at once for a single waiting period.
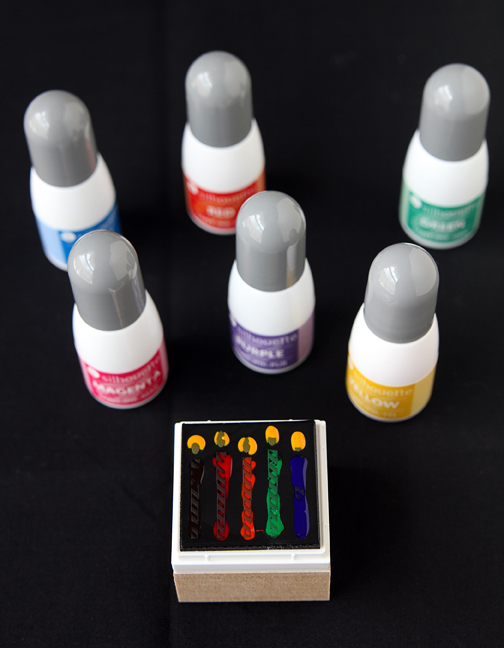
It absorbs quickly. I usually wait 5-10 minutes before blotting the excess ink away in the next step.
4- BLOT EXCESS INK
Once your ink has absorbed for a bit (it won’t all absorb), simply stamp it several times on a piece of scrap paper to remove the excess. Once the stamp is stamping cleanly, stamp on a label to add to the lid for that stamp.
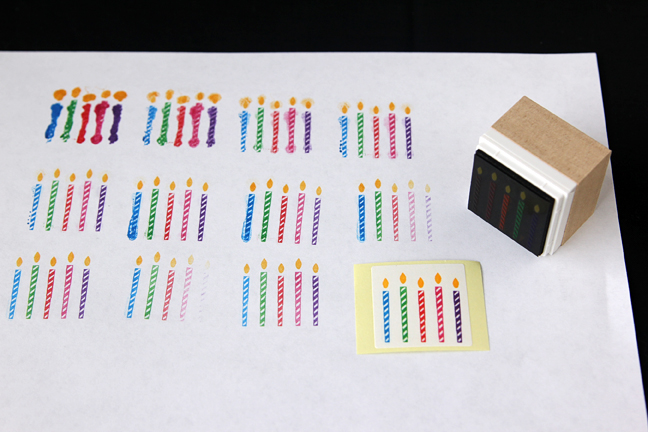
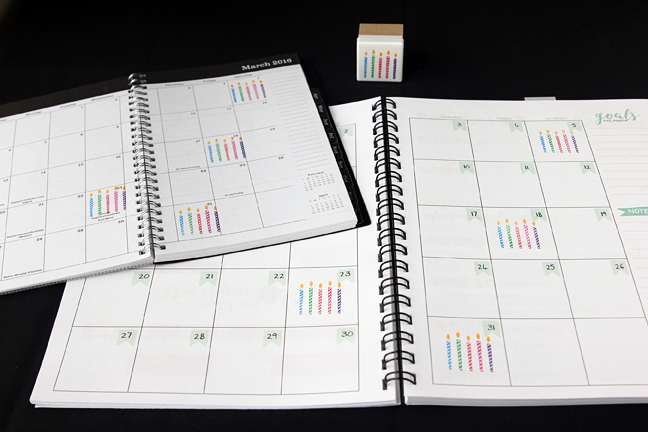
Don’t you love all that color?!

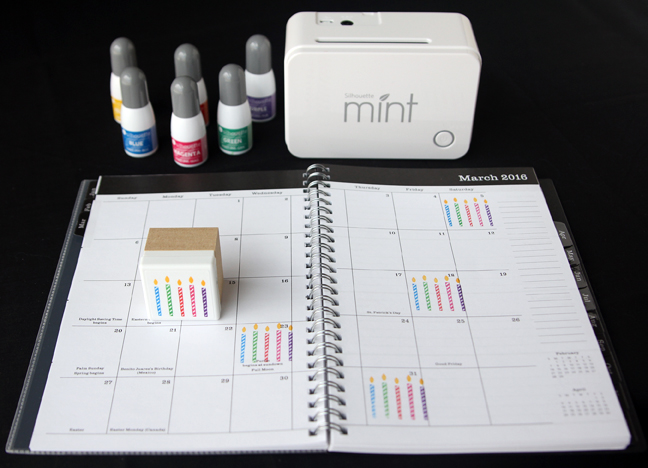
5- STAMP EVERYTHING!
Now stamp up those planners and cards and tags and whatever needs some beautiful colored candles until you run out of ink. Then add the same colors of ink, let it sit, blot, and stamp some more!

 Free Class - Father's Day Apron Set
  Free Class - Custom Graduation Tumbler
Kelly Wayment
June 28, 2024
You can use it with vinyl as long as it is smooth and flat to allow the static charge to hold on to it. Rolled vinyl that wants to go back to its rolled shape will not necessarily work well, and it would need to be trimmed to fit the ES mat cutting area.
Kelly Wayment
June 28, 2024
Yes, you can use the heat pen while using the ES mat. 🙂
Yurii
March 2, 2024
Hello. May it be used with heat pen?
Thanks
Jerome
February 24, 2024
Hi, works this with the normal vinyl foils or only with printer papter etc?
Kelly Wayment
February 16, 2024
Once you’ve pushed the mat up against the rollers, just press the “Load” arrow button (bottom right on the display). Does a regular sticky mat load into the machine for you?
Michelle a goodall
January 24, 2024
Hello! I just got my new electrostatic mat and have watched every video i can find on it. However, what i can t find is why it wont feed into my cameo 5/ it slides right up the rollers but wont go any further. and yes- iam pushing the into button. help!