Welcome to the setup guide for your Silhouette Alta® Plus 3D printing machine. These step-by-step instructions will help guide you through the process of setting up your 3D printer.
Step 1: Register Your Machine
Start by taking the Alta Plus out of the box. Once the machine is out of the box, you may register it at silhouetteamerica.com/setup. Select your language and the Alta Plus machine. Then proceed to fill out all the needed information. You will find a unique serial number on the bottom of the machine. Completing the registration process will also sign you up for your official Silhouette account if you don’t already have one.
Step 2: Check the Box Contents and Set Up the Silhouette Alta®
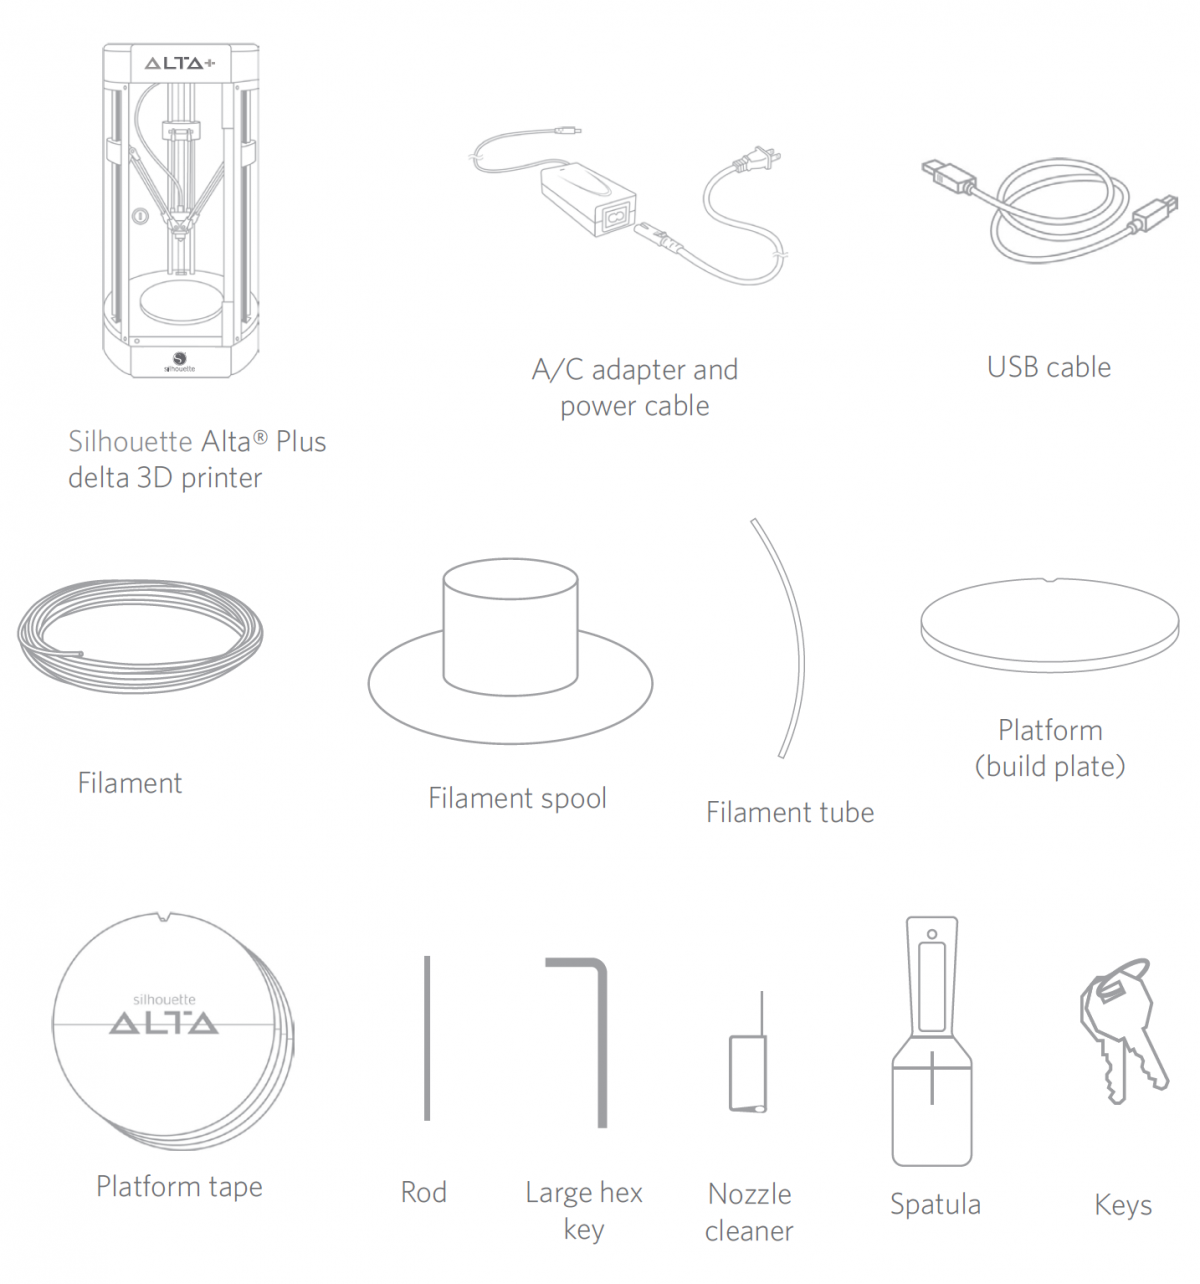
Once your machine has been registered, check to make sure that you have all of the items that should be in the box. In addition to the machine, there should be
- a power cord with an A/C adapter
- a USB cable
- loose white filament and a filament spool
- a platform and platform tape sheets
- a hex key (for machine adjustments)
- a rod tool
- a filament tube
- a nozzle cleaner
- a spatula tool
- and keys to lock and unlock the case surrounding the Alta
Once you’ve confirmed all items are present, discard any tape, and remove any plastic pieces used to hold the machine parts in place.
Don’t forget to remove the 3 plastic fixing clips that are attached to each belt inside your 3D printer.
Plug in the included A/C adapter to the right-hand side of the Alta and then into a wall socket. Then connect the Alta to your computer using the provided USB cable.
Your machine comes preassembled and precalibrated, and Silhouette has already tested the Alta printer to make sure it works. In fact, the filament spool that comes in the box was printed with your very own machine.
Step 3: Download and Install the Silhouette 3D™ software
Now that your machine is out of the box, you’re ready to download and install the Silhouette 3D® software. To download the software, go to silhouetteamerica.com/software#silhouette-3D
Click on the option for your operating system. Once the download is complete, run the installation file and proceed through the onscreen steps to install and setup your software. The first thing you’ll see when Silhouette 3D™ opens is a slideshow that walks you through removing the packaging pieces from the Alta and where important parts of your machine are located. When you’ve finished with the slideshow, you’ll note that there is the main screen that displays a circular area with a grid. This represents the Alta platform’s print area.
There is a bar on the left-hand side where you will go to create your own shapes and text. At the top of the Silhouette 3D™ window, you’ll see your document tools. On the right-hand side of the screen, sign in to your pre-existing or newly created Silhouette account to access the designs in your library. This is where you will be able to access your designs, including 3D designs for the Alta.
Step 4: Access the Free Designs for your Silhouette Alta® Plus
Your Silhouette Alta® Plus comes with 25 free designs you can print. These designs will appear in your Silhouette library when you register your new machine. To access your library, open Silhouette 3D™. On the right-hand side of the screen, you’ll see a window prompting you to sign in to your Silhouette account so that you can have access to all your designs in the Silhouette library, not just the 3D designs. Make sure you’re connected to the internet, and log in to your Silhouette account. To open one of your included 3D designs, open the Free Designs folder in your library and double-click on your chosen design.
Step 5: Enjoy Your Silhouette Alta® Plus
Now that your Alta Plus is all set up, you’re ready to create designs and print them! You can view software tutorials here and view inspirational 3D printing projects here.
 3D Printed Cupcake Topper Picks
  Create a Custom Vase with the Silhouette Alta® Plus