Silhouette
Products
  • Silhouette
    Cameo
  • Silhouette
    Portrait
  • Silhouette
    Mint
  • Silhouette
    Curio
  • Silhouette
    Alta
  • Silhouette
    Blades & Mats
  • Silhouette
    Tools & Accs.
  • Silhouette
    Materials
  • Silhouette
    Replacement Parts
  • Silhouette
    Clearance
Software
  • Get Software
  • Machine Firmware
  • Beta Software Feedback
  • Apply/Manage License Keys
Support
  • Get Help
  • FAQ
  • Machine Setup
  • Silhouette 101
  • Programs
  • sign in Sign In
  • Silhouette 101 Logo
  • Get Started
    • Product Information
      • Why Silhouette?
      • Machine Comparison Chart
      • Alta Plus
        • Introduction
        • Specs
        • Setup
      • Cameo 4
        • Introduction
        • Specs
        • Setup
        • Auto Tool Detection
        • Built-in Roll Feeder
        • AutoBlade for Cameo 4
        • Tool Adapters
        • Bluetooth
      • Cameo 3
        • Introduction
        • Specs
        • Setup
      • Portrait 2
        • Introduction
        • Specs
        • Setup
        • AutoBlade
        • Bluetooth
        • Deep Cut
      • Mint
        • Introduction
        • Specs
        • Setup
      • Curio
        • Introduction
        • Specs
        • Setup
        • Deep Cut
        • Dual Carriage
        • Embossing/Debossing
        • Metal Etching
        • Stippling
      • Accessories & Materials
        • Accessories Guide
        • Materials Guide
    • Manuals
      • Machines
        • Cameo
        • Portrait
        • Curio
        • Mint
        • Alta Plus
      • Software
        • Silhouette Studio®
        • Mint Studio™
        • ModelMaker™
        • Silhouette Connect™
        • Silhouette 3D™
    • Unboxing
      • Cameo 3
      • Portrait 2
      • Curio
      • Mint
      • Alta
    • Design Store
      • Design Store Overview
      • Build Your Library
      • Ways to Save
        • Low Everyday Price
        • Credit Boost
        • Subscriptions
      • Font Guide
      • Free Cut Files & Fonts
      • Artist Spotlights
  • Tutorials
    • Free eBooks
      • The Silhouette Handbook
      • Print & Cut Perfection
      • Guide to Glass Etching
      • 12 Quick How-tos
      • Stamping Made Fresh
      • 3D Printing Basics
      • Cutting Basics
      • Mastering Silhouette Studio®
      • PixScan™ Like A Pro
      • Creating Custom Apparel
      • Vinyl All The Things
      • Discovering Mint Studio™
      • Heat Transfer Essentials
    • Software How Tos
      • Silhouette Studio®
        • Features List
        • Basic Edition
        • Designer Edition
        • Designer Edition Plus
        • Business Edition
      • Silhouette Web™
      • Silhouette 3D™
      • Mint Studio™
      • ModelMaker™
    • Essentials
      • Adjusting the Blade
      • Adjusting the Rollers
      • Loading Your Mat
      • Making Your First Cut
      • Using a Crosscutter
      • Using a Dual Carriage
      • Cutting Without a Mat
      • Cutting Adhesive Materials
      • Cutting From a USB
      • Cutting Fabric
      • Sketching with Pens
      • Hand Tools
      • Vinyl
      • Heat Transfer
      • Printable Heat Transfer
      • Double-sided Adhesive
      • Shrink Plastic
      • Rhinestones
      • Minting a Stamp
      • Fabric Ink
      • Silkscreen
      • Glass Etching
      • Stamping Material
      • Print & Cut
      • PixScan™
      • Loading Curio Base
      • Embossing/Debossing
      • Metal Etching
      • Stippling
      • Doming Stickers
      • Printing with Silhouette Alta®
      • Firmware Update
      • Silhouette Studio® Shortcuts
      • Troubleshooting
    • Projects By Category
      • Apparel
      • Cards
      • Fabric
      • Gifts
      • Home
      • Kid Crafts
      • Paper Crafts
      • Parties
      • Planning
      • School Projects
      • Scrapbooking
    • Projects By Event
      • Back To School
      • Birthday
      • Christmas
      • Easter
      • Father's Day
      • Halloween
      • Mother's Day
      • Thanksgiving
      • Valentine
      • Weddings
    • Projects By Material
      • 3D Printing
      • Cardstock
      • Double-Sided Adhesive
      • Fabric Ink
      • Fabric Stabilizer
      • Glass Etching
      • Heat Transfer
      • Metal Etching Sheet
      • Metal Stippling Sheet
      • Rhinestones
      • Score & Emboss Paper
      • Sketch Pens
        • Pen/Marker Holder
        • Silhouette Sketch Pens
      • Stamping Material
      • Stencil Materials
      • Vinyl
      • Printables
        • Cotton Canvas
        • Cotton Fabric
        • Foils
        • Heat Transfer
        • Image Transfer
        • Scratch-off
        • Shrink Plastic
        • Sticker Papers
        • Tattoo Paper
        • Vellum
        • Vinyl
        • Window Cling
      • Specialty Media
        • Chipboard
        • Cork Sheets
        • Corrugated Paper
        • Embossable Foil
        • Faux Leather Paper
        • Foil Transfer
        • Leatherette
        • Magnet Paper
        • Scratch-off (gold)
        • Scratch-off (silver)
        • Wood Sheets
  • Videos
    • Unboxing
      • Cameo Pro
      • Cameo 4 Plus
      • Cameo 4
      • Cameo 3
      • Portrait 3
      • Portrait 2
      • Curio
      • Mint
      • Alta
    • Basics
    • Product Videos
    • Software Tutorials
      • Silhouette Studio®
      • Silhouette Connect™ Plugin
      • Mint Studio™
      • ModelMaker™
    • Classes
      • All Things Studio
      • Guide to Glass Etching
      • Print & Cut Perfection
      • 3D Printing Basics
      • Vinyl All The Things
      • Heat Transfer Essentials
      • Creating Custom Apparel
      • PixScan™ Like a Pro
    • Stories
      • Product Prototyping
      • Home Crafting
      • Custom Apparel
      • Design & Branding
      • STEM Learning
      • Quilting
      • Stamp Art
      • Industrial Design
      • Branding
      • 3D Paper Craft
      • Planning
      • Film Making & Photography
      • Interior Design
      • MakerFaire
      • Handlettering
    • Maker Studio
☰
Silhouette 101 Logo ×
  • Get Started
    • Product Information
      • Why Silhouette?
      • Machine Comparison Chart
      • Alta Plus
        • Introduction
        • Specs
        • Setup
      • Cameo 4
        • Introduction
        • Specs
        • Setup
        • Auto Tool Detection
        • Built-in Roll Feeder
        • AutoBlade for Cameo 4
        • Tool Adapters
        • Bluetooth
      • Cameo 3
        • Introduction
        • Specs
        • Setup
      • Portrait 2
        • Introduction
        • Specs
        • Setup
        • AutoBlade
        • Bluetooth
        • Deep Cut
      • Mint
        • Introduction
        • Specs
        • Setup
      • Curio
        • Introduction
        • Specs
        • Setup
        • Deep Cut
        • Dual Carriage
        • Embossing/Debossing
        • Metal Etching
        • Stippling
      • Accessories & Materials
        • Accessories Guide
        • Materials Guide
    • Manuals
      • Machines
        • Cameo
        • Portrait
        • Curio
        • Mint
        • Alta Plus
      • Software
        • Silhouette Studio®
        • Mint Studio™
        • ModelMaker™
        • Silhouette Connect™
        • Silhouette 3D™
    • Unboxing
      • Cameo 3
      • Portrait 2
      • Curio
      • Mint
      • Alta
    • Design Store
      • Design Store Overview
      • Build Your Library
      • Ways to Save
        • Low Everyday Price
        • Credit Boost
        • Subscriptions
      • Font Guide
      • Free Cut Files & Fonts
      • Artist Spotlights
  • Tutorials
    • Free eBooks
      • The Silhouette Handbook
      • Print & Cut Perfection
      • Guide to Glass Etching
      • 12 Quick How-tos
      • Stamping Made Fresh
      • 3D Printing Basics
      • Cutting Basics
      • Mastering Silhouette Studio®
      • PixScan™ Like A Pro
      • Creating Custom Apparel
      • Vinyl All The Things
      • Discovering Mint Studio™
      • Heat Transfer Essentials
    • Software How Tos
      • Silhouette Studio®
        • Features List
        • Basic Edition
        • Designer Edition
        • Designer Edition Plus
        • Business Edition
      • Silhouette Web™
      • Silhouette 3D™
      • Mint Studio™
      • ModelMaker™
    • Essentials
      • Adjusting the Blade
      • Adjusting the Rollers
      • Loading Your Mat
      • Making Your First Cut
      • Using a Crosscutter
      • Using a Dual Carriage
      • Cutting Without a Mat
      • Cutting Adhesive Materials
      • Cutting From a USB
      • Cutting Fabric
      • Sketching with Pens
      • Hand Tools
      • Vinyl
      • Heat Transfer
      • Printable Heat Transfer
      • Double-sided Adhesive
      • Shrink Plastic
      • Rhinestones
      • Minting a Stamp
      • Fabric Ink
      • Silkscreen
      • Glass Etching
      • Stamping Material
      • Print & Cut
      • PixScan™
      • Loading Curio Base
      • Embossing/Debossing
      • Metal Etching
      • Stippling
      • Doming Stickers
      • Printing with Silhouette Alta®
      • Firmware Update
      • Silhouette Studio® Shortcuts
      • Troubleshooting
    • Projects By Category
      • Apparel
      • Cards
      • Fabric
      • Gifts
      • Home
      • Kid Crafts
      • Paper Crafts
      • Parties
      • Planning
      • School Projects
      • Scrapbooking
    • Projects By Event
      • Back To School
      • Birthday
      • Christmas
      • Easter
      • Father's Day
      • Halloween
      • Mother's Day
      • Thanksgiving
      • Valentine
      • Weddings
    • Projects By Material
      • 3D Printing
      • Cardstock
      • Double-Sided Adhesive
      • Fabric Ink
      • Fabric Stabilizer
      • Glass Etching
      • Heat Transfer
      • Metal Etching Sheet
      • Metal Stippling Sheet
      • Rhinestones
      • Score & Emboss Paper
      • Sketch Pens
        • Pen/Marker Holder
        • Silhouette Sketch Pens
      • Stamping Material
      • Stencil Materials
      • Vinyl
      • Printables
        • Cotton Canvas
        • Cotton Fabric
        • Foils
        • Heat Transfer
        • Image Transfer
        • Scratch-off
        • Shrink Plastic
        • Sticker Papers
        • Tattoo Paper
        • Vellum
        • Vinyl
        • Window Cling
      • Specialty Media
        • Chipboard
        • Cork Sheets
        • Corrugated Paper
        • Embossable Foil
        • Faux Leather Paper
        • Foil Transfer
        • Leatherette
        • Magnet Paper
        • Scratch-off (gold)
        • Scratch-off (silver)
        • Wood Sheets
  • Videos
    • Unboxing
      • Cameo Pro
      • Cameo 4 Plus
      • Cameo 4
      • Cameo 3
      • Portrait 3
      • Portrait 2
      • Curio
      • Mint
      • Alta
    • Basics
    • Product Videos
    • Software Tutorials
      • Silhouette Studio®
      • Silhouette Connect™ Plugin
      • Mint Studio™
      • ModelMaker™
    • Classes
      • All Things Studio
      • Guide to Glass Etching
      • Print & Cut Perfection
      • 3D Printing Basics
      • Vinyl All The Things
      • Heat Transfer Essentials
      • Creating Custom Apparel
      • PixScan™ Like a Pro
    • Stories
      • Product Prototyping
      • Home Crafting
      • Custom Apparel
      • Design & Branding
      • STEM Learning
      • Quilting
      • Stamp Art
      • Industrial Design
      • Branding
      • 3D Paper Craft
      • Planning
      • Film Making & Photography
      • Interior Design
      • MakerFaire
      • Handlettering
    • Maker Studio

3D Camera with Silhouette ModelMaker™

By Silhouette Sep 18, 2018

Featured Image for 3D Camera with Silhouette ModelMaker™ (#117683)

One of the exciting things you can do with the Silhouette ModelMaker™ software is make 2D designs into 3D creations. If you’d like to learn how you can make your own, follow along with this tutorial!

Supplies Needed:

  • Silhouette CAMEO® or Silhouette Portrait®
  • Silhouette ModelMaker™
  • Silhouette Studio®
  • Silhouette Cutting Mat
  • Silhouette Cutting Blade
  • Cardstock
  • Silhouette Metallic Heat Transfer – Blue, Gold, and Black
  • Silhouette Transfer Tape
  • Printer
  • Glue or Double-sided Tape
  • Design ID #271650

Step One: Prepare the Design

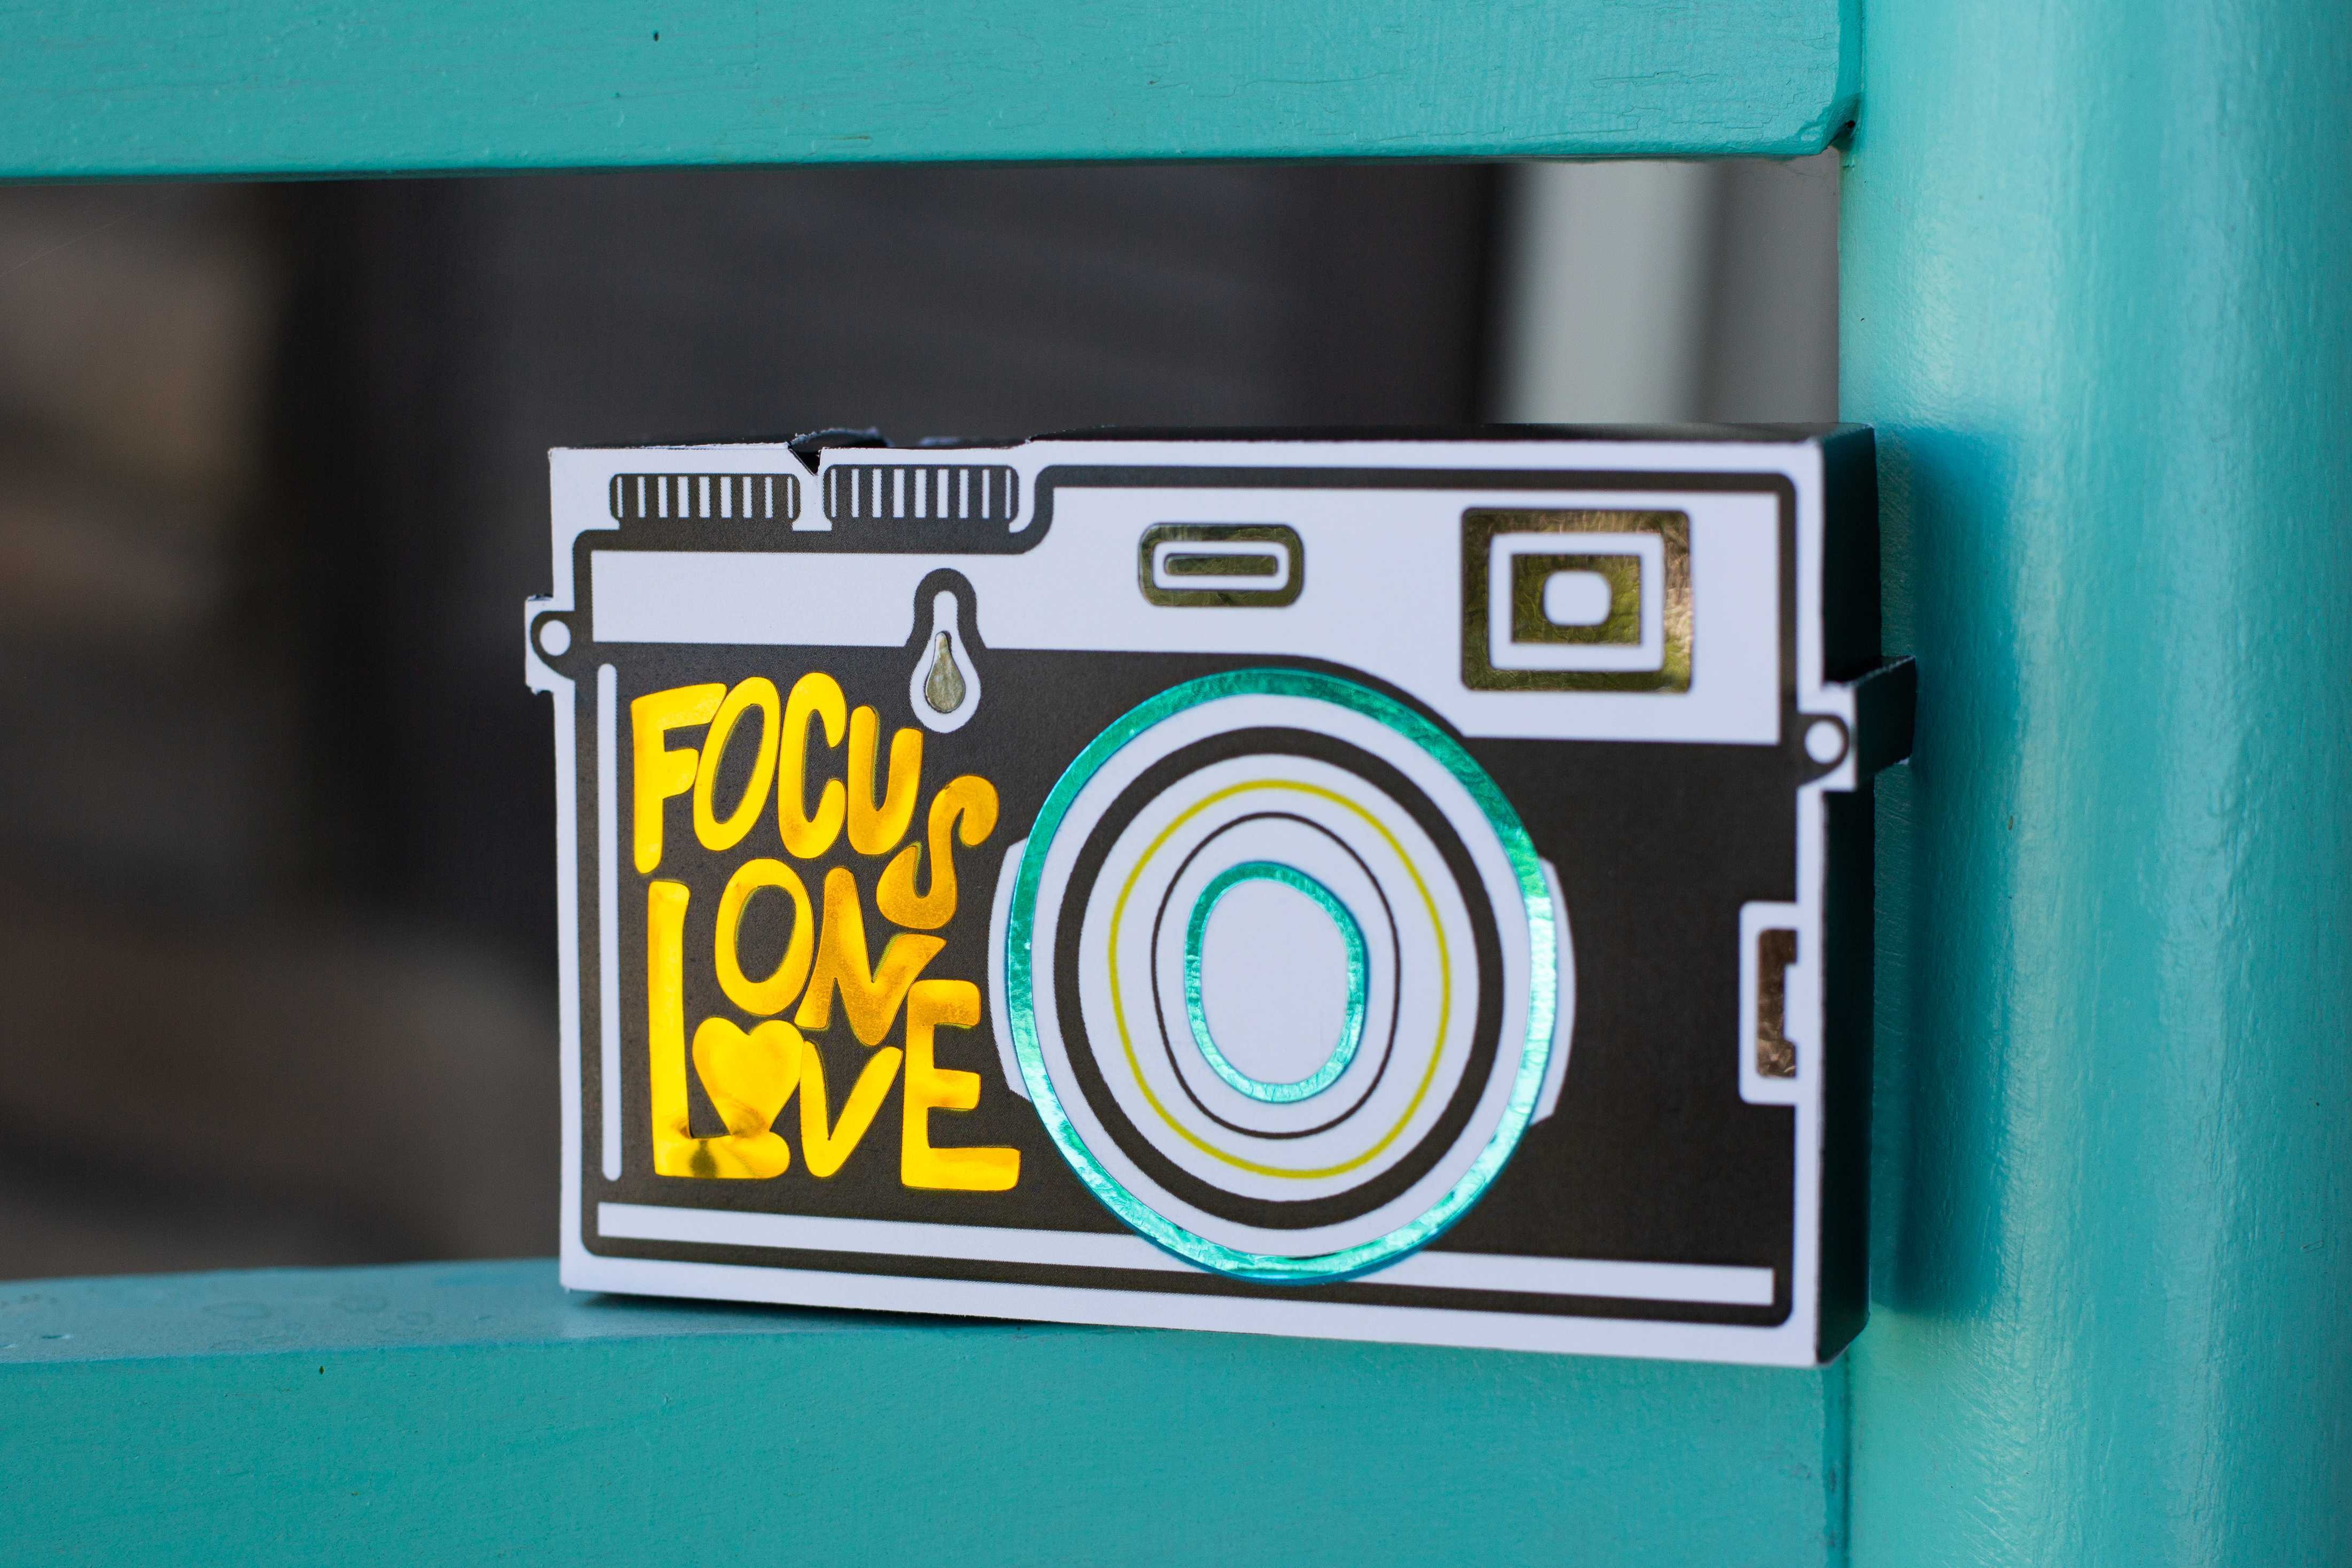
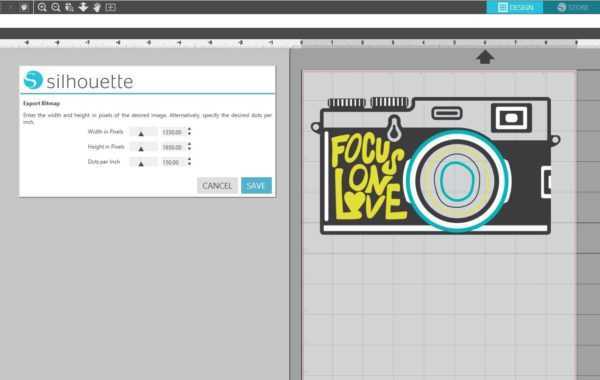
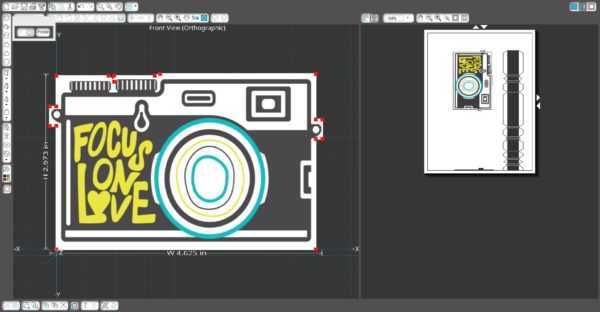
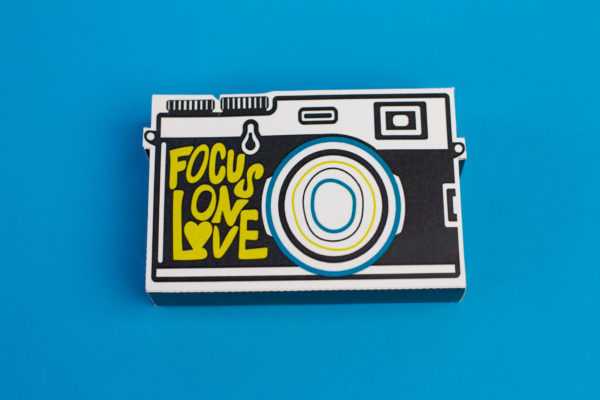
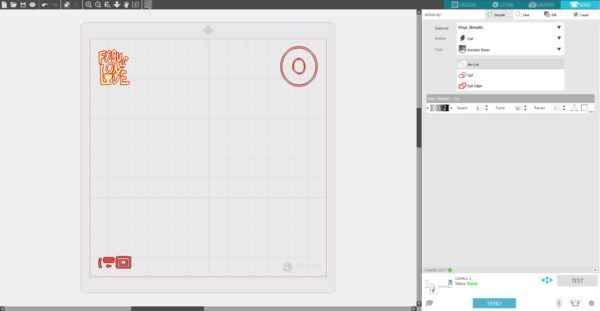
1. Open the “Focus on Love” design (Design ID #271650) in Silhouette Studio®. Ungroup the design and delete the outer cut line. Go to File > Save As and save the image on your computer in a JPEG format (this option is available only for Silhouette Studio® Business Edition users). This will be the front image of our 3D camera.

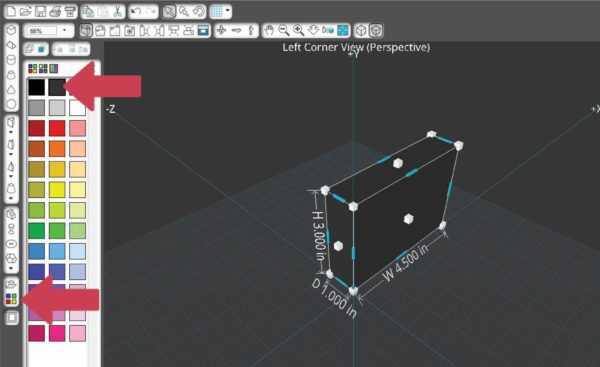
2. Open Silhouette ModelMaker™. Click the Irregular Prism button. On the X-axis, draw a irregular prism (approximately 4.5 in. x 3 in. x 1 in.). To draw an irregular prism shape, click to set a corner point. Then drag the mouse to draw out the base, and click to set it. Next, drag the mouse upward and click to set the height. Now it looks like a cuboid shape.

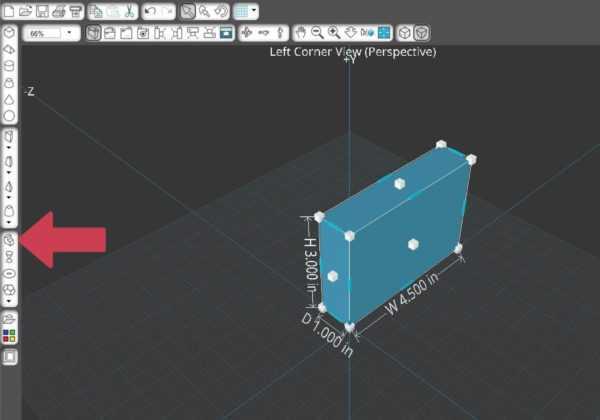
Once the shape has been created, ModelMaker™ animates the shape to position it with the side facing you, and the shape is ready for editing. You shouldn’t need to edit it anymore, so click Finish, which is located in the upper left-hand corner under the toolbar.

3. Open the Color Palette by clicking on this icon in the lower left of the Edit window. Select the shape and apply the dark gray color to the irregular prism.

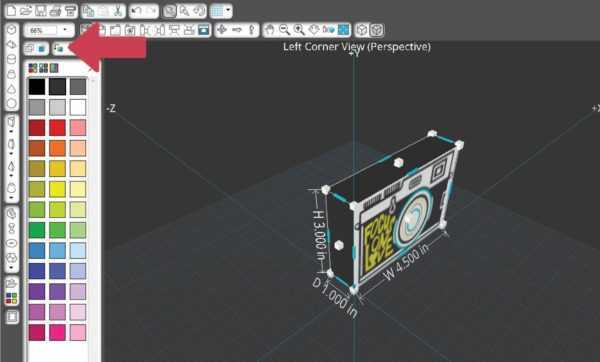
4. Drag the camera JPEG image that we previously saved to the front face of the prism. Use one of the orientation options called Rotate Texture to rotate the front image, if needed.

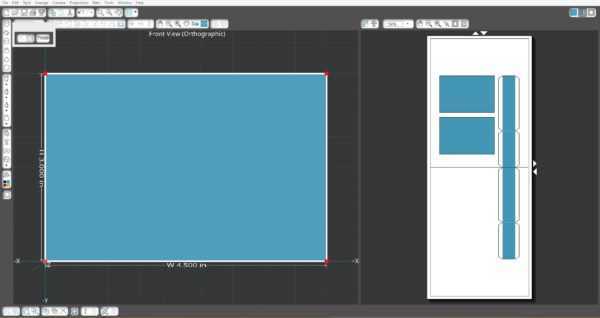
5. Right-click on the prism and choose the Edit Points option.

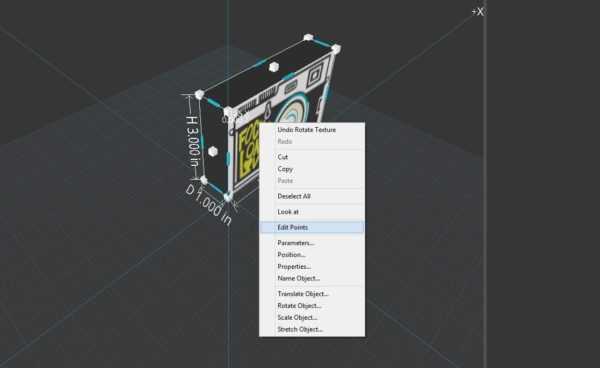
If you see that the front image doesn’t look proportional, drag the corner edit points to make the front image look more proportional.

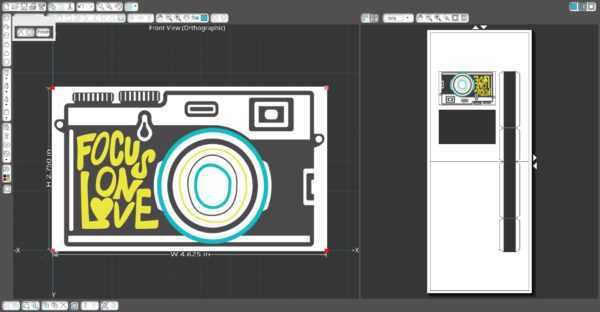
6. Add some edit points and place them along the prize perimeter that repeats the camera image shape. Create points by clicking on the white perimeter, and move existing red points by clicking and dragging. A highlighted point is a pale red, and you can use the delete button on the pop-up menu to delete a selected point if needed. Click Finish when done.

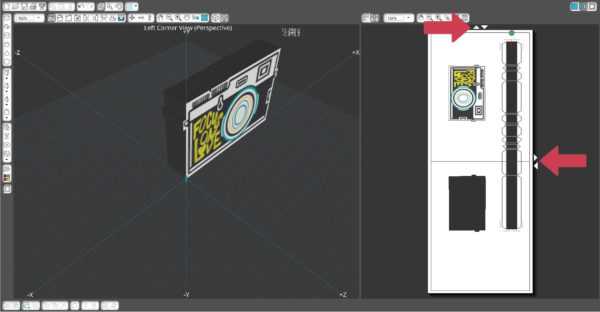
To add or delete extra pages in the output window, use the arrow buttons on the side and top of the page. Rearrange the nets (flat models) on the pages so that they don’t overlap each other.

Step Two: Print & Cut the Design

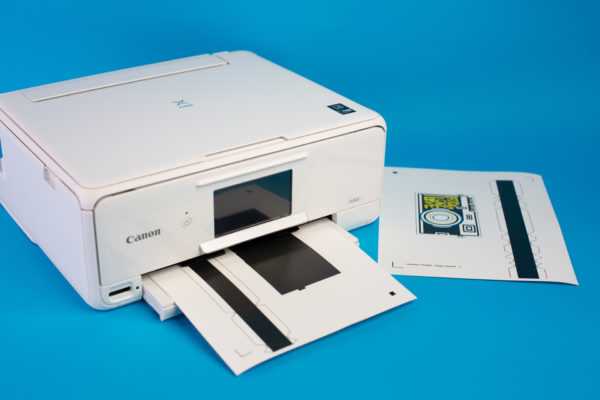
1. Now that our model is designed and ready, we can add registration marks and print the document from the Output Window on a home printer. After that, we will cut the document using a Silhouette machine.

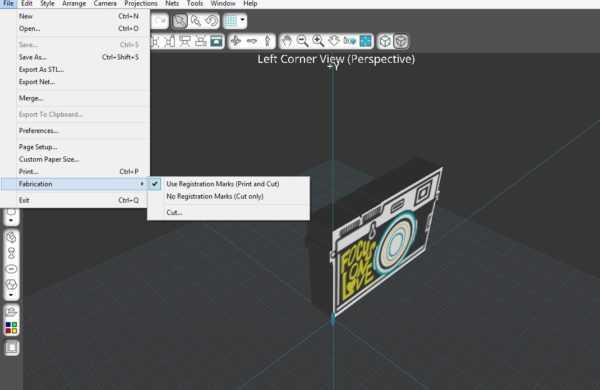
2. To add registration marks, go to File > Fabrication > Use Registration Marks. You’ll notice that you now have less of a printable area in the Output Window. Rearrange the nets in the Output Window so they fit within the printable area, as shown by these borders.

3. These pages are ready to Print & Cut, so just click on the cutting machine icon. The pop-up says “Print and Cut.”

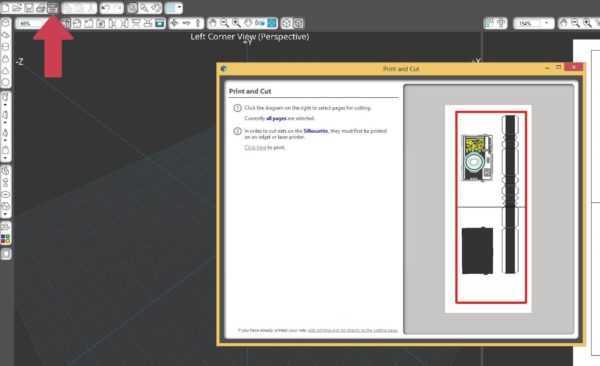
4. The dialog box that comes up lets you choose which pages to print. The red border shows which pages are selected to print. When you’re ready, click Print. Then select your printer and choose specific properties, such as print quality and page orientation.

5. After you’ve printed the pages with registration marks, you are ready to cut, so click Continue to go the cutting page.

6. The software recognizes your Silhouette machine if it’s turned on and connected, and it tells you which page to place on the cutting mat. Check your mat and cut settings by clicking on the Settings link.

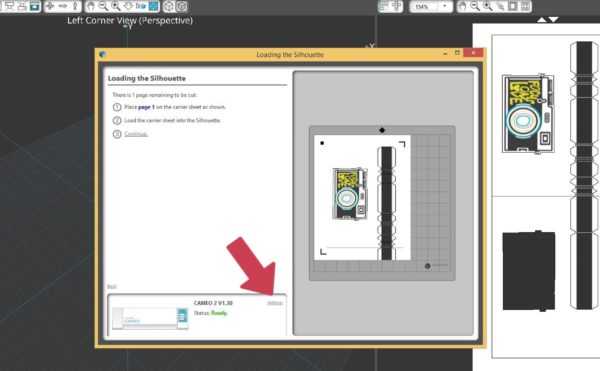
8. Click to detect the registration marks automatically, and the optical eye will read the marks. If it’s successful, click to cut page 1.

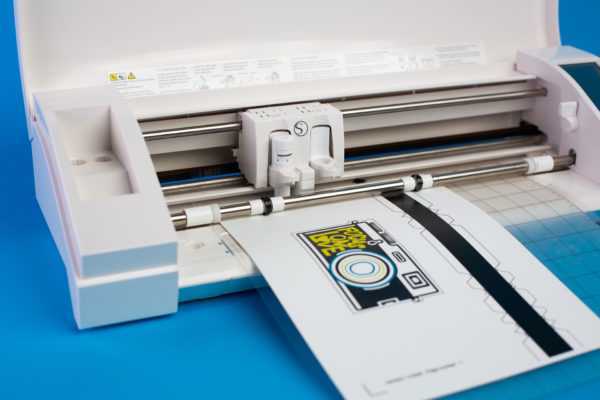
9. Unload the mat, remove the cutouts and any excess paper. Follow the instructions to continue with the subsequent pages.

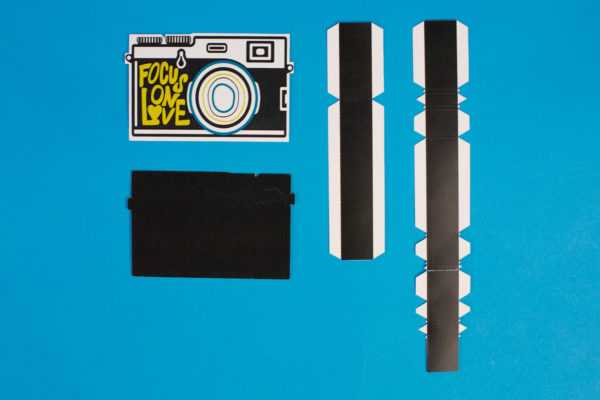
To learn more how to Print & Cut in ModelMaker™ watch this video.

Step Three: Assemble the Camera

1. After all pieces printed and cut, assemble the camera. Fold any perforated lines and glue the separate pieces together.

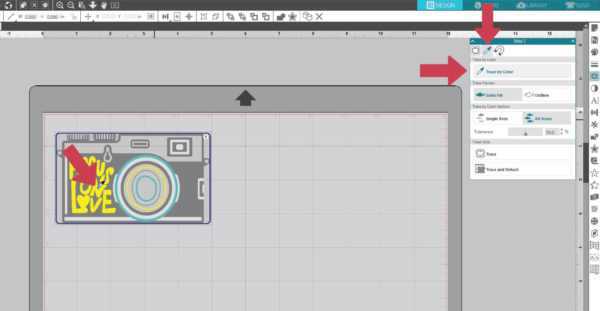
2. You can embellish the 3D camera with metallic vinyl elements. First we need to trace the designs of those elements in Silhouette Studio® using the Trace by Color feature, which is available to users with Silhouette Studio® Designer Edition and higher. With this feature, you’re able to quickly select just the parts of an image that you want to assign cut lines to based on the color. You can find the Trace icon (it looks like a butterfly) on the right side of the screen. To learn about Trace by Color feature, watch this video.

3. Open the “Focus on Love” design (Design ID #271650) in Silhouette Studio®. Go to the Trace panel and choose the Trace by Color tab. Select the design and click the Trace by Color button. Click the pointer on your image, and watch how just one color is highlighted in yellow to show your Trace Preview.

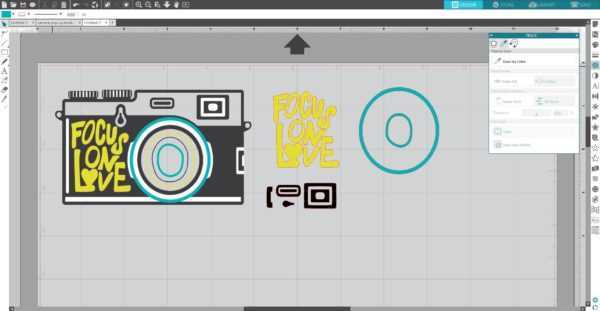
4. If we drag the camera design away, you can see the cut lines are created.

5. Repeat these steps for each color you want to trace. Use Release Compound Path (select design > right-click > release compound path) option to separate elements after they have been traced. Delete elements you don’t want to use. Measure the actual size of the elements on the assembled 3D camera model and, if necessary, resize the traced pieces in Silhouette Studio® so that you can cut them out.

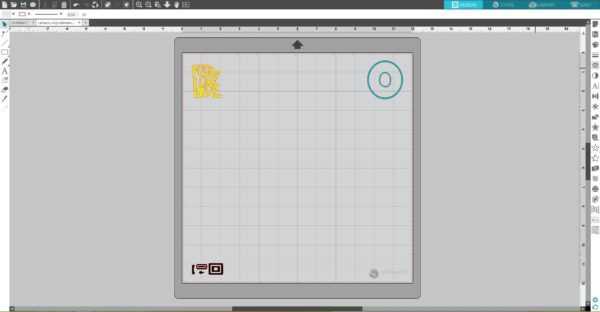
6. Place each piece in the corners of the working space.

7. Place pieces of metallic gold, blue, and black vinyl on the mat on the same spots as you placed designs on the working space in the Silhouette Studio®. Make sure the pieces of vinyl are not smaller than your designs. Adjust the rollers, if needed, and feed the mat into the cutting machine.

8. In Silhouette Studio®, go to the Send tab, choose “Vinyl, Metallic” as the material, adjust the blade as indicated (unless you use a machine with an AutoBlade), and click “Send.”

9. Weed (peel away) the negative space so all that remains on the vinyl backing is your design.

10. Using transfer tape, apply vinyl elements on the 3D camera model.

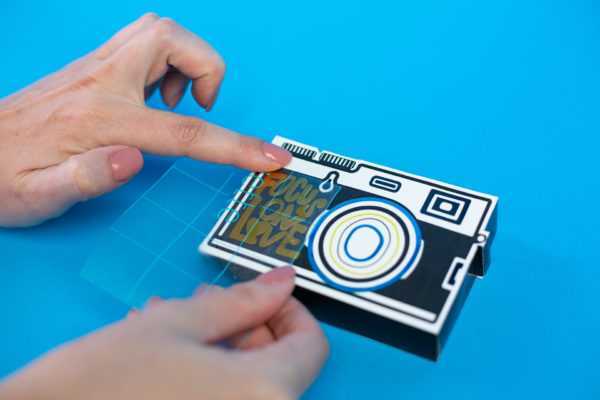
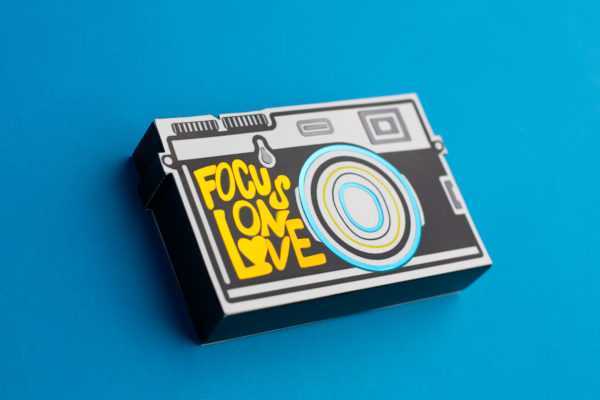
After you’ve added all of the metallic vinyl, your 3D camera model is ready!

  • Cameo 3
  • Cardstock
  • Paper Crafts
  • Portrait 2
  • Tutorials

3 Comments

  1. Kelly Wayment

    June 28, 2024

    You can use it with vinyl as long as it is smooth and flat to allow the static charge to hold on to it. Rolled vinyl that wants to go back to its rolled shape will not necessarily work well, and it would need to be trimmed to fit the ES mat cutting area.

    Test
  2. Kelly Wayment

    June 28, 2024

    Yes, you can use the heat pen while using the ES mat. 🙂

    Test
  3. Yurii

    March 2, 2024

    Hello. May it be used with heat pen?
    Thanks

    Test
  4. Jerome

    February 24, 2024

    Hi, works this with the normal vinyl foils or only with printer papter etc?

    Test
  5. Kelly Wayment

    February 16, 2024

    Once you’ve pushed the mat up against the rollers, just press the “Load” arrow button (bottom right on the display). Does a regular sticky mat load into the machine for you?

    Test
  6. Michelle a goodall

    January 24, 2024

    Hello! I just got my new electrostatic mat and have watched every video i can find on it. However, what i can t find is why it wont feed into my cameo 5/ it slides right up the rollers but wont go any further. and yes- iam pushing the into button. help!

    Test

Comments are closed.

Company
  • Design Store
  • Find a Store
  • Machines
  • International Distributors
Support
  • Machine Setup
  • Silhouette Catalog
  • Returns and Refunds
  • Update Software
  • My Account
  • Contact
Programs
  • Silhouette Handmade
  • Educator Discounts
  • Club Silhouette
Follow Us
  • Facebook
  • Twitter
  • Pinterest
  • Instagram
  • YouTube
Site links
  • Home
  • FAQ
  • Shop
  • Cart

© 2023 Silhouette America, Inc. All rights reserved.

Made by Magneto IT Solutions