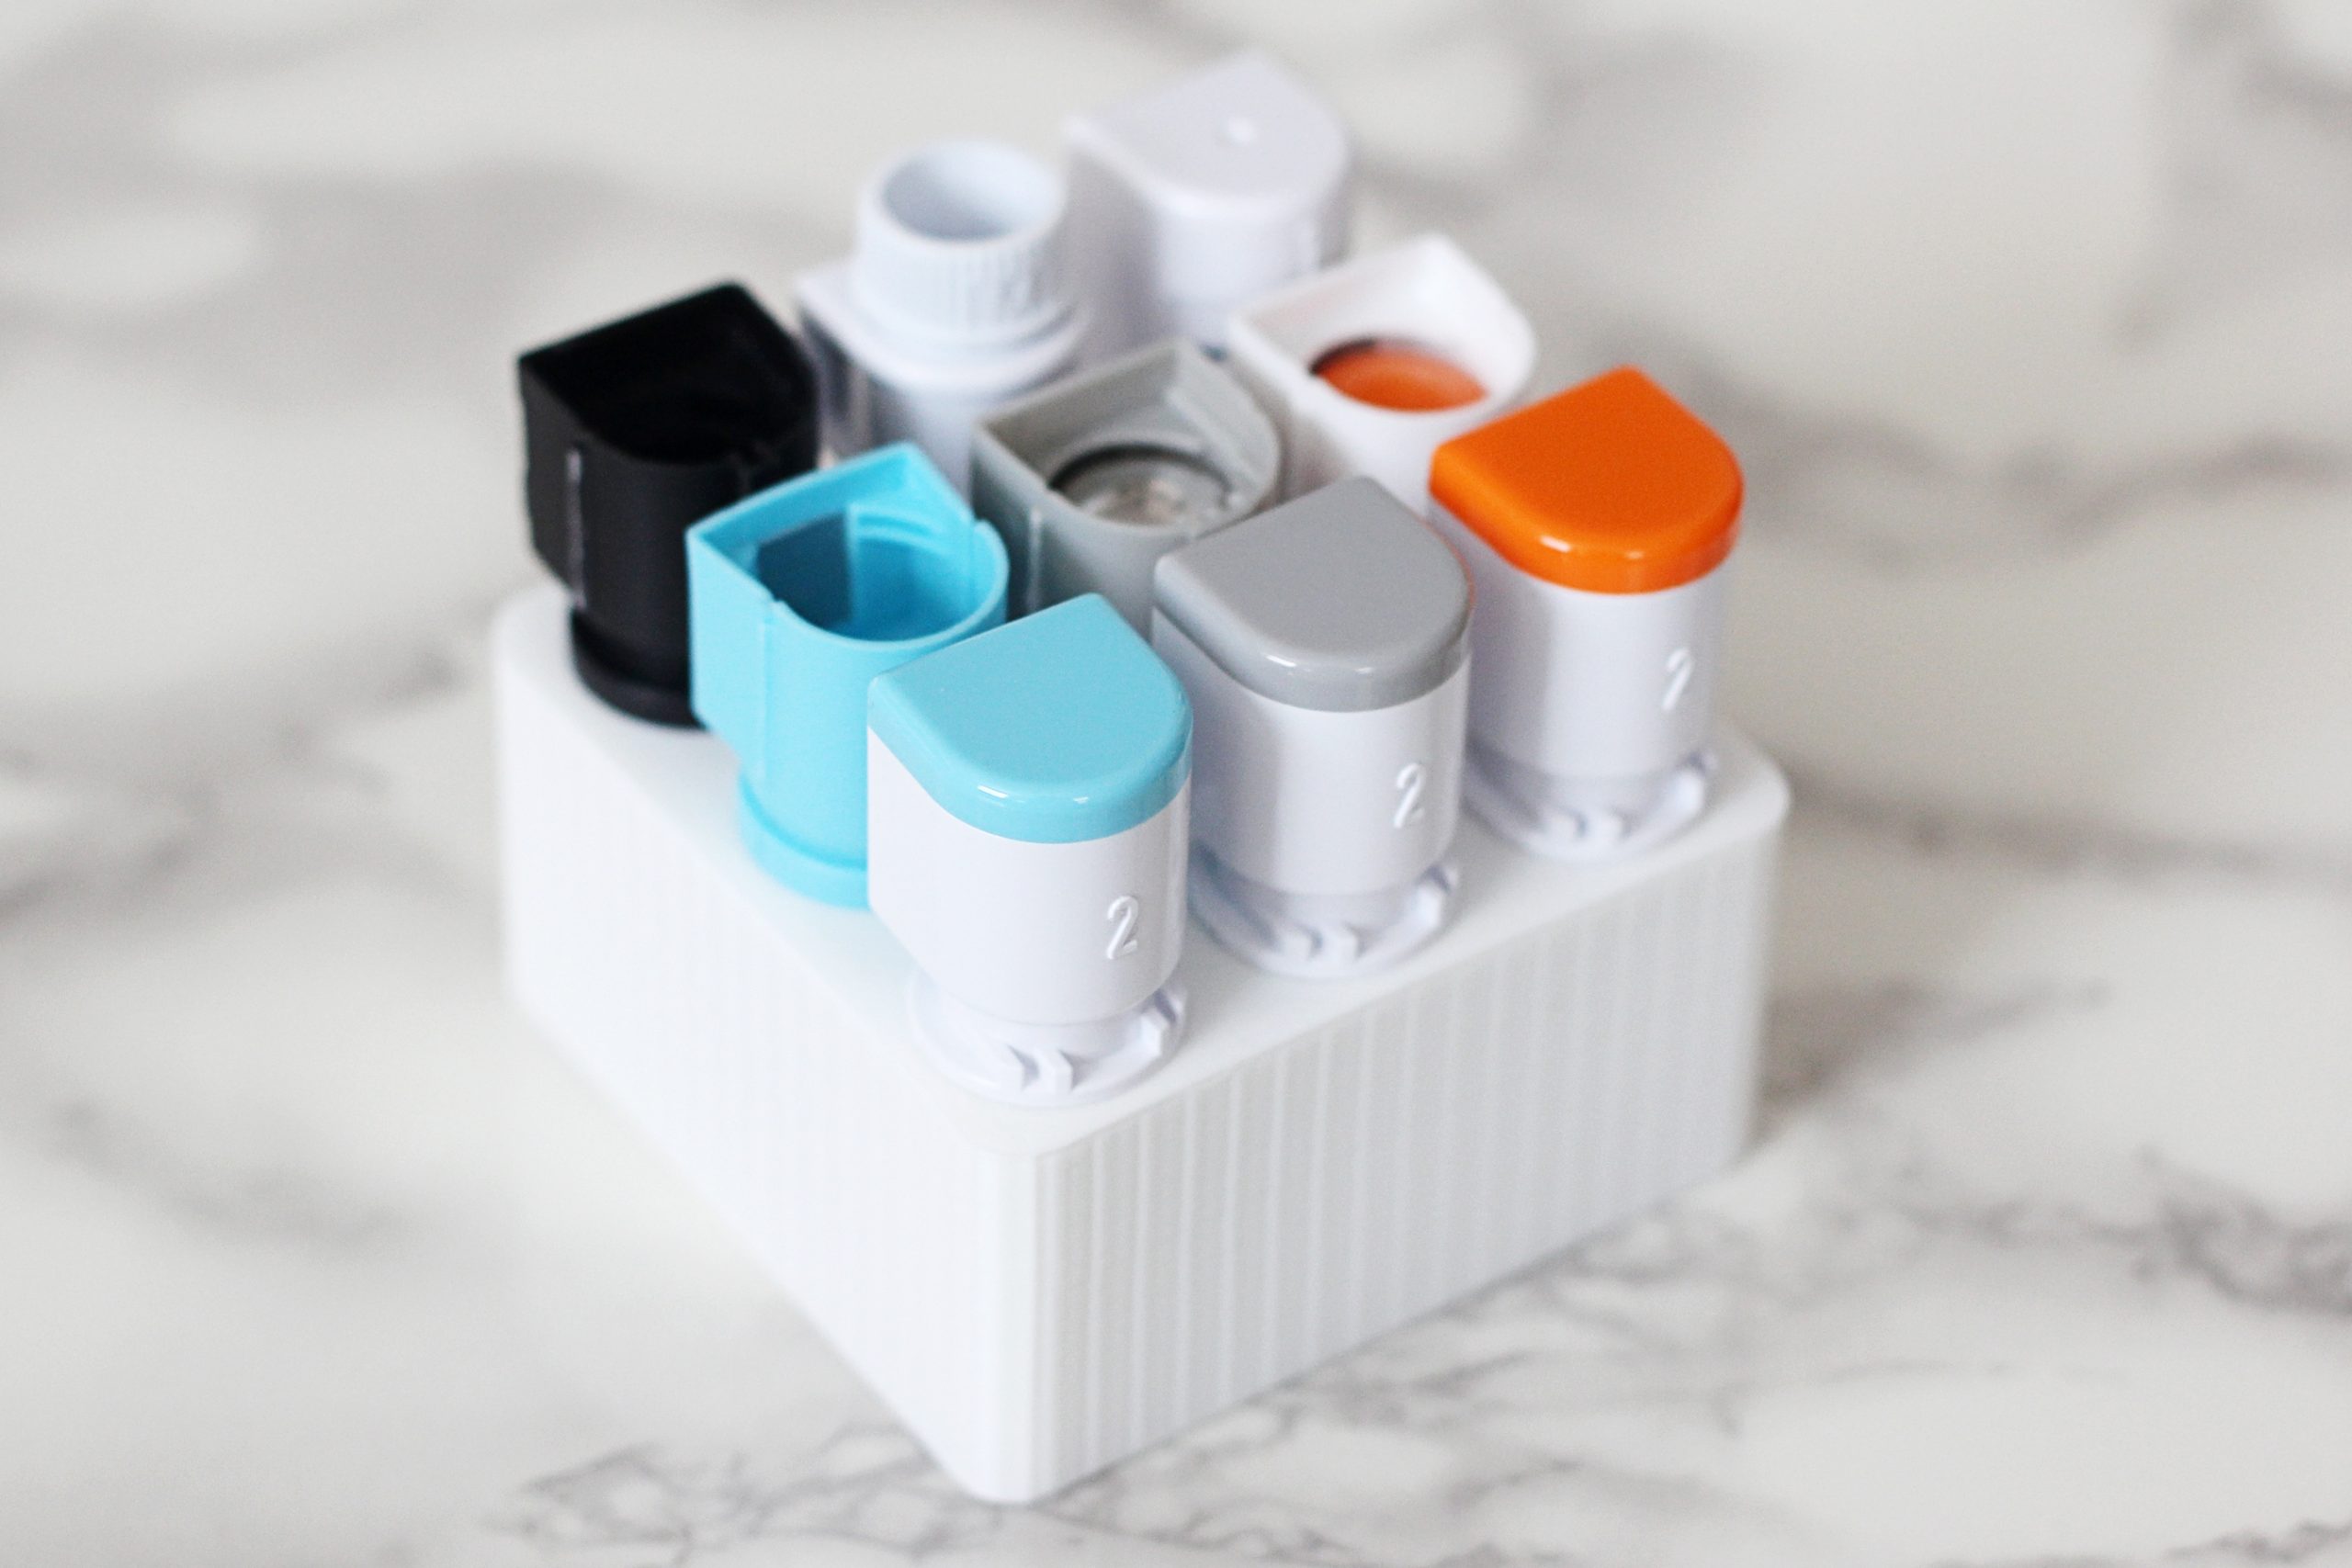
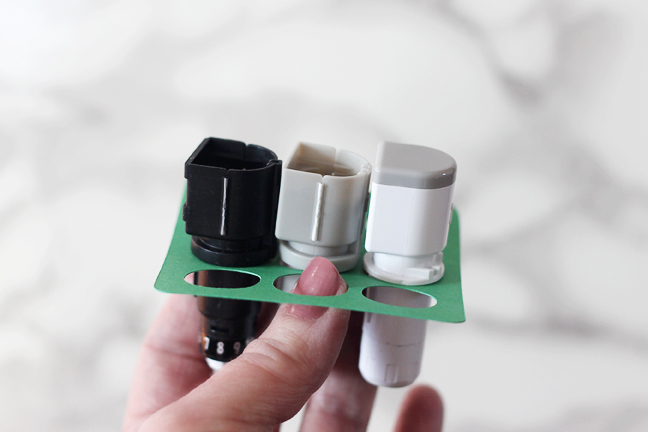
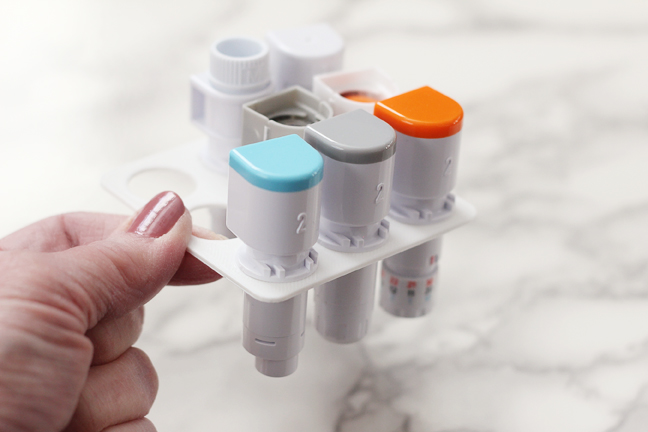
While I love making 3D prints just for fun, I like to use my Silhouette Alta® for practical uses too. Today I’m going to show you how to design your own 3D printed tool holder. I’ll show you how to make a tool holder for the Cameo 4 tools, but you can use the techniques to create other tool holders as well.
Supplies/Tools:
- Silhouette Studio® Software
- Silhouette 3D™ Software
- Silhouette Alta® 3D Printer
- Silhouette Cameo®, Silhouette Portrait®, or Silhouette Curio™ (optional)
- PLA 1.75 mm Filament
- Cardstock (optional)
To clarify, Silhouette 3D™ is the program you will use to 3D print your final tool holder with the Alta. We’ll use Silhouette Studio® (free download here) to prepare the design before opening it in Silhouette 3D™.
Step One: Prepare 2D Design
In Silhouette Studio®, use the drawing tools to create a 2D design. Feel free to adjust the sizes or shapes to suit your own design, keeping in mind that the Alta cannot print larger than 5 inches in any direction.
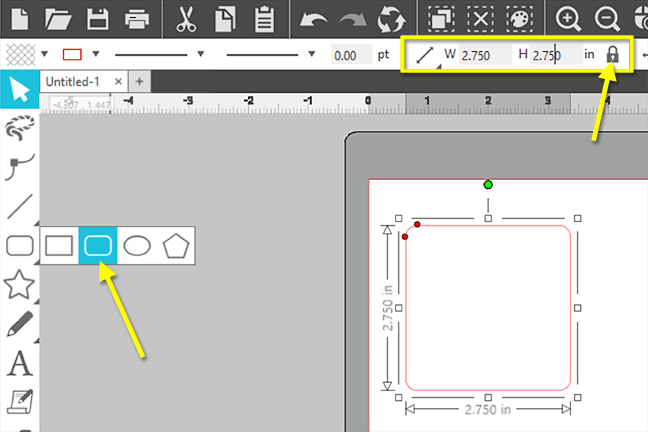
1. Use the rounded rectangle tool to draw a round-cornered square (hold Shift while dragging to make a square).
2. Select the rounded square and use the Scale tool (with aspect ratio locked) to adjust the size to 2.75 inches by 2.75 inches.
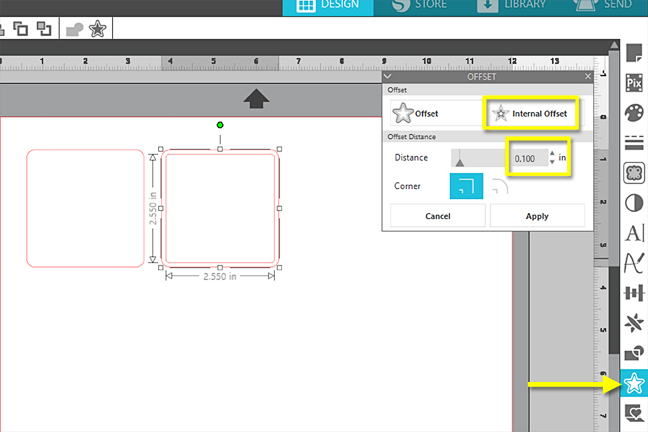
3. Make a duplicate copy of the rounded square.
4. With one copy of the rounded square, use the Offset Panel to create an Internal Offset with a distance of 0.100 inches and click Apply.
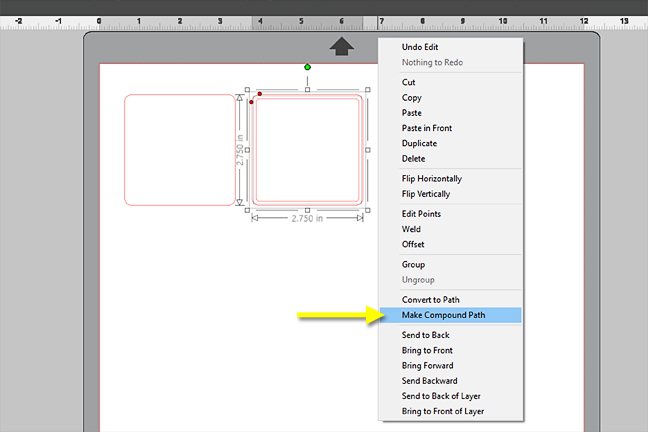
5. Select the inner and outer square together, right-click for a pop-up menu, and choose “Make Compound Path.”
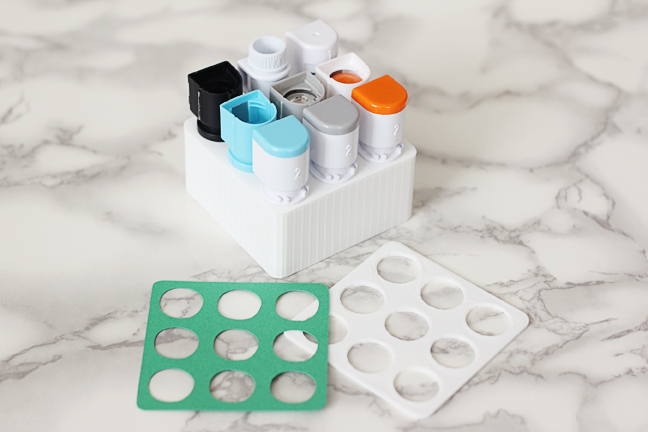
6. Fill the square with color to verify it’s empty in the middle, and then drag it aside. This piece which will be the walls of the tool holder is finished.
7. Use the ellipse drawing tool to draw a circle (hold Shift while dragging) that’s 0.687 inches. (Use the locked Scale tool again to set the dimensions exactly, as in steps 1 and 2 above.)
8. Make eight copies for a total of nine circles.

9. Draw a square exactly 2.50 inches. This will be a temporary guide for your circle placement.
10. Drag the nine circles inside of it, and then use your Align and Horizontal and Vertical Spacing functions in the Transform Panel or the Quick-access Toolbar to evenly space the circles into three rows of three. The four corner circles should align exactly with the top/bottom and side edges of the square, and then align and space the other circles accordingly.
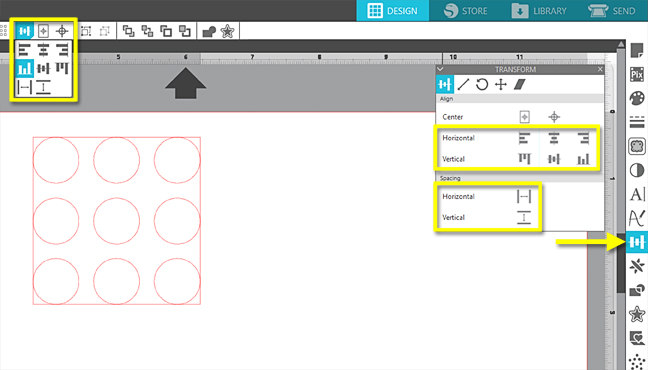
Tip: To learn more about the Align and spacing tools for Silhouette Studio® version 4, watch the first two minutes of this video on the manipulation tools available in the Transform panel.
11. Group just the nine circles together and delete the 2.5-inch square you used as a guide.
12. Center the group of nine circles within the untouched rounded 2.75-inch square you created at the beginning.
Note: To make a tool holder for original tools that fit the Portrait, Curio, and Cameo 3 or older machines, keep the same rounded rectangle shapes but make the inside circles a little smaller.
Step Two: Test the Design
1. Test this square with holes by cutting it from cardstock with your Silhouette cutting machine. This is especially important if you are creating your own design.
2. Place your tools in the paper cutout to verify the sizing and spacing is correct. Adjust as necessary before moving on.
Note: If you are strictly an Alta user and do not have a Silhouette cutting machine, move on to the next step and your testing will all be done with the Alta.
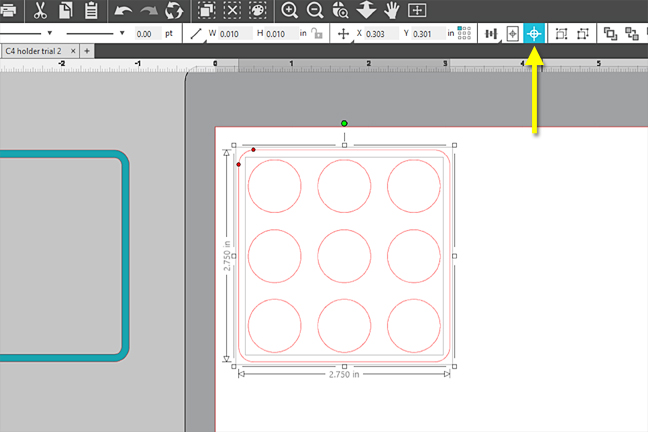
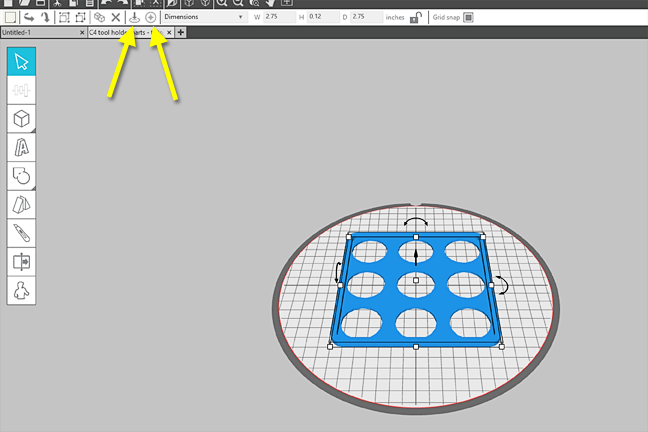
3. When your design passes the 2D paper test for hole sizes and spacing, select the circles and rounded square together, right-click, and choose “Make Compound Path.”
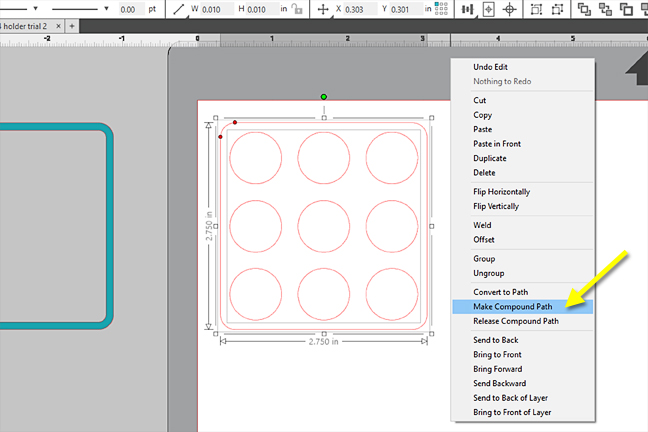
4. Fill it with color to make sure the circles are now holes, and the second piece is ready.
5. You can verify the design will fit on the Alta platform by choosing the Alta as your machine on the Page Setup panel.
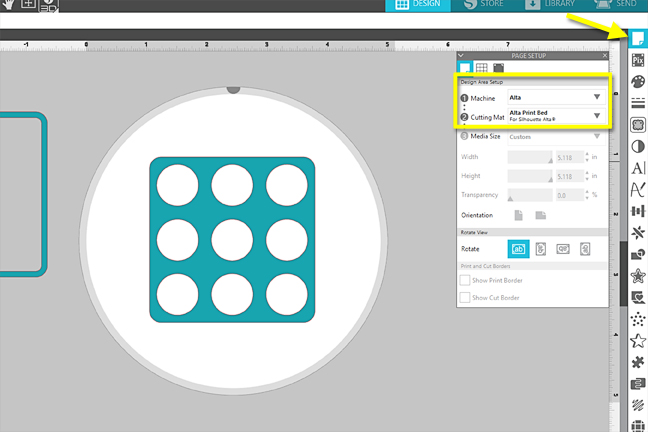
6. Save the design as a normal .Studio3 file to your hard drive.
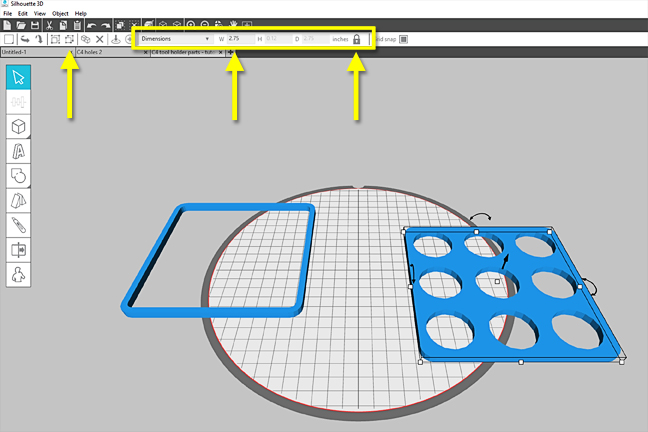
7. Open Silhouette 3D™ and open that saved .Studio3 file. Choose the Extrusion import option when prompted.
8. Don’t be alarmed if the size is off. Silhouette 3D™ tries to fit all objects to the platform upon opening.
9. Ungroup the two pieces, and then select one at a time and adjust the size back to 2.75-inch square (lock the aspect ratio first).
10. We’ll test this as a 3D print now. If your tool holes are pretty snug, you may end up with tools that fit snugly in the paper version, but are too tight in the 3D printed version due to the PLA’s contraction during printing and cooling.
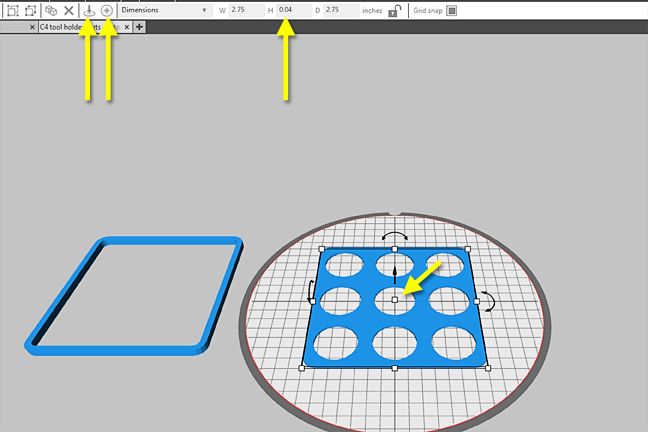
11. Prepare the square with circles for printing by selecting it, select Level to Bed, and then select Center Selection on Print Bed.
12. This can be fairly thin, so you can change the thickness by dragging the center manipulation point down or input the height dimension (unlock first) to 0.04 inches.
13. Go to the 3D Print tab and select the square with holes to print it. I use the Standard quality setting for tool holders like this.
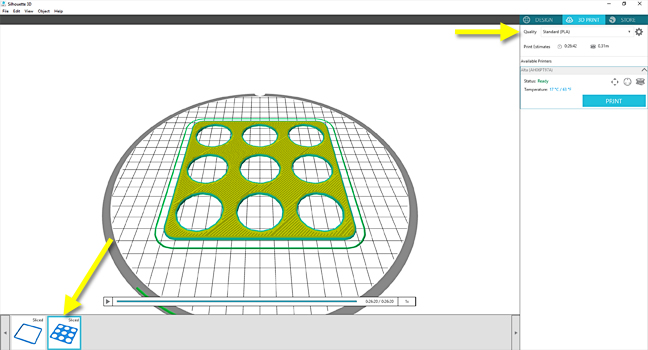
14. Prepare your platform, load the filament, and send it to print when ready.
15. When it’s finished, test your tools in the holes to make sure the spacing and fit is not too tight in the PLA version.
Step Three: Print the Tool Holder
Once you’re confident the size is going to work, make the final steps to print the whole tool holder.
1. The square with holes should still be leveled and centered to the bed. Now select the hollow square piece and again level and center to bed. This is the fastest way to perfectly align them together.
2. Unlock and input the dimensions for your outer square to 1.35 inches high. I’ve measured this for the tallest tool (the Cameo 4 pen holder) so the tools can all hang freely without adding significant extra height (which would add time to the print).
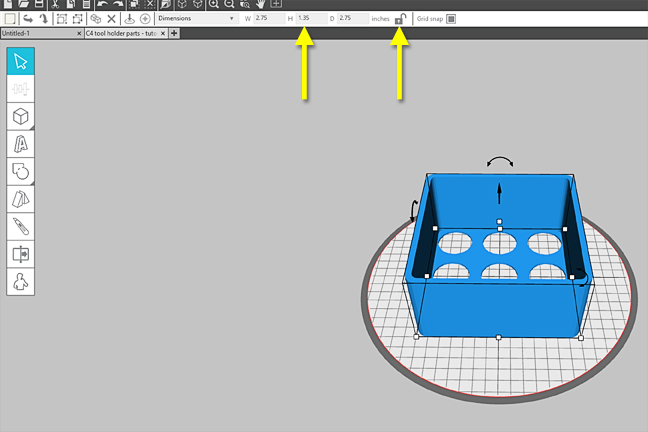
3. Select and GROUP the two pieces together so they print as one merged piece.
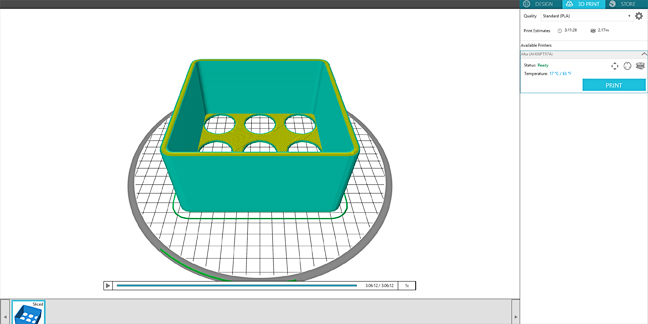
4. Go to the 3D Print tab once again, and this time it should be a single piece that can be printed on the same quality setting you used before.
5. Print it upside-down because the top is flat, and this way there is no overhang with hollow space to worry about adding supports.
Tip: Use a fresh, smooth piece of Alta platform tape. You may also wish to rub a little glue stick on the platform tape to help the first layer adhere and avoid warping at the corners.
Now you’ve got a nifty little tool holder for your Cameo 4 tools! Don’t be afraid to experiment with designing other types of tool holders using drawing tools in Silhouette Studio® or 3D shape creation tools in Silhouette 3D™.
 Free Class - Father's Day Apron Set
  Free Class - Custom Graduation Tumbler
Nasze Naturalne
September 3, 2025
Your authentic voice really shines through in everything you create and share
Naszenaturalne
September 2, 2025
Really love your style
Kelly Wayment
June 28, 2024
You can use it with vinyl as long as it is smooth and flat to allow the static charge to hold on to it. Rolled vinyl that wants to go back to its rolled shape will not necessarily work well, and it would need to be trimmed to fit the ES mat cutting area.
Kelly Wayment
June 28, 2024
Yes, you can use the heat pen while using the ES mat. 🙂
Yurii
March 2, 2024
Hello. May it be used with heat pen?
Thanks
Jerome
February 24, 2024
Hi, works this with the normal vinyl foils or only with printer papter etc?