
I don’t know if you guys have noticed but Silhouette has created new awesome wood vinyls. They come in three colors: Ebony, Maple, and Walnut.
This is my first time using this vinyl material, and I am amazed at how my project turned out.
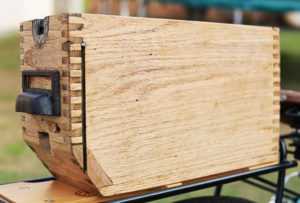
What is my said project, you ask? Well, I’ve always had a rack on the back of my bike but no storage basket. So I took a vintage box I purchased from my local flea market and attached it onto my bike rack. To personalize it, I decorated it with my favorite Monstera plant using Silhouette’s new wood vinyl.
Supplies Needed:
- Silhouette CAMEO®, Silhouette Portrait®, or Silhouette CURIO™
- Silhouette Studio®
- Silhouette Cutting Mat
- Silhouette Blade
- Silhouette Wood Vinyl (Walnut)
- Vinyl Transfer Tape
- Utility Knife
- Ruler
- Design ID #134210
Step One: Measure the Box
Even though I had no clue what direction I was going to place the Monstera decals, I still measured the box because it helps to know the area you are working with.
Step Two: Open Silhouette Studio®
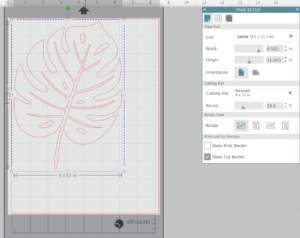
- Open your Page Setup panel.
- Since I’m using my Portrait 2, I changed the size to “Letter” and the cutting mat to “Portrait.”
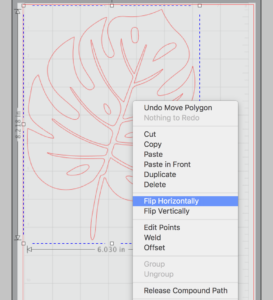
3. On my second and larger Monstera leaf, I wanted to go in the opposite direction. It’s as simple as right clicking your mouse and choosing “Flip Horizontally.”
This will make your leaves more appealing and not so uniform.
Step Three: Cut the Tropical Leaves
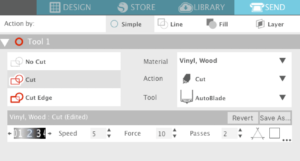
- When you’re ready to send your design to your machine to have it cut, chose “Vinyl, Wood” as your material.
- Your blade will automatically be set on 1, but I found that I would have to do 4 passes in order to cut through the wood vinyl with that depth setting.
- So manually change your Autoblade to 2 and adjust the number of passes to 2.
Step Four: Place the Monstera Decals onto the Box

I just eyeballed the placements of the decals and this is where you would use your utility knife to slice off the excess vinyl that goes over the edge of the box.
I am over the moon about how this project turned out. It looks like the leaves are stained or engraved on the wood. It’s quite amazing.
Give this wood vinyl a try. I promise you will not be disappointed.
Kelly Wayment
June 28, 2024
You can use it with vinyl as long as it is smooth and flat to allow the static charge to hold on to it. Rolled vinyl that wants to go back to its rolled shape will not necessarily work well, and it would need to be trimmed to fit the ES mat cutting area.
Kelly Wayment
June 28, 2024
Yes, you can use the heat pen while using the ES mat. 🙂
Yurii
March 2, 2024
Hello. May it be used with heat pen?
Thanks
Jerome
February 24, 2024
Hi, works this with the normal vinyl foils or only with printer papter etc?
Kelly Wayment
February 16, 2024
Once you’ve pushed the mat up against the rollers, just press the “Load” arrow button (bottom right on the display). Does a regular sticky mat load into the machine for you?
Michelle a goodall
January 24, 2024
Hello! I just got my new electrostatic mat and have watched every video i can find on it. However, what i can t find is why it wont feed into my cameo 5/ it slides right up the rollers but wont go any further. and yes- iam pushing the into button. help!