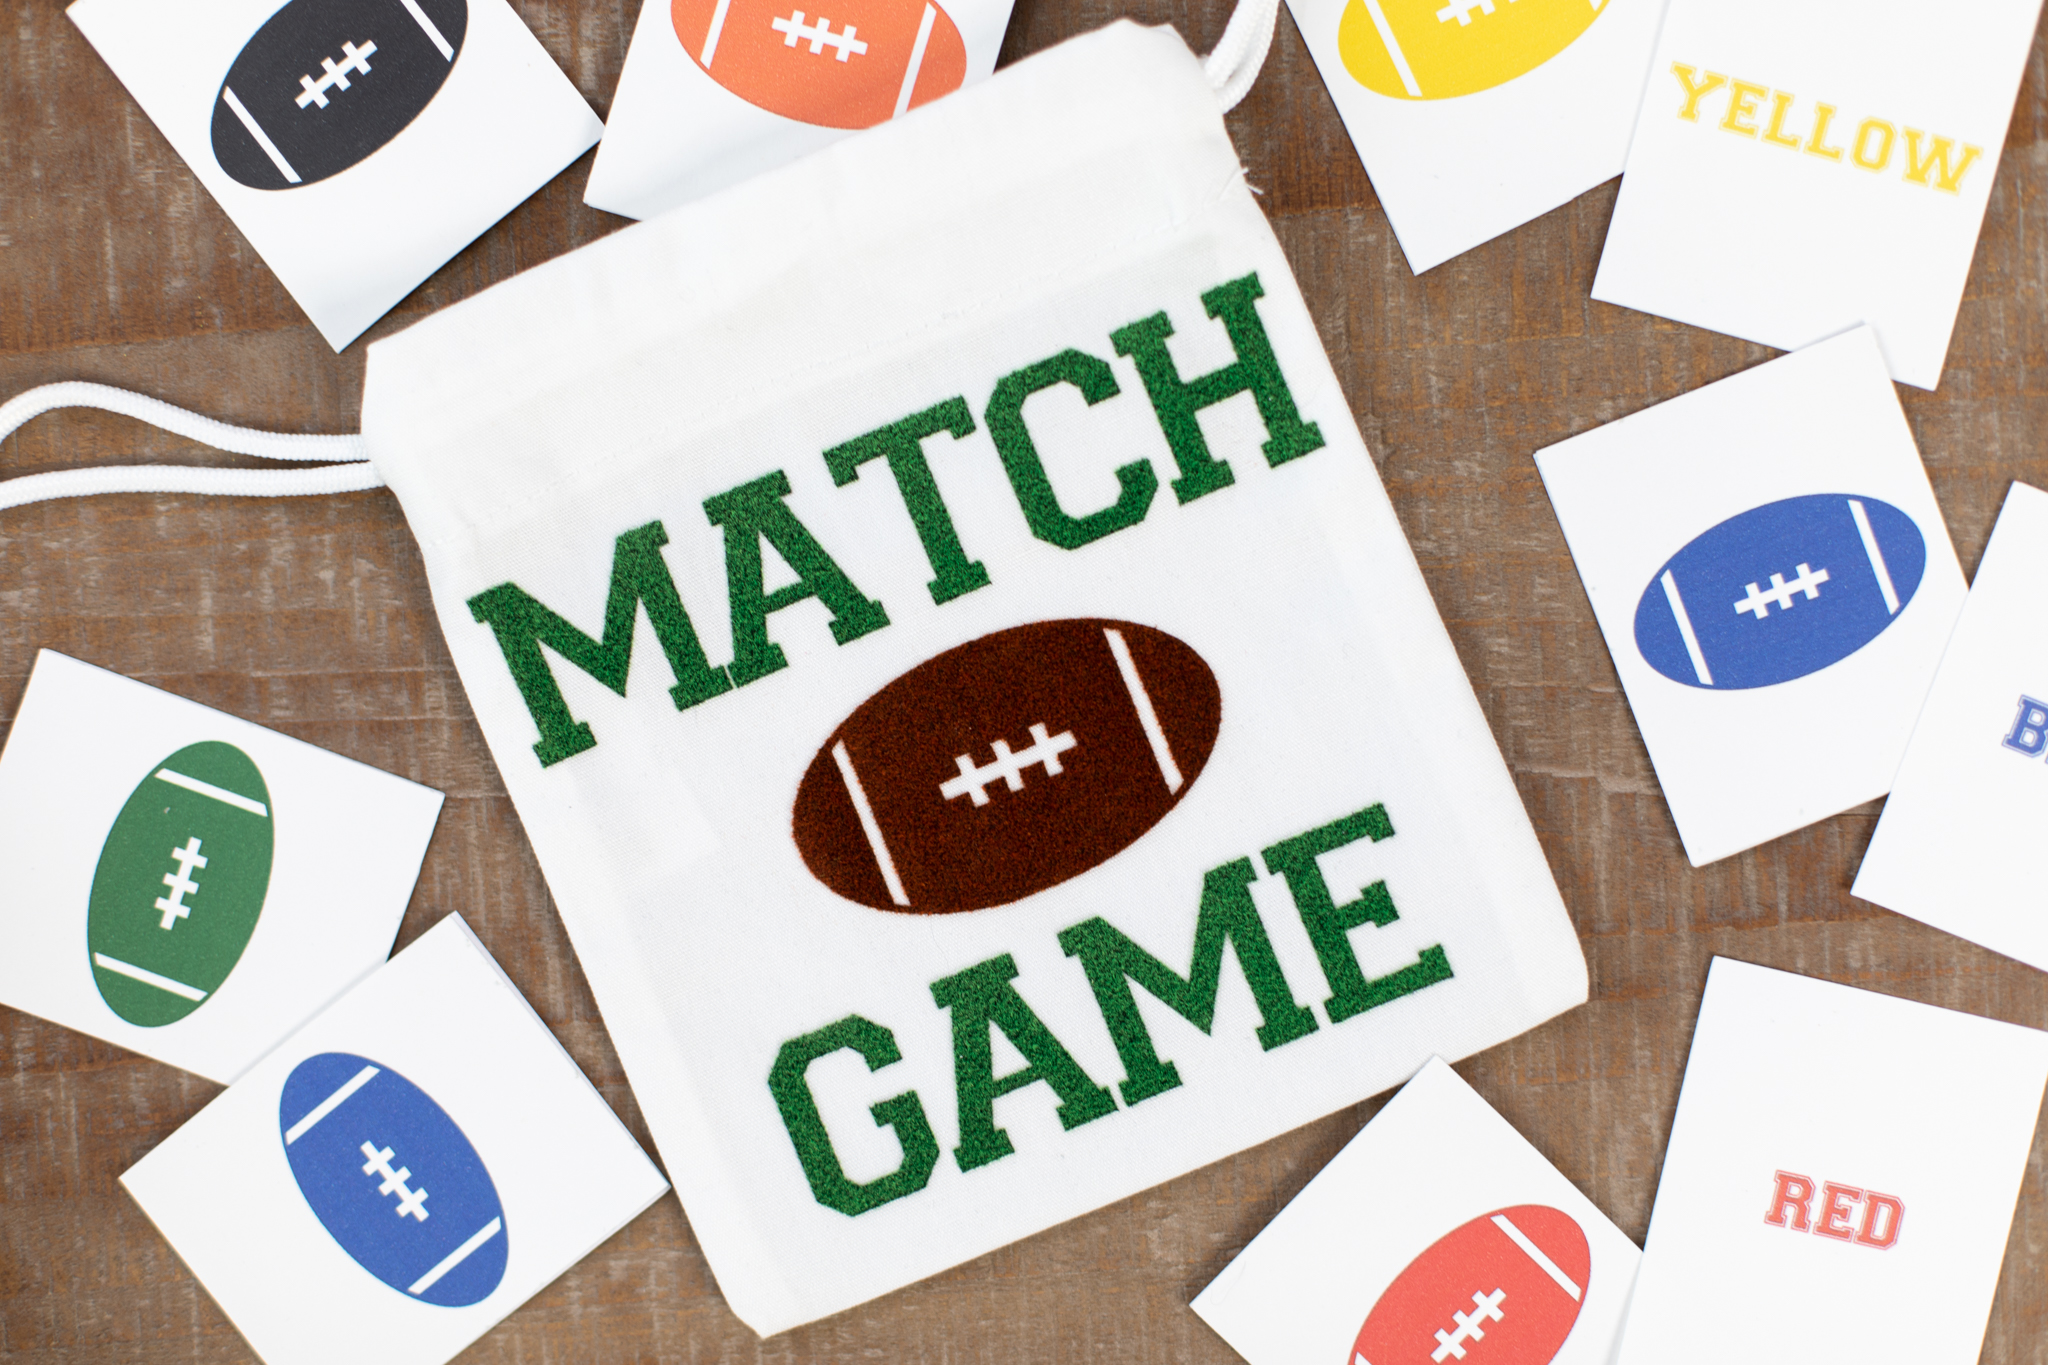
Are you ready for some football? Well, at least a fun football matching game for your little one! With Silhouette Studio, you can take any design from the Silhouette Design Store and customize it to fit your needs. We’re going to use one design and change the colors to create a matching game to teach children about different colors. We’re also going to use flocked heat transfer material to decorate a bag to store the game in! We used a Portrait 3 for this project, but you can also use the Cameo 4. Come along and learn how to create this fun, educational game.
Supply List:
- Silhouette Portrait® 3 or Cameo® 4
- Silhouette Studio® Basic Edition
- Silhouette Hook Tool
- Flocked Heat Transfer – 12 Inch Brown
- Flocked Heat Transfer – 12 Inch Light Green
- White cardstock
- Patterned paper
- Printer
- Adhesive of choice
- Drawstring pouch
- Fabric scissors
- Iron
- Design ID #225795 by Lori Whitlock
- Design ID #377262 by Silhouette
Step One: Design The Football Card
Before we draw anything on our page, we need to setup our document in Silhouette Studio® for Print & Cut. Go to the Page Setup Panel in the toolbar on the right side of the screen. Your design area setup settings should look like this:
- Machine: Portrait 3
- Cutting Mat: Portrait 3
- Media Size: Letter
Now, go to the Registration Marks tab. This is where we’ll turn on our registration marks so we can print our cards onto cardstock before cutting them. This is an important step because it makes sure your machine cuts accurately! Simply turn on the registration marks at the top of the panel and keep the default settings that are automatically enabled.
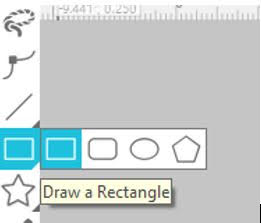
We’re ready to start creating the base of our cards. Select the Draw a Rectangle tool in the toolbar on the left side of the screen. Hover over the tool until you see a variety of shapes you can choose from. Select the rectangle tool and draw a rectangle that is 2.5 in. tall and 2 in. wide. Don’t worry about making these measurements exact the first time; you can use the Scale Tool in the Quick Access Toolbar at the top of the screen to adjust the size.
Now, open Design ID #377262. This will open the football design in your document. Resize the football so it fits inside your rectangle—these measurements don’t need to be exact. Finally, select both the rectangle and the football, go to the Align Tool in the Quick Access Toolbar, and select “Align Center – Middle.” This will center your football to your card!
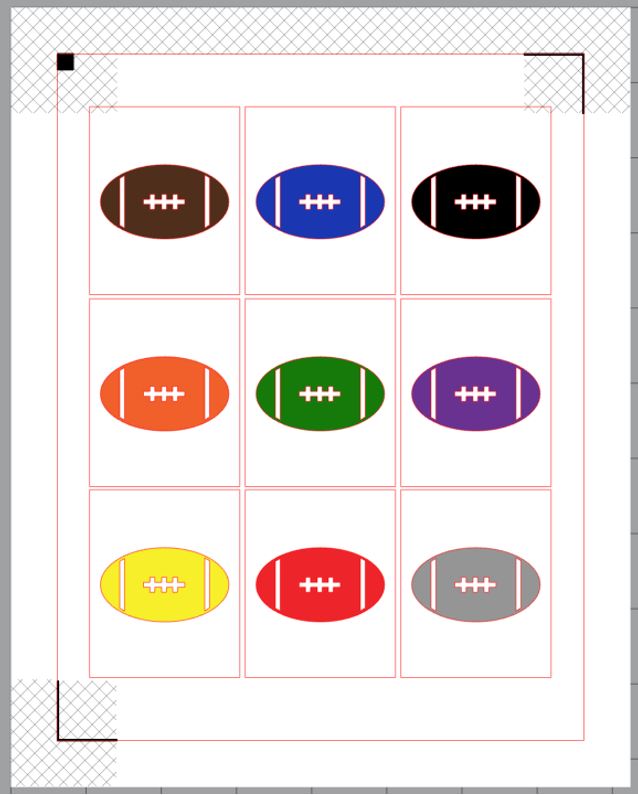
The last thing we need to do is duplicate our card design to create a total of nine cards. We’re going to group the two shapes together temporarily so we can create our page layout more easily. Select both of your shapes, right-click, and select Group. Then, right-click again and select Duplicate. Do this until you have nine cards. Arrange them on your page so none of them overlap with the registration marks or each other. Lastly, select all of your cards, right-click, and select Ungroup. This will make it easier for us to recolor the footballs in the next step.
Step Two: Select Football Colors
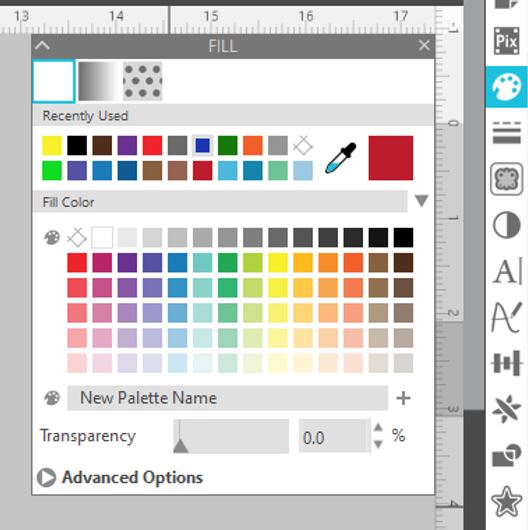
Recoloring designs is incredibly simple using the Fill Panel. Open this tool by clicking the paint palette icon on the right side of the screen. Now, click on one of your footballs and recolor it by clicking on the color you want it to be. You can use the default colors at the top of the panel, or you can click Advanced Options to choose the exact shade you want. Repeat this step for all of your cards.
Step Three: Cut Out the Cards
It’s time to print out our cards! Make sure that nothing is overlapping with the registration marks or the crosshatching areas, then click the Print icon at the top of the screen. Print out two copies onto white cardstock.
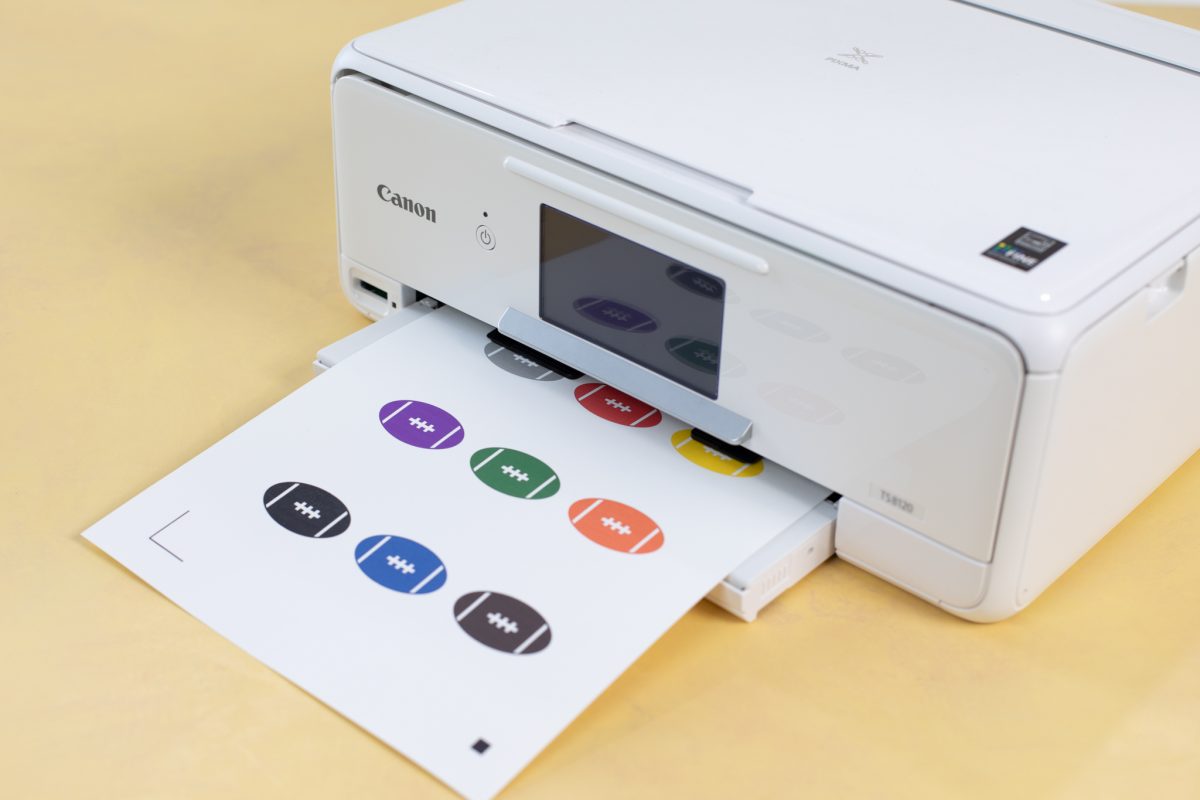
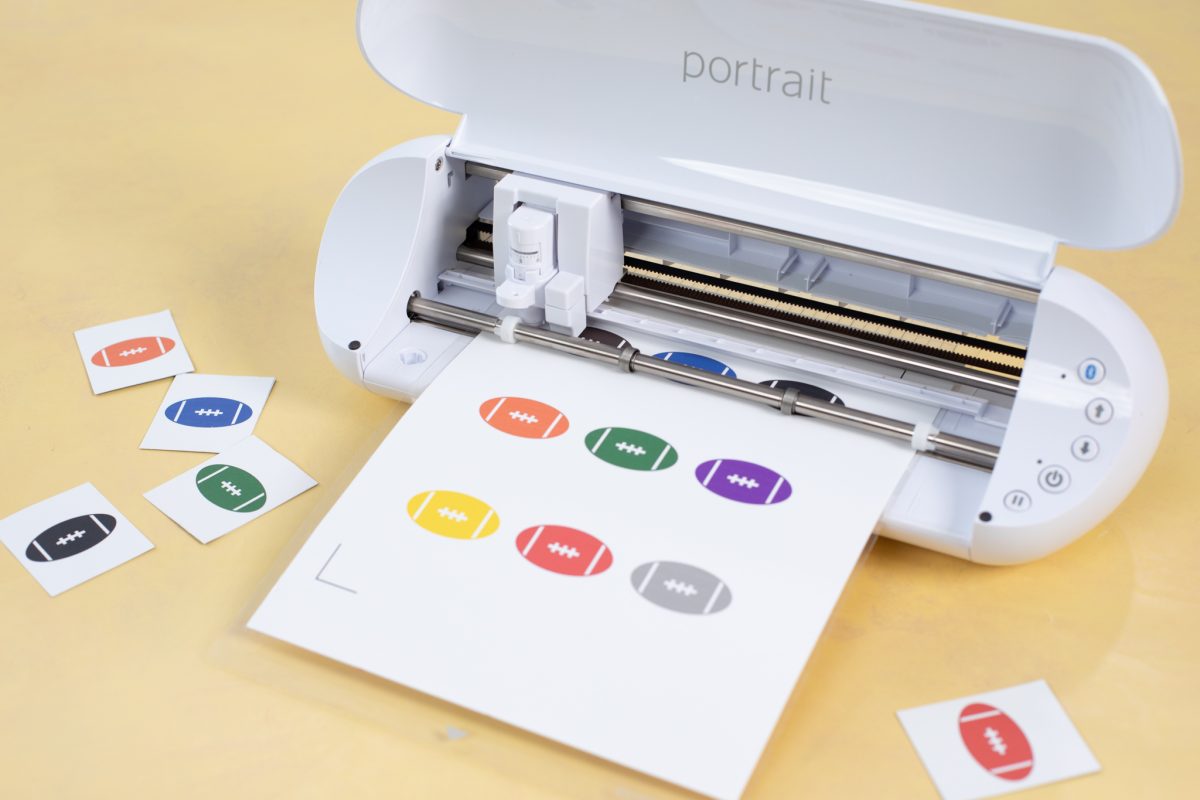
Next, place one of your cardstock sheets onto your cutting mat with the square registration mark in the top-left corner and load the mat into the machine. In the Send Panel in Silhouette Studio, select that material and blade you’re using. For this project we used the “Cardstock, Plain” material setting and our AutoBlade.
Click the Send button to send the cut job to your machine. Before cutting, the blade carriage will scan the registration marks in the corners of the page. Once it’s located all of them, it will begin cutting all of your cards. When the machine is finished cutting, unload the cutting mat, remove the cardstock from the mat, and place your second sheet of cards. Repeat this process with your second page.
Step Four: Cut Out Card Backings
We wanted to add a cute backing to our cards so you can’t see any of the colors through the back of the cardstock, so we picked up a sheet of scrapbook paper. If your cardstock is thick enough so you can’t see any of the design on the front, feel free to skip this step.
Open a new document in Silhouette Studio® and adjust the Page Setup Panel settings for our new material. Because we’re using 12 x 12 in. paper for these card backings, we selected that as our media size.
Repeat the same process to create a rectangle as we did in Step One. However, we do not need to add any other designs to the center of the card. We need a total of 18 card backings, and instead of duplicating this rectangle 18 times, we can use the handy Replicate tool. With your rectangle selected, go to the Object tab at the top of the screen, click Replicate, and then click Fill Page. This will create a grid of card backings that are evenly spaced onto your page!
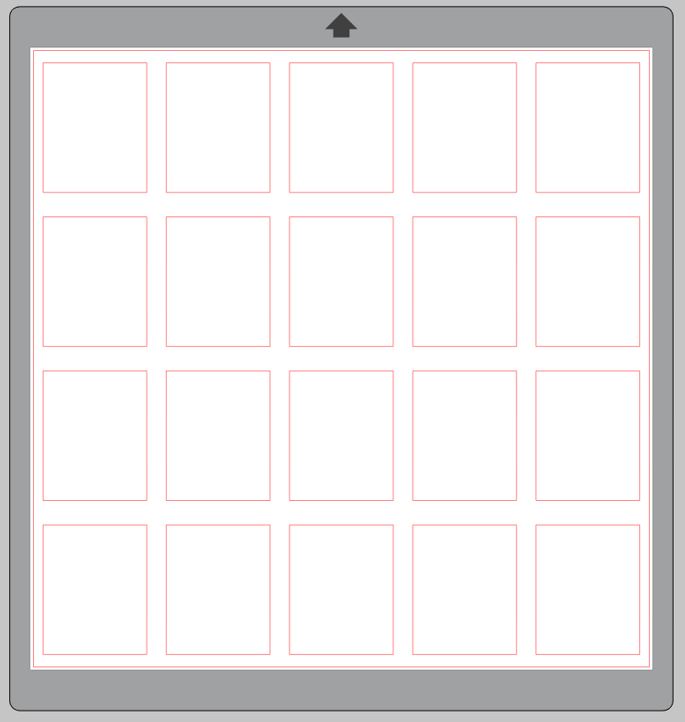
Note: If you’re using 12 x 12 in. paper like we are, you’ll be able to fit all 18 onto one sheet. However, if you’re using a smaller media size, you may need to cut your card backings out of two patterned paper sheets.
We’re ready to cut out our card backings. Position your patterned paper onto your cutting mat and load it into the machine. Select your material and blade settings in the Send Panel—we’re using the same settings as we did for our cardstock pieces. Send the job to your machine.
Step Five: Assemble the Cards
All that’s left to do is to attach the two card pieces! Use your preferred glue or tape to place the back of the football card on the back of your patterned card backings. We love how this football patterned paper looks for our game.
With that, we’re done creating the cards! To add more difficulty as your little one grows, you can change one of the football cards to words of the colors.
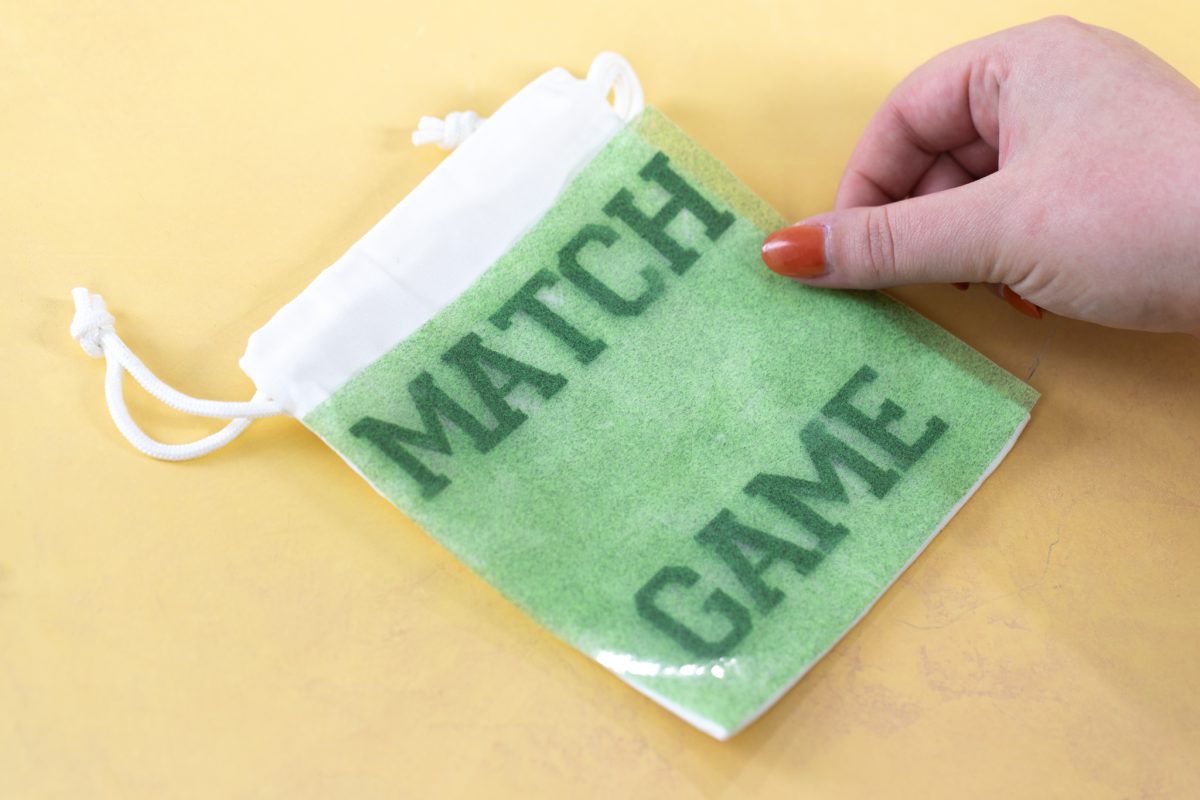
Step Six: Design the Bag
It’s time to create a bag to store our card game inside. We’re going to use flocked heat transfer on a drawstring bag. This is a unique heat transfer material that behaves like the heat transfer vinyl you might be used to, but it has a velvety felt-like finish that goes great with textiles, like our bag. It can also be cut without a mat, like our other vinyl and heat transfer rolls. However, we’re going to cut the pieces we need off of the roll and place them on a cutting mat to save as much material as possible.
Before we design anything, measure your bag. We want to make sure our bag design will fit onto it! Our bag is 5 x 6 in., so all of our design elements need to be smaller than that. Draw a 5 x 6 in. rectangle on your design page, using the Scale tool to make sure your measurements are exact.
Let’s start with the font. Create a new document in Silhouette Studio® and open up Design ID #225795, the Varsity Font by Lori Whitlock. Instead of loading the design onto the document like the football did earlier, this will open the Text Panel with the font selected. From here, we can type out our text. We typed out “match” and “game” into separate text boxes so we can move them around. Move the text to the top and bottom of the 5 x 6 in. rectangle and use the Align tools in the Quick Access Toolbar to make sure they’re centered with the rectangle. Group the text and rectangle together.
Next, open up Design ID #377262, the same football we used for our cards. Resize it so it fits in between the top and bottom row of text we created. Because we’re going to cut it out of a different heat transfer color, move it to the other side of the design page and draw a rectangle around it.
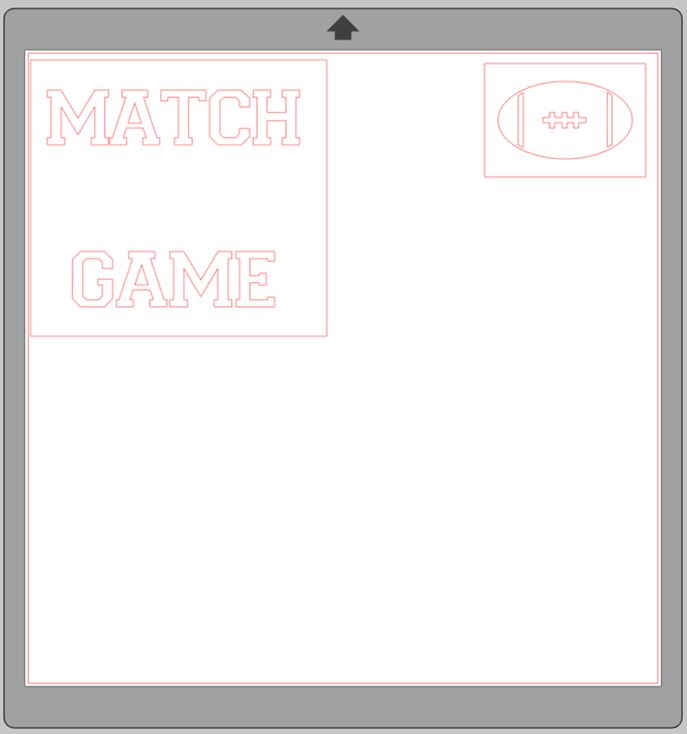
Note: The size of this rectangle doesn’t matter for your design, but you’ll want it to have clean measurements you’ll be able to cut out of the heat transfer easily. Our rectangle is 2.5 x 2 in.
It’s important to mirror your design when you work with heat transfer so that your design appears right side up when you iron it onto the bag. Select all of your shapes and click on the Object tab at the top of the screen. Select Mirror and Flip Horizontally.
Step Seven: Cut the Design
We need to cut out our small heat transfer rectangles before we send any cutting jobs to the machine. Remember that this step is optional—we’re cutting down our heat transfer so we can save material, but you can also cut your elements directly from the roll. Use a ruler to measure out a 5 x 6 in. rectangle on the green flocked heat transfer and a 2.5 x 2 in. rectangle on the brown. Cut them out using fabric scissors.
Because we’re cutting our design out of two separate heat transfer colors, move the football design onto the gray holding area to the side of the design page, leaving only the rectangle with text. Adjust your media size setting in the Page Setup Panel to 5 x 6 in. to match this rectangle, and make sure it’s centered to the page. Apply the green rectangle to your cutting mat with the glossy side down. Load the mat into your machine.
Note: Make sure that your heat transfer is lined up with the top-right corner of your cutting mat and that your material matches how the virtual cutting mat looks in Silhouette Studio®. Otherwise, your design may cut incorrectly.
In the Send Panel, set your machine to the right material and blade settings. We used the “Heat Transfer, Flocked” setting and our AutoBlade. Send the project to your machine.
Once the cutting is finished, remove the mat from the machine. Use your hook tool to weed out any unwanted heat transfer pieces, leaving only your design.
It’s time to cut out the football. Move the text rectangle off of the design area in Silhouette Studio® and replace it with the football. Adjust your media size settings to 2.5 x 2 in. to match this rectangle, and make sure it’s centered to the page. Follow the same steps to load your heat transfer into the machine, cut out the football, and weed your design.
Step Eight: Assemble the Bag
It’s time to assemble your bag! Turn on your iron, using a medium heat setting with no steam. While that heats up, center the wording on the bag. When it’s placed where you want it, apply the text by using the iron with medium pressure. Remember to always use a thin towel or wax paper between the transfer tape and the iron, otherwise you might scorch the heat transfer or the bag!
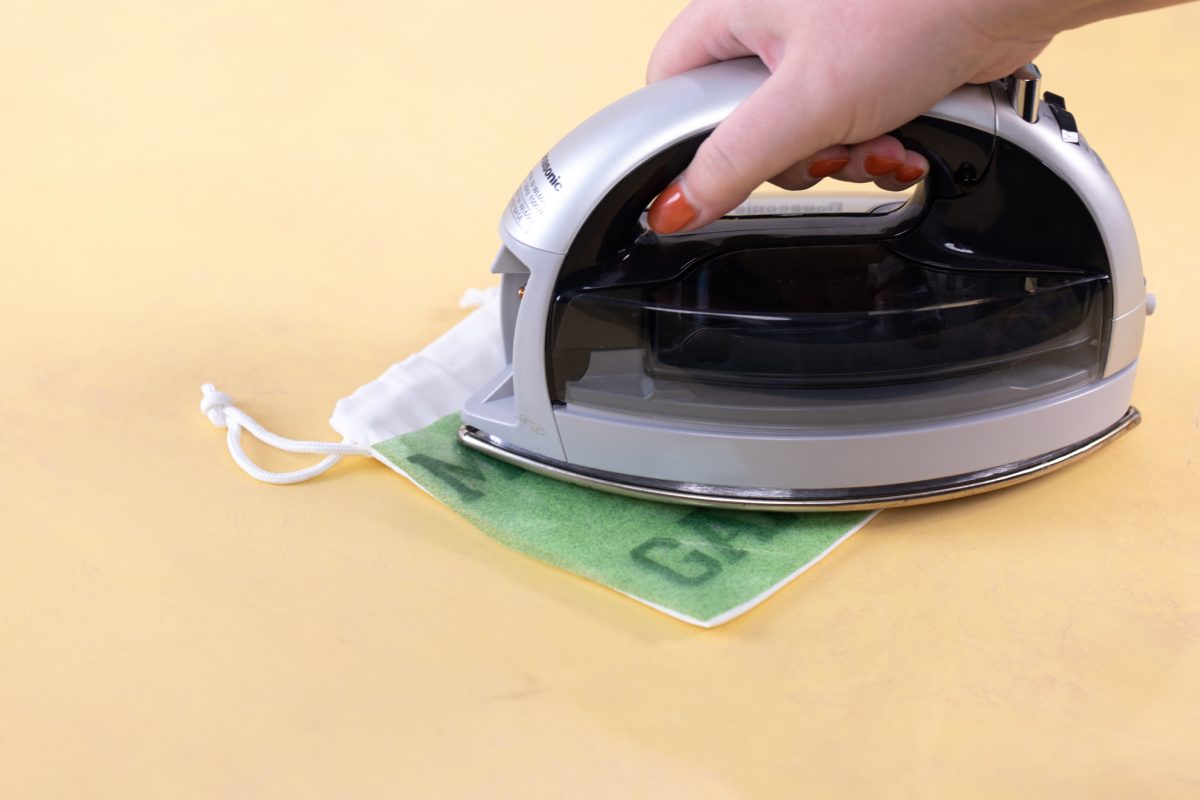
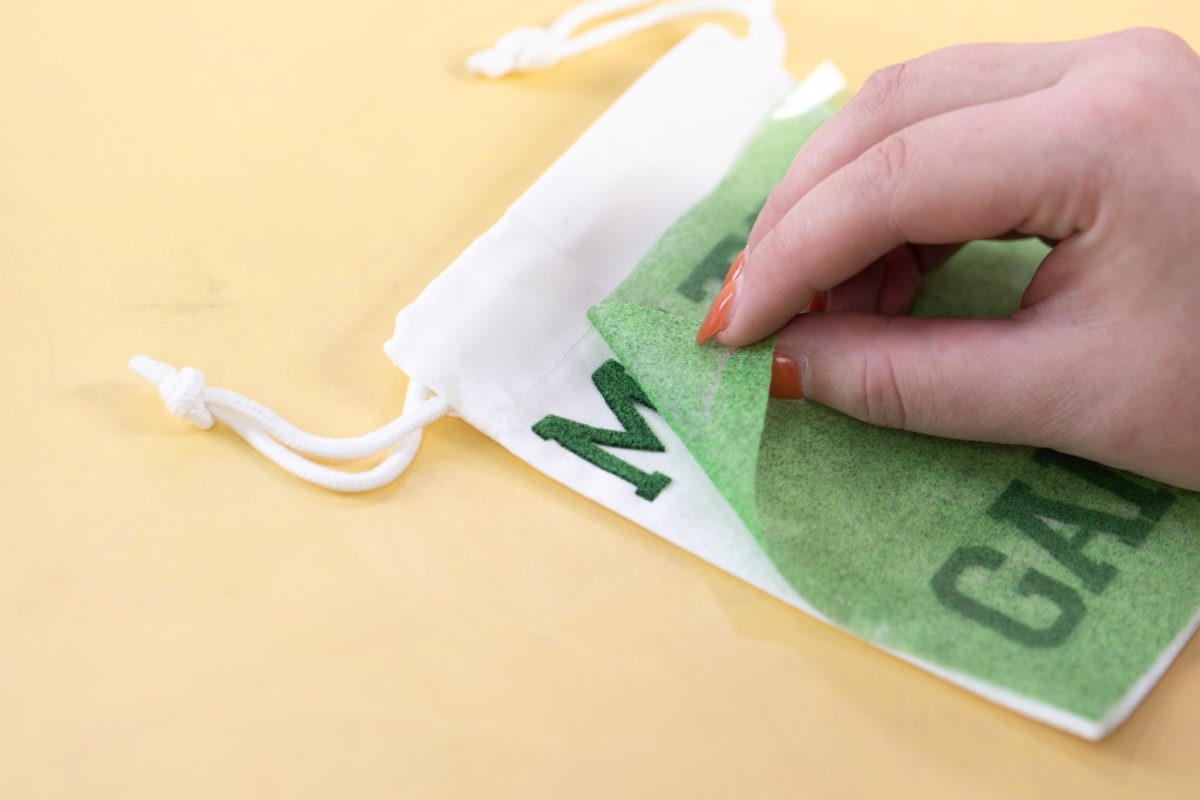
Press the heat transfer onto the bag for about 60 seconds. Gently peel the corner of the transfer tape to see if the heat transfer is adhered to the bag; if it’s not, continue pressing until the text is completely attached. When you’re sure that the text is fully ironed onto the bag, remove the transfer tape. Place the flocked football image onto the bag and repeat these steps.
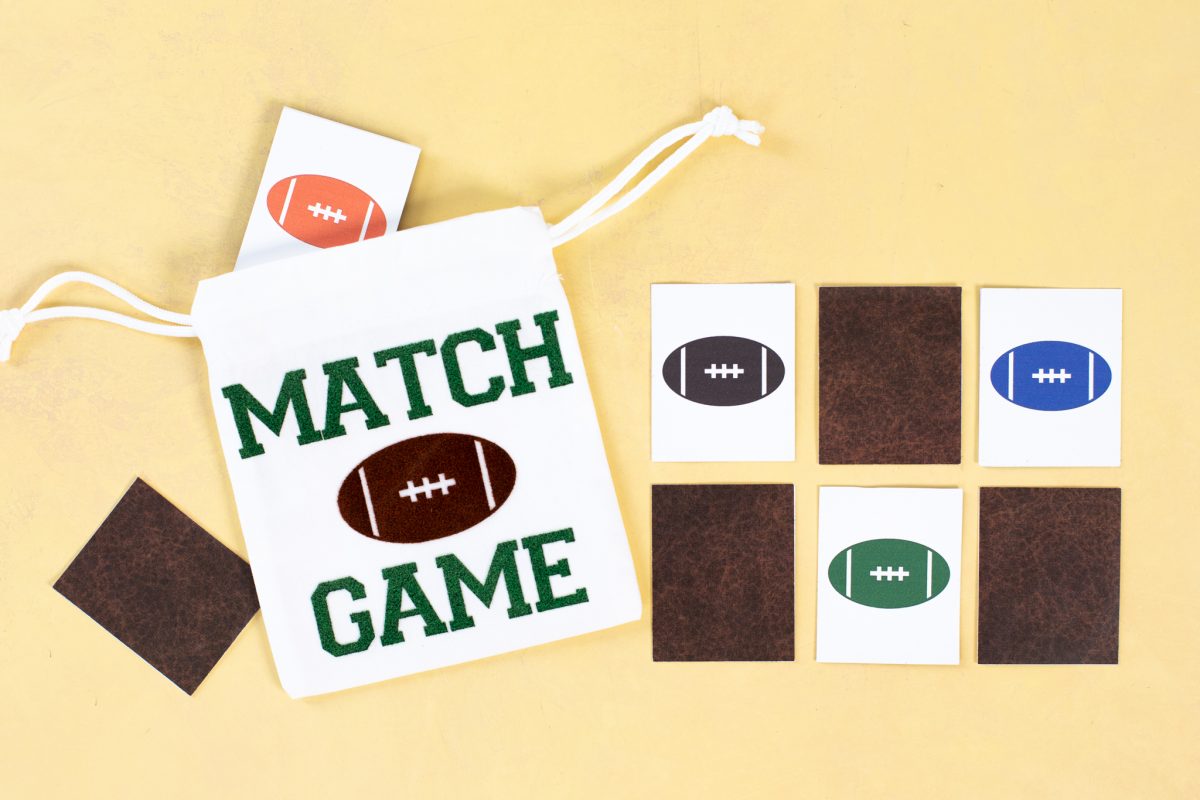
Your football matching game is officially complete! We created both the game itself and an adorable storage bag to keep it nice and organized. Have you created your own games with your Silhouette machine? Let us know below!
 Free Class - Father's Day Apron Set
  Free Class - Custom Graduation Tumbler