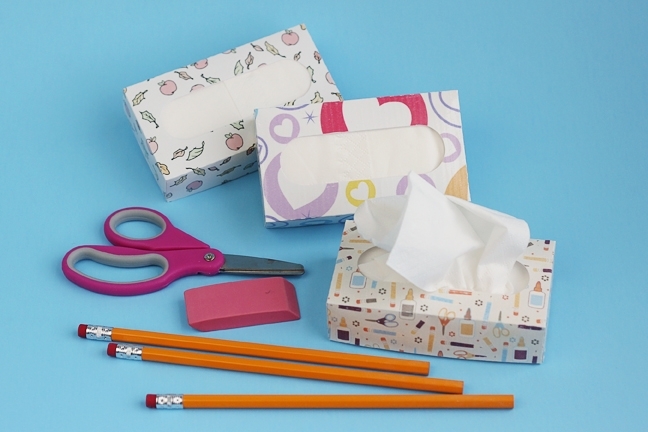
Can you believe how fast the past three months have flown by? Here in the states, it’s back-to-school season so I’ve created a duct-tape project to share with you. Does duct tape remind you of school, or is it just me? With Silhouette’s help, this is about as easy as it gets!
Did you know Silhouette makes duct tape sheets that can be cut with the CAMEO, Portrait, or Curio? And better yet, this material is printable so you can choose any pattern you like!
Supplies Needed:
- Silhouette Printable Duct Tape Sheets – White
- Silhouette CAMEO, Portrait, or Curio (requires larger base)
- Inkjet printer
- Favorite adhesive
- Travel-size tissues
- 3D Travel Sized Tissue Box (Design ID #62411)
- Apple Printable (Design ID #93637)
- Rainbow Hearts Printable (Design ID #92800)
- Draw Cut Glue Pattern (Design ID #31618)
Step One: Create the Design
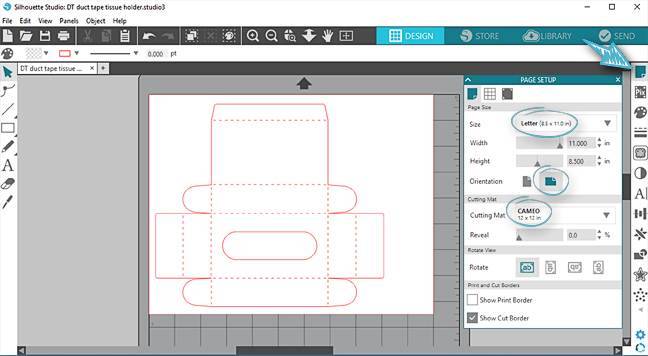
1. Open the Travel Sized Tissue Box design.
2. Group all the pieces together, if necessary (use the handy Quick Access Toolbar at the top or Object > Group).
3. Set up your page size in the Page Setup Panel (top panel on the right side of the page):
- Size = Letter (to match the letter-size duct tape sheet)
- Orientation = Landscape (you don’t want to resize this design, and it will only fit on the whole page one way)
- Cutting mat = CAMEO 12 x 12 in (or the mat appropriate to whichever machine you are using)
4. Drag the design to position it on your page so it’s completely within the cut borders.
Step Two: Fill It With a Pattern
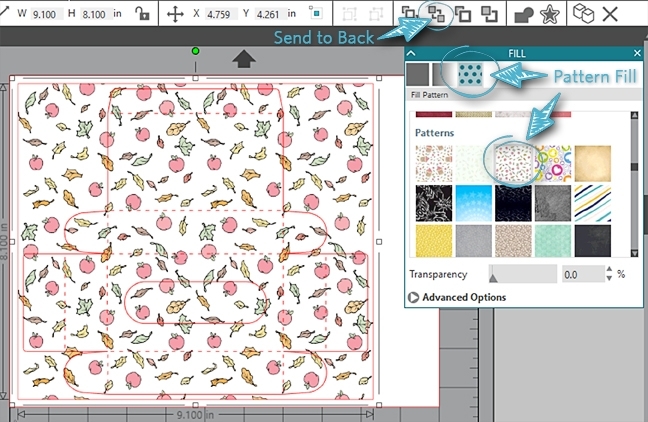
Normally, we would do a Print & Cut by using registration marks to fill a shape with a pattern, but this design is a little too big to fit within Print & Cut borders. Remember, we can’t resize it because it’s perfect for existing travel-size tissue packs.
Instead, we’ll just create a rectangle that encompasses the tissue design and fill that rectangle with a pattern.
1. Use your Draw a Rectangle tool (you’ll find it on the left side of your screen) and click and drag to create a rectangle around the whole tissue box design. (Mine is about 9.1 in. x 8.1 in.)
2. Select the rectangle and choose a fill pattern from the Fill Panel’s third tab. (The icon on the right for Fill Panel looks like a paint palette.) My screenshot examples use Apple Printable.
3. Send the pattern to the back so you can still see your design, by choosing Send to Back from the Quick Access Toolbar or Ctrl(Cmd) + Shift + [ while the rectangle is still selected.
Step Three: Preparing to Cut
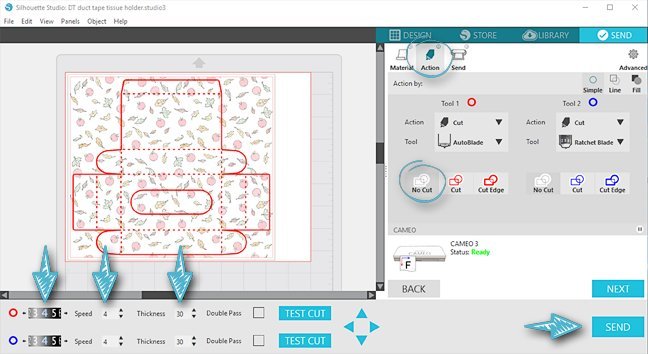
You’re just about ready to cut! Let’s set up our Send Panel settings so the tissue box will cut, but the rectangle will only print.
1. In the Send Panel, select the Material: “Duct Tape, Printable”.
2. In the Action tab of the Send Panel, turn off the cut line for the rectangle and adjust your blade settings.
- Select the rectangle and click “No Cut”. There should now be NO bold line around the rectangle; only bold lines for all of the cuts and perforations of the tissue box.
- Tool 1 Action should show Cut and Autoblade (for CAMEO 3), or Ratchet blade for other machines.
- Adjust the blade settings by clicking on the animated dial and inputs so Tool 1 (red) Blade = 4, Speed = 4, and Thickness/Force = 30. (This is what worked for me to cut completely through the duct tape and its backing; your test cuts may lead you to a different setting.)
- Refer to the image above for reference.
3. Print the page (File > Print)
Tip: Make sure to load your duct tape sheet in your printer so it prints on the glossy tape side, and it’s a good idea to make sure it’s set to print in the same orientation as you have in Silhouette Studio (landscape).
Step Four: Cut and Assemble the Tissue Box
Now that it’s printed, let’s cut the tissue box.
1. Press the duct tape sheet onto the mat in landscape orientation to match your on-screen project, printed side up.
HINT: Some glossy printable materials take a while to dry after printing, but this one dries quickly. Hooray!
2. Load the mat into your machine and press SEND in the software. It will cut through the duct tape layer and its backing.
3. Remove the tissue box from the mat, flip it printed side down on a clean surface, and fold upwards on the perforation lines (the dashed lines).

NOTE: Leave the backing in place for the tissue box; we don’t need it to be sticky.
(4) Use your favorite adhesive and/or the extra bits of unprinted duct tape to secure the glue tabs in place.

(5) When it looks like a box, insert the stack of tissues, and close the bottom flap.

If you want to print this in a different pattern, simply select the rectangle and choose a different fill pattern; then you’re ready to print a new box!
You’ve got to admit that’s a pretty cute duct tape box! The kids will love these because they’re made with trendy duct tape, and I love them because they’re clean and precise (and not messy like some other duct-tape crafts).

I’ve already made several cute boxes and purses with this printable duct tape. What will you try with these duct tape sheets?
Save
Save
 Free Class - Father's Day Apron Set
  Free Class - Custom Graduation Tumbler
Nasze Naturalne
September 3, 2025
Your authentic voice really shines through in everything you create and share
Naszenaturalne
September 2, 2025
Really love your style
Kelly Wayment
June 28, 2024
You can use it with vinyl as long as it is smooth and flat to allow the static charge to hold on to it. Rolled vinyl that wants to go back to its rolled shape will not necessarily work well, and it would need to be trimmed to fit the ES mat cutting area.
Kelly Wayment
June 28, 2024
Yes, you can use the heat pen while using the ES mat. 🙂
Yurii
March 2, 2024
Hello. May it be used with heat pen?
Thanks
Jerome
February 24, 2024
Hi, works this with the normal vinyl foils or only with printer papter etc?