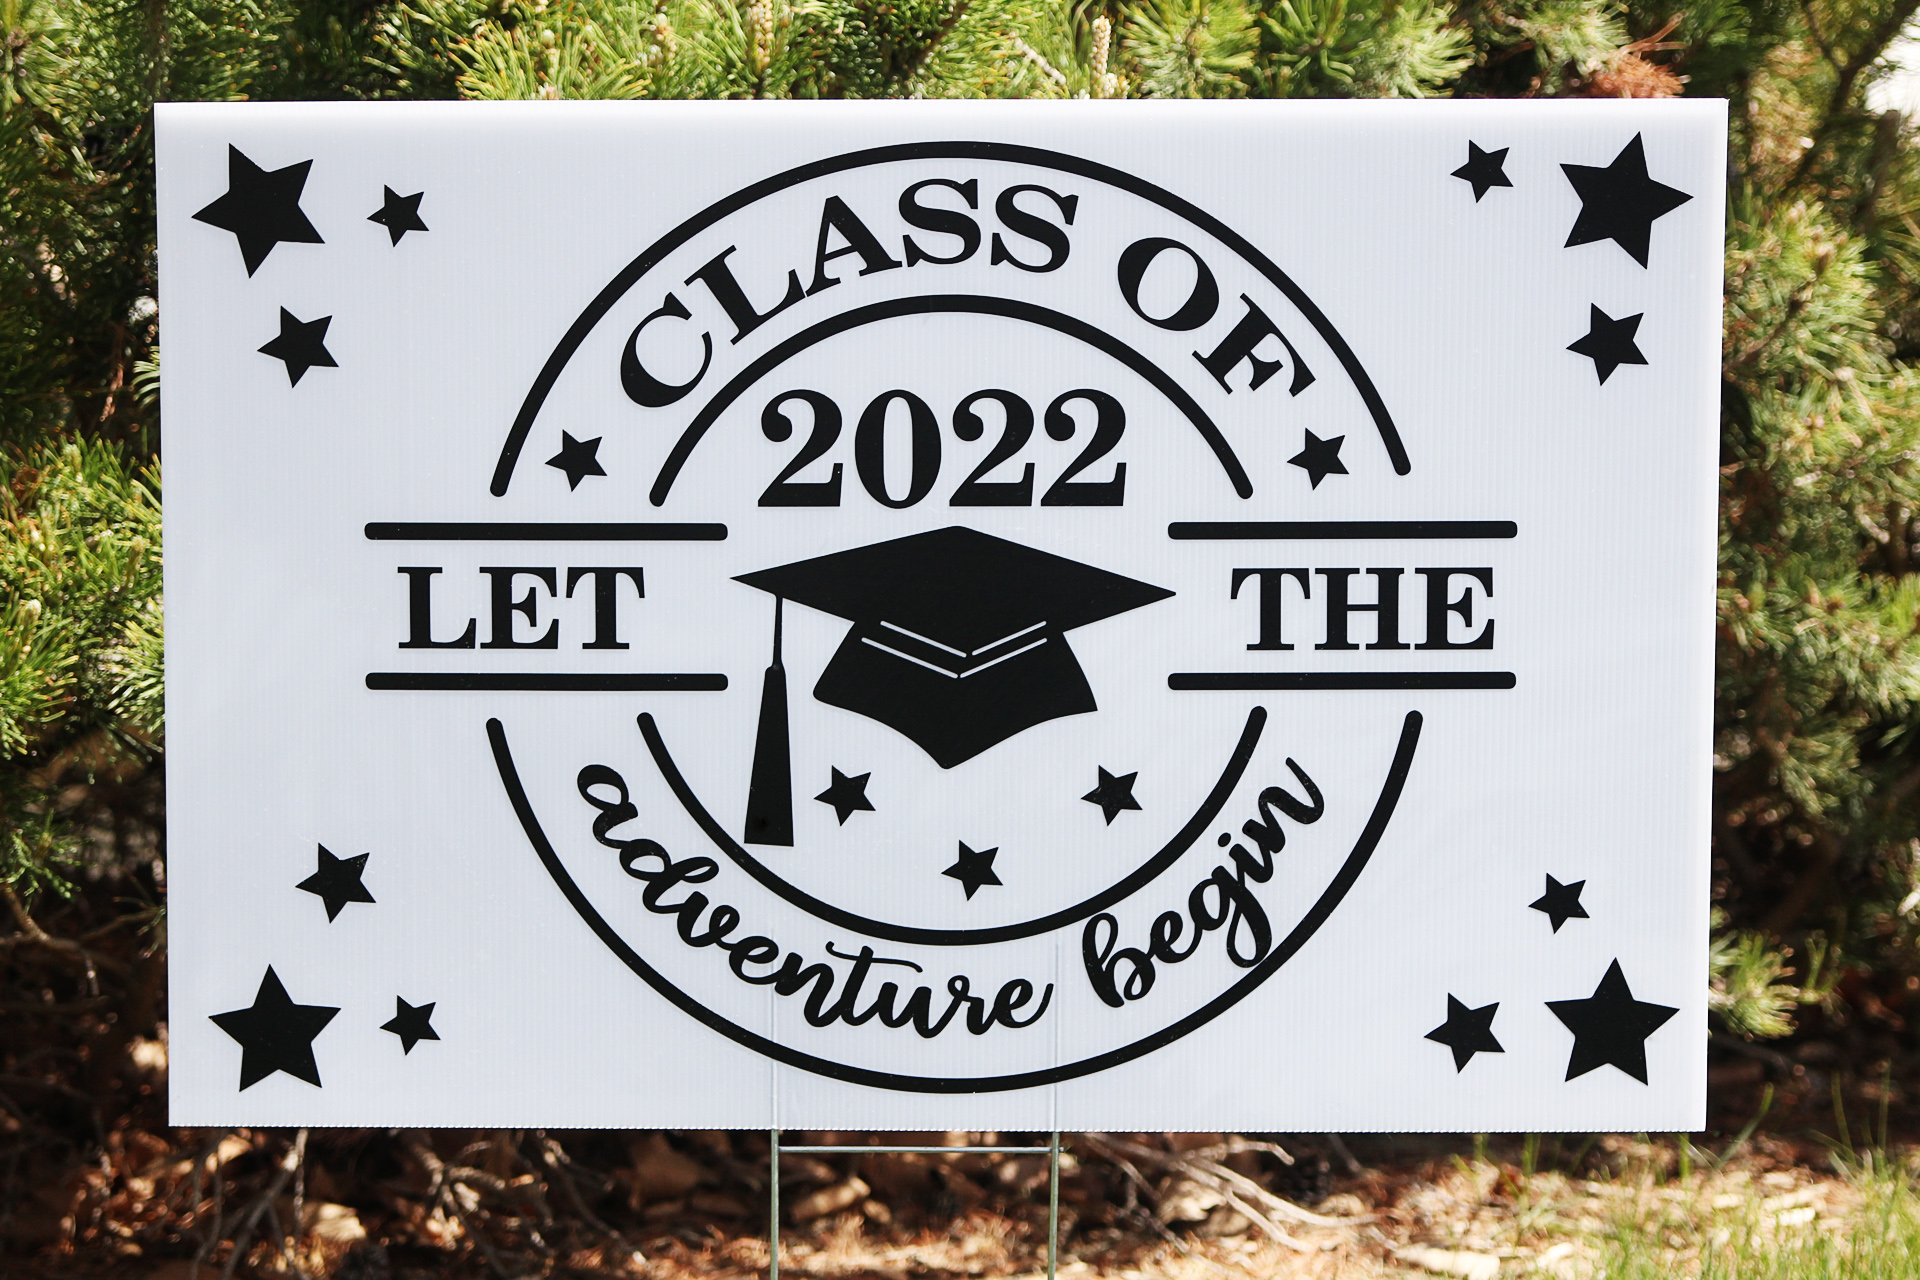
It’s graduation season, and I’ve got a fun project for you today that utilizes the large cutting area of the Cameo Pro. This sturdy graduation yard sign is 20 x 30 in., so you can really celebrate your senior in style! Check out my step-by-step tutorial below.
Supplies:
- Silhouette Cameo® Pro
- Silhouette Studio® – Basic Edition or higher
- White plastic corrugated board – 20 x 30 in.
- 24-in. black adhesive vinyl – I recommend matte vinyl with removable adhesive, like Oracal 631, if you want to re-use the sign later
- Transfer tape
- Hook tool
- Scraper tool
- H-bracket sign holder
- Design ID #407340 by Graphic House Design
Step One: Create Design
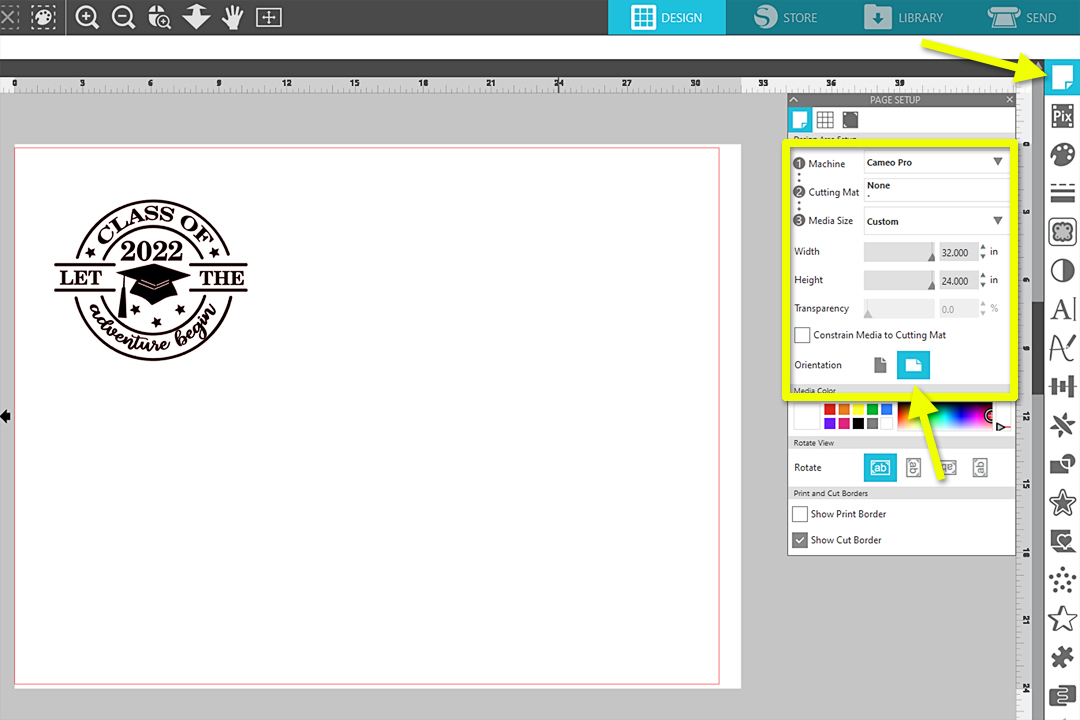
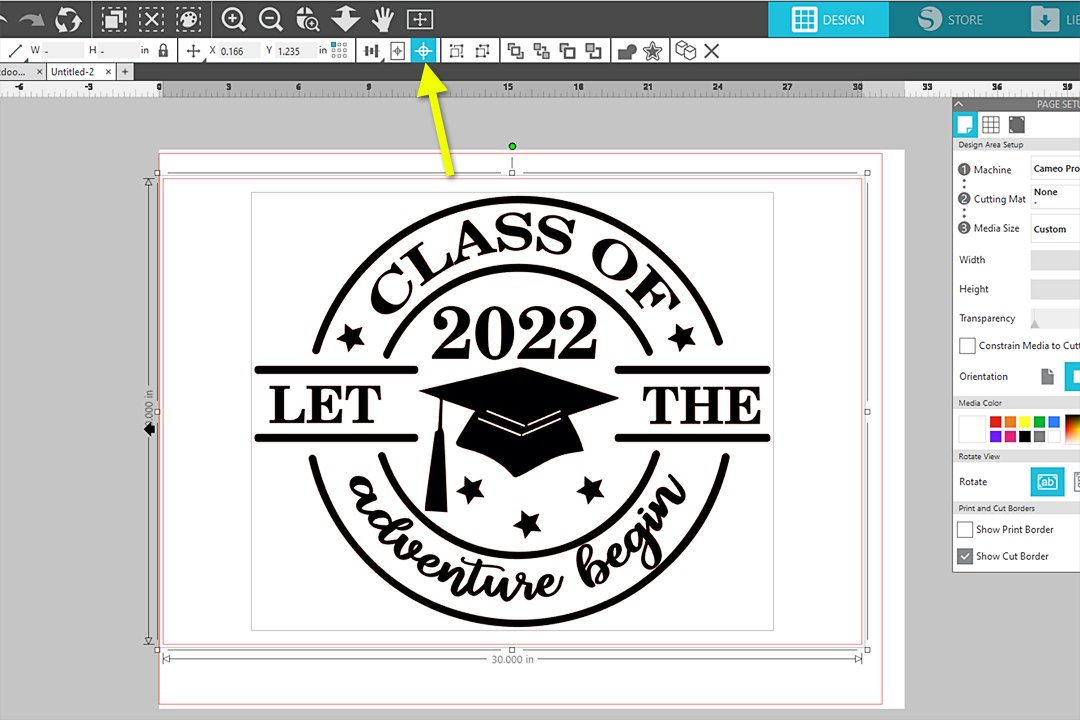
In Silhouette Studio®, open the Class of 2022 design. Set your Page Setup Panel to cut from a 24-in. vinyl roll as follows:
- Machine = Cameo Pro
- Cutting Mat = None
- Media Size = 32 in. width x 24 in. height
- Orientation = Landscape
Use the rectangle drawing tool to draw a rectangle the size of your corrugated plastic sign board. Mine is 30 in. wide x 20 in. high.
Tip: Use the Scale options on the Quick Access Toolbar to unlock the aspect ratio and input the exact dimensions.
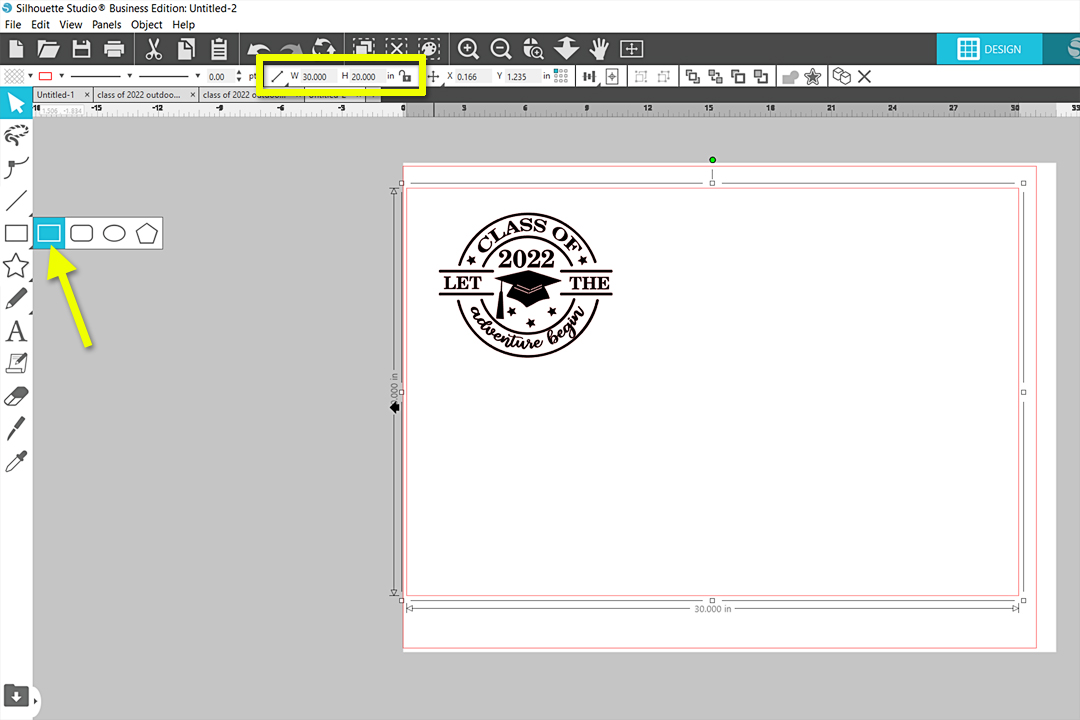
Position the rectangle so it fits within the cut border on the virtual page.
Select the design and resize it to fit within the drawn rectangle so it has a little bit of white space between the top and bottom edges of the design.
Tip: Use the Scale options on the Quick Access Toolbar to lock the aspect ratio and input a height of 18.5 inches.
Select both the design and the drawn rectangle, and choose Center from the Quick Access Toolbar.
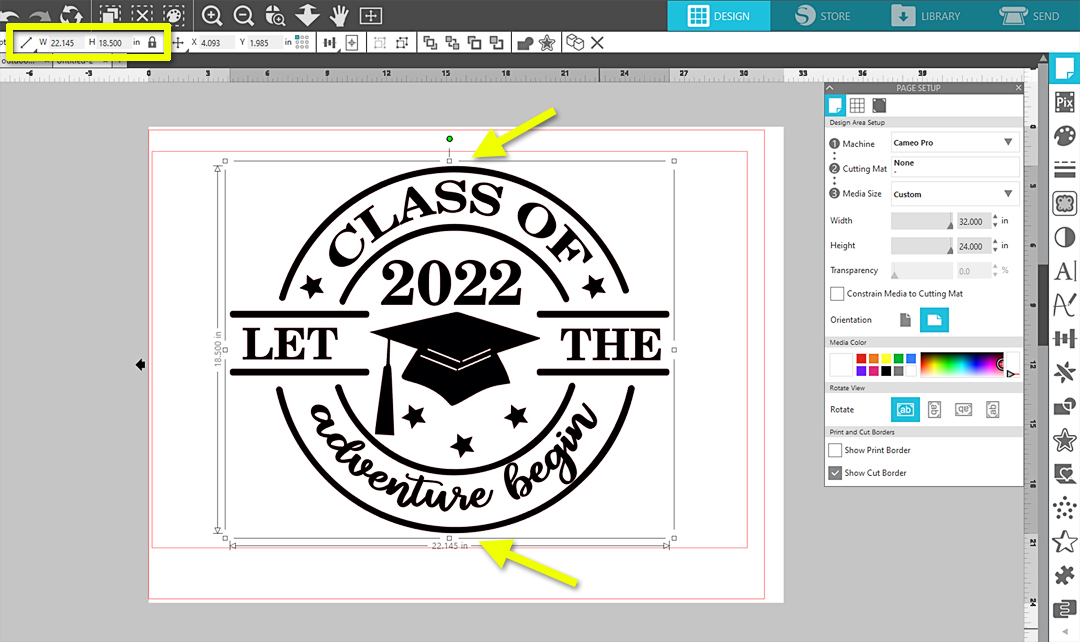
As an optional embellishment, you can ungroup the Class of 2022 design and make 12 copies of one of the stars.
Leave four star copies at their original size, increase the size of four more star copies to about 1.6 in., and increase the size of the final four star copies to about 2.6 in. You can do this by selecting four at a time and dragging a corner handle outwards to enlarge them all at the same time.
Reposition the stars in groups of three at the outer corners of the drawn rectangle so they look something like this:

Select the stars and the grad design, and Group them.
Hint: If you want to replace the year in this design with later graduation years, delete the 2022 portion while it’s ungrouped, and use your Text Tool to type the year you need. You can choose any font on your computer and resize it to fit the space.
Step Two: Create Manual Weed Lines
To create manual weed lines, please follow the next steps carefully and in order.
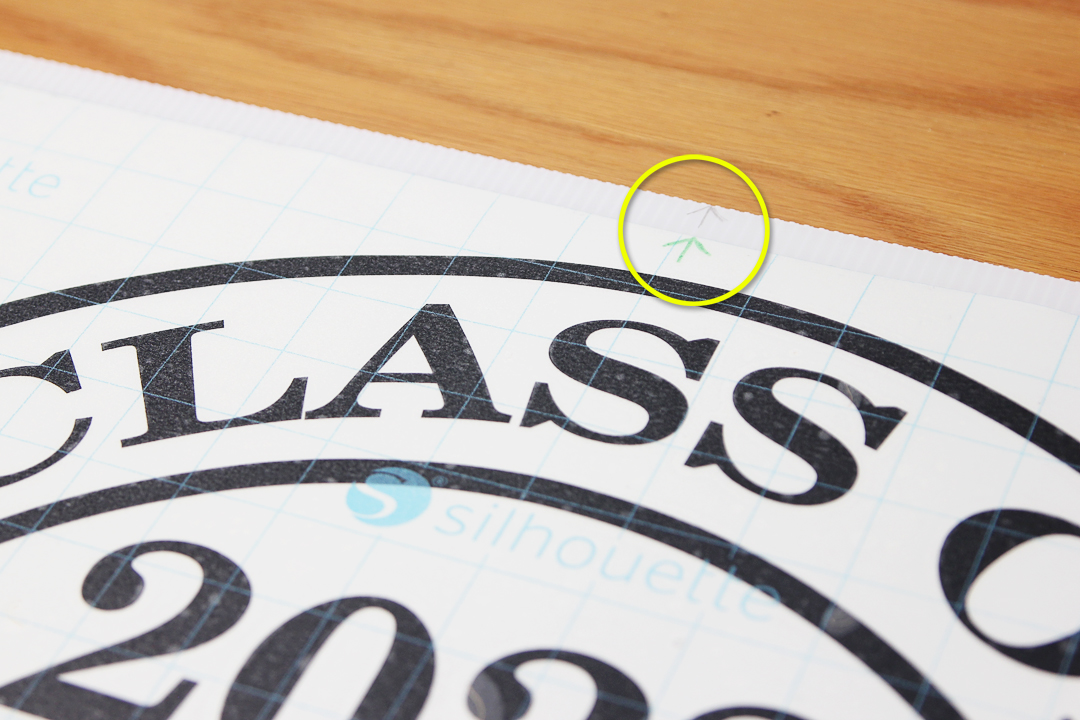
Use the Line Drawing tool to draw a series of horizontal lines that go from the left edge to the right edge of the drawn rectangle. Many of the lines will cross over the design, and that’s okay for now.
Tip: Hold your Shift key while drawing a line to keep it perfectly horizontal.
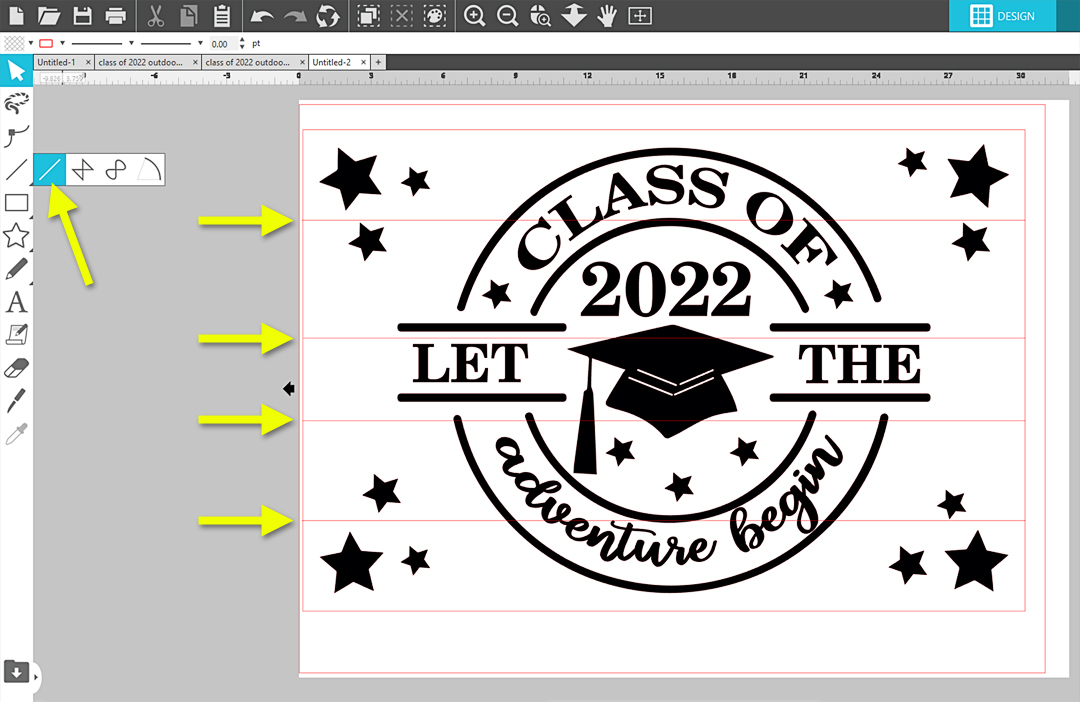
Hold your Shift key while clicking to select each of the lines you just drew. (Not the drawn rectangle, just the horizontal lines.)
With those lines selected, right click and choose “Make Compound Path” from the pop up menu.
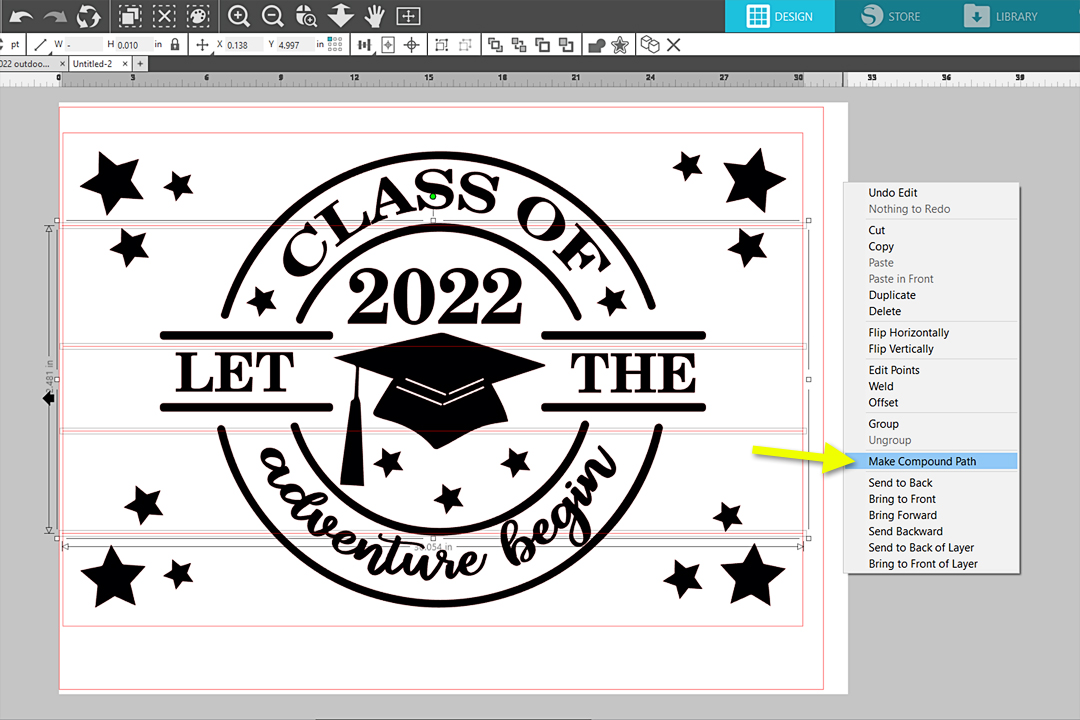
While they are still selected, choose “Send to Back” from the Quick Access Toolbar.
Open the Modify Panel.
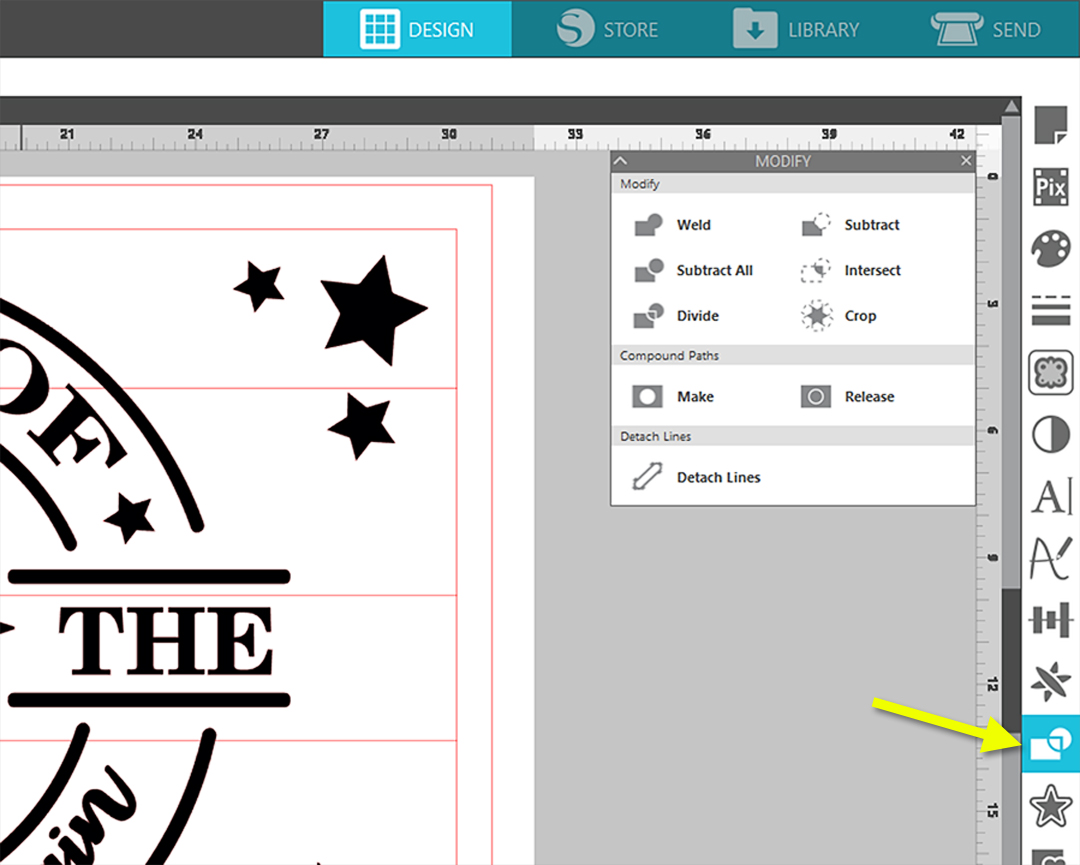
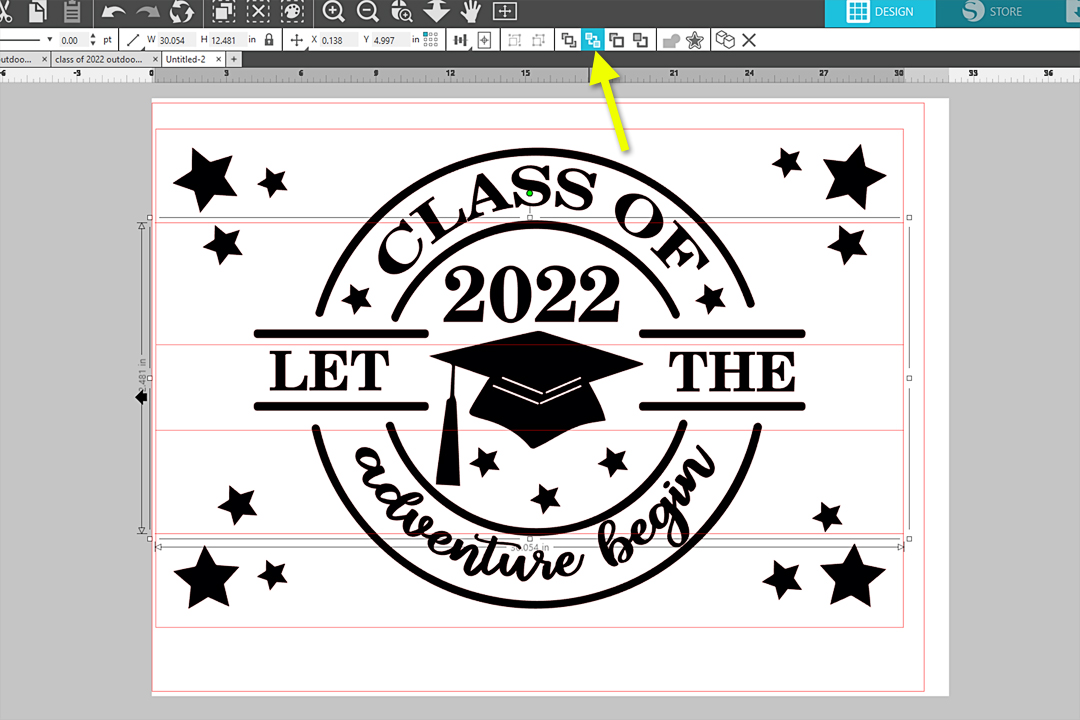
Select the main design and the lines (not the drawn rectangle) and choose “Subtract All” from the Modify Panel.
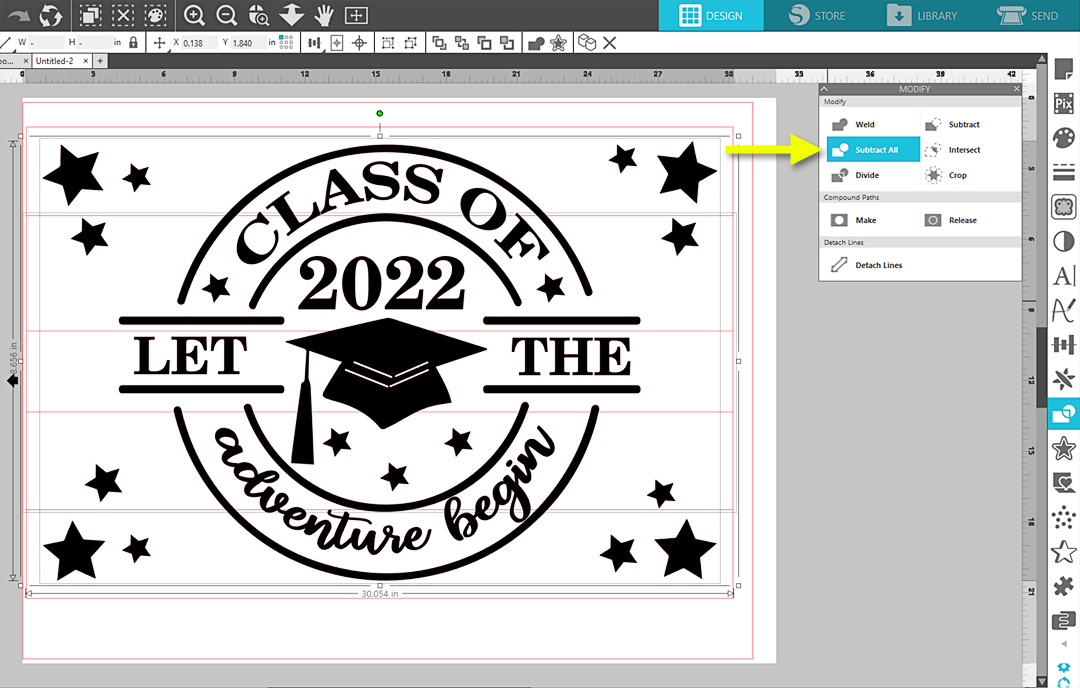
Verify the weed lines have disappeared from behind the main design by going to the Send Panel and looking at the bold red lines. No lines should cross through the main design.
Go back to the main Design Page, select the entire rectangle with the lines and design, and Group them together.
Now you have a full design with weed lines in the size of your sign board, ready to cut.
Step Three: Prepare to Cut
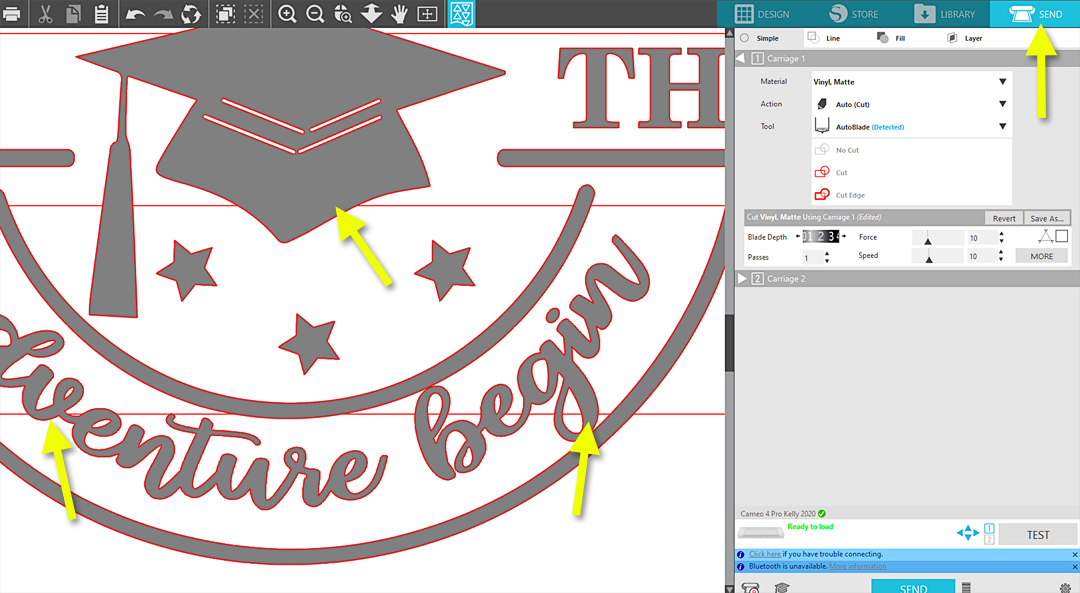
Position the design anywhere within the cut lines of the virtual media. Remember we are viewing in landscape orientation, so the vinyl will be cut sideways from what you see here.
The arrow indicates the leading edge where the vinyl loads into your Cameo Pro.

In the Send Panel, set your material to Vinyl, Matte. I recommend adjusting to the following settings, but you may perform a test cut to verify what works best for your machine and blade.
- Blade Depth = 2
- Force = 8
- Speed = 9
- Overcut = ON
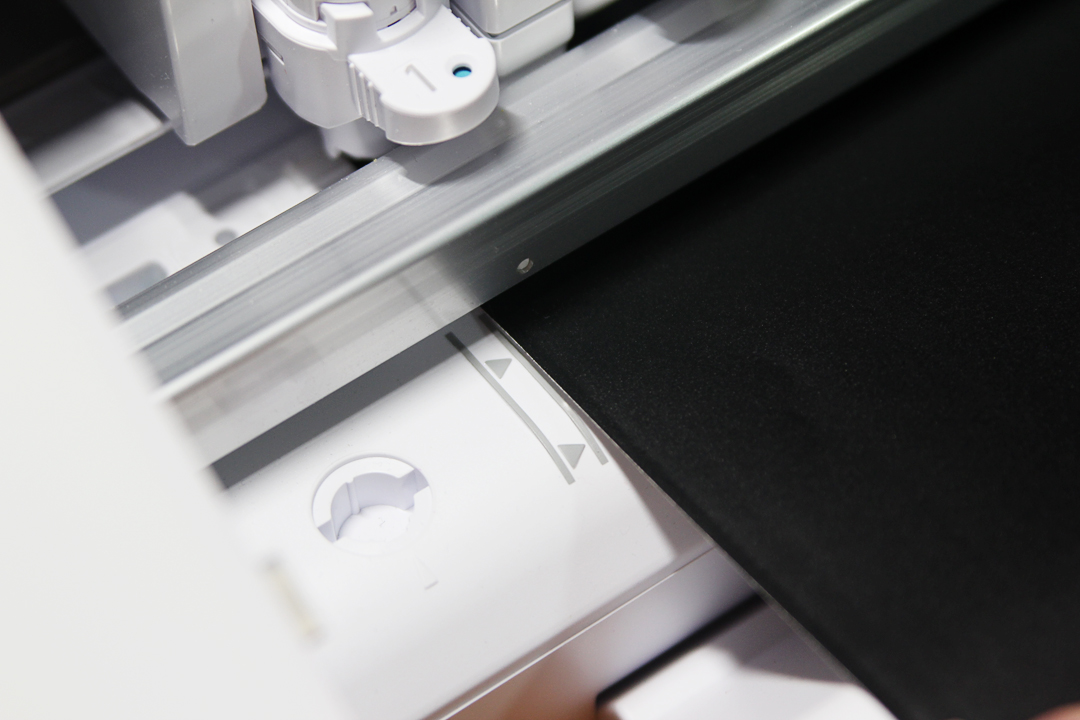
Set up the roll feeder for your Cameo Pro, and make sure there is plenty of room in front of and behind your machine so the roll never hangs down below your table surface while cutting.
Load your 24-in. wide vinyl into your Cameo Pro with the left edge of the vinyl against the inner loading guide line.
Send to cut the full design once you’ve verified the appropriate cut settings.
Tip: If you get a warning message that your media width is too wide, simply input 23.9 inches instead of 24 in the Page Setup Panel.
Step Four: Weed & Apply
Once the design has been successfully cut and trimmed off the main roll, cut the vinyl down to the sign-size rectangle with scissors.
Use a hook tool to weed away all the excess vinyl, leaving only the main design in place on the vinyl backing.
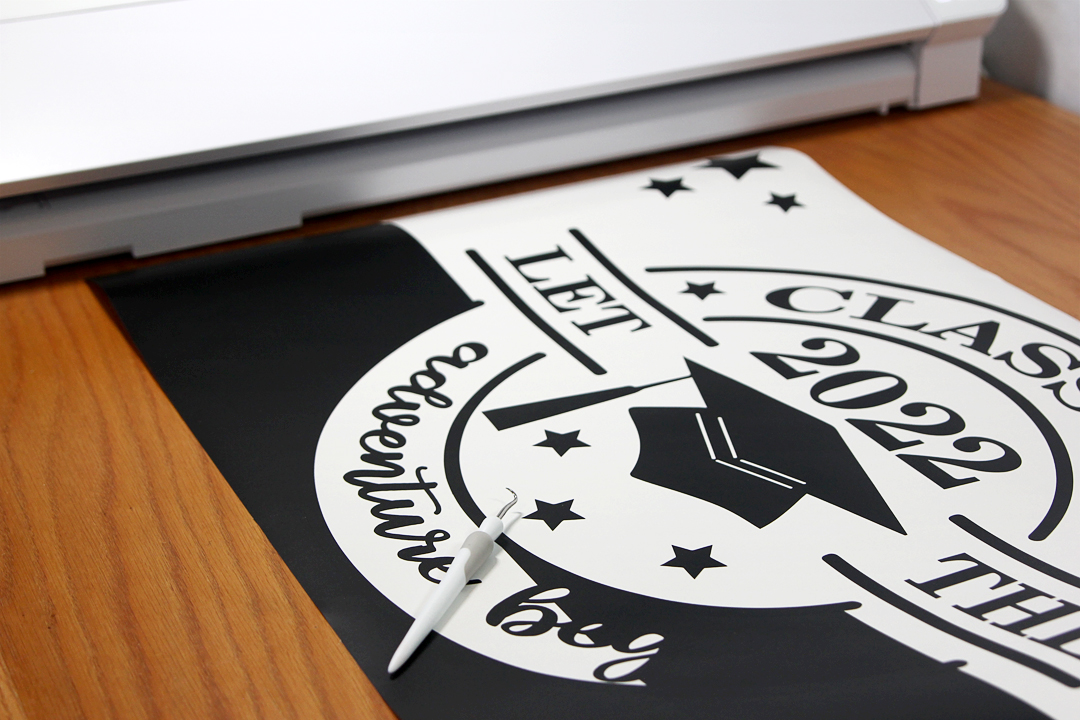
Use multiple pieces of overlapped transfer tape to cover the entire design. Run a scraper tool against the top of the transfer tape to encourage it to grip the vinyl design beneath.
You may find it helpful to mark the midpoint of each part of the design to assist with placement onto the sign. This can be marked on top of the transfer tape. Make sure you are measuring the midpoints based on the original sign rectangle, and not necessarily where the center of the transfer tape is.
Mark the midpoint of each sign edge in pencil. You’ll erase these once the design has been applied.
Trim away an inch or two of the vinyl backing on one side.
Use the marks to position the design on the sign and stick the exposed transfer tape and design onto the sign. This doesn’t have to be perfect; you just want to avoid being very obviously crooked or off-center.
Use this sticky edge as a hinge and carefully remove the remainder of the vinyl backing while pressing the design down onto the sign.
You may want to cut away strips of the backing as you apply the vinyl, just to get it out of the way. Be sure not to cut into the vinyl design!
Burnish the design once more with a scraper tool, then carefully remove the transfer tape, leaving the vinyl design in place on the sign.
Tip: Because this is such a large job, you will likely get a few bubbles and creases in parts of the design. Bubbles can mostly be pressed out towards the sides with your finger or the scraper tool. With removable vinyl on this plastic corrugated board, you can try to carefully lift pieces with creases and place them smoothly back down again. If you do this, be careful not to stretch or tear the vinyl.
Step Five: Display in your Yard
Use an H-bracket sign holder to poke one side into the corrugated grooves of the sign, and the other side to poke into your lawn.
This plastic sign with vinyl is both water resistant and reusable for another sign project! Simply remove this vinyl when you’re done and replace it with another design.
Happy graduation!

 Free Class - Father's Day Apron Set
  Free Class - Custom Graduation Tumbler