Welcome! I’m so happy to be back here on the Silhouette America blog!
Today I’ll be showing you a few tips and tricks to help you get perfect cuts with the Silhouette Cutting Mats.
We’ve heard lots of chatter and questions about the cutting mat and how to troubleshoot when things go awry, so I’m here to help. In this article, we’ll cover Cutting Mats for the CAMEO and the Portrait and I’ll show you how to work through a few common mat issues using the CAMEO for my demonstrations.
Your new cutting mat
When using the Portrait or the CAMEO, Silhouette offers three different sizes of cutting mats and two different hold strengths.
Silhouette Portrait® mats
- 8 in. x 12 in.
- 8 in. x 12 in. light hold
Silhouette CAMEO® mats
- 12 in. x 12 in.
- 12 in. x 12 in. light hold
- 12 in. x 24 in.
Mat Strength
Regular mats are perfect for a wide variety of media, from copy paper to cardstock, fabric, specialty media (such as sticker paper, vinyl, magnet paper, chip board, stencil sheets), and so on.
When you get a new cutting mat you’ll notice it’s pretty sticky. You can take a little of the excess stickiness out by using your hand or a clean piece of cotton (such as an old t-shirt) to gently blot the whole mat. This will remove a little of the stick so that your papers are less likely to tear.
Light hold mats are perfect for light weight, more delicate and thiner media such as vellum, copy paper, and so forth.
(We’ll cover the Pixscan™ and Curio Mats in separate articles)
You’ll find that the more you use your mat, the less sticky it will be. For the best results, you’ll want to buy a new mat once your old mat loses its stick.
If you’re worried about your media sliding around on the mat,you can temporarily hold papers in place with painter’s tape or washi tape.
Loading and using the mat
To get the most accurate cut, line up your material with the grid on the mat. Top and Left edges should be lined up perfectly.

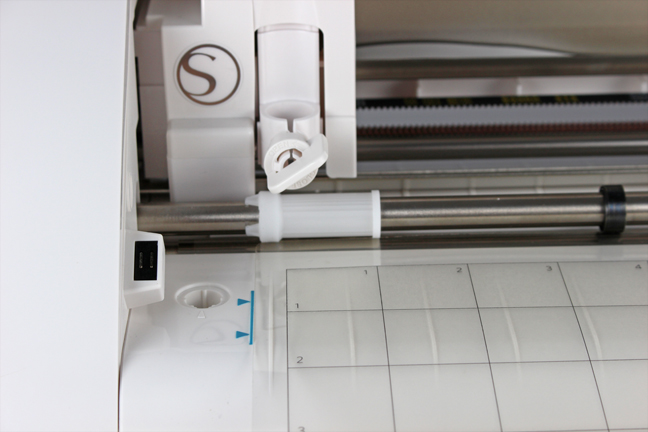
It’s important that you use the markings on the Silhouette machine to line up your mat when loading it in the machine. At the front left of the machine you’ll see a vertical blue line with two arrows touching it. The left edge of your mat should be touching this line with the front of the mat against the white rollers.

The mat can be loaded with the black arrow either facing or away from the machine. When I’m doing a mass run of the same cut I like to alternate sides that I feed into the machine for less wear and tear in that specific area on the mat.
When loading the mat, press the “Load cut mat” button, not the “load media” button to ensure proper placement of your cut.
It’s super frustrating to have the perfect file set up and beautiful paper loaded only to end up with your cuts off and paper wasted. Just a quick double-check before loading can save time, money and frustration.
Using the Test Cut feature will also help cut down on frustration. Click here for a how-to on the Test Cut feature.
Did you know you can use the Portrait mats in the CAMEO?
Quickly and easily change between mat sizes with a simple roller adjustment.
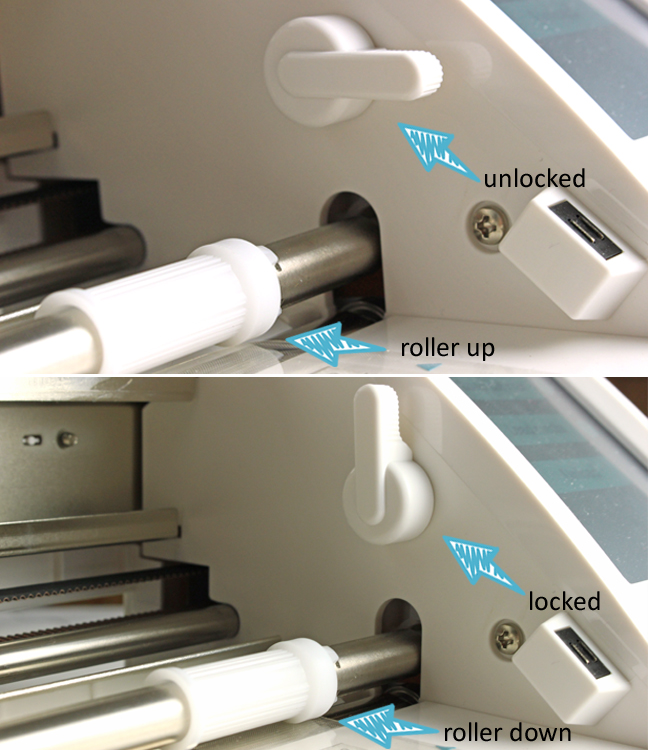
1. Release the roller shaft by turning the release button towards you (or down).
2. Grasp the grasp the bar with one hand and the roller with your other hand.
3. Twist the sliding roller until the pinchers are free from the notches.

4. Slide the roller to the notches that correspond with the size of your mat and lock the roller in place.
5. Return the release lever to the lock position.
Make Sure the roller rolls over the non-sticky part of your mat to avoid the rollers getting gummy. Adjust the rollers as needed.
Is Your Mat Slipping? Try This!
If your mat is slipping, check to make sure the white release lever on the right is locked in place, facing up. This ensures the rollers grasp the mat and hold it securely in place as the Silhouette cuts.
Removing materials from the mat
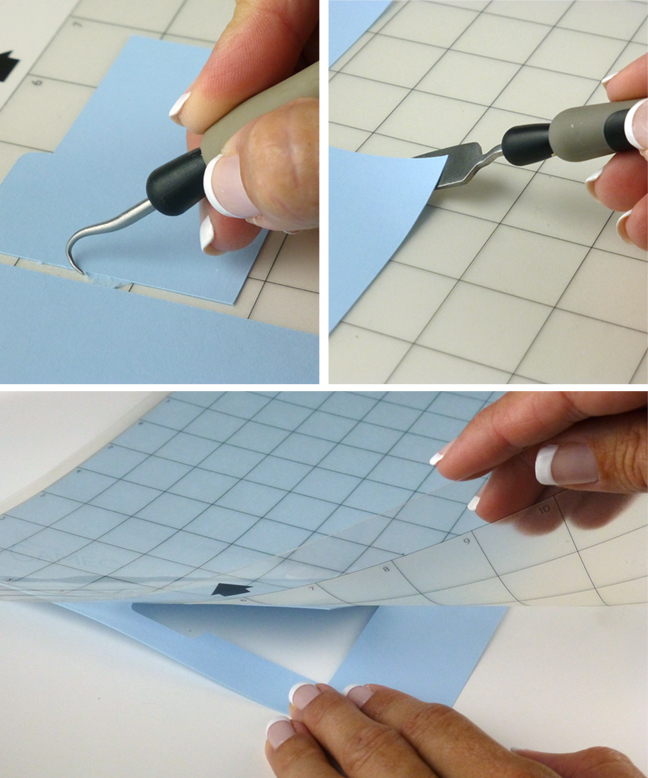
The easiest way to remove material from your mat is to flip your mat upside down and pull your mat away from your media as opposed to pulling your media away from your mat.
The Spatula and Hook tools are also super helpful when removing fine detailed cut materials from the mat.
I hope this answers some of your questions and helps you get perfect cuts on every project. If you have a question that isn’t addressed here, please leave a comment and ask away! We’re happy to answer; our goal is to help you in any way we can.
What questions do you have about the Silhouette cutting mats?
Kelly Wayment
June 28, 2024
You can use it with vinyl as long as it is smooth and flat to allow the static charge to hold on to it. Rolled vinyl that wants to go back to its rolled shape will not necessarily work well, and it would need to be trimmed to fit the ES mat cutting area.
Kelly Wayment
June 28, 2024
Yes, you can use the heat pen while using the ES mat. 🙂
Yurii
March 2, 2024
Hello. May it be used with heat pen?
Thanks
Jerome
February 24, 2024
Hi, works this with the normal vinyl foils or only with printer papter etc?
Kelly Wayment
February 16, 2024
Once you’ve pushed the mat up against the rollers, just press the “Load” arrow button (bottom right on the display). Does a regular sticky mat load into the machine for you?
Michelle a goodall
January 24, 2024
Hello! I just got my new electrostatic mat and have watched every video i can find on it. However, what i can t find is why it wont feed into my cameo 5/ it slides right up the rollers but wont go any further. and yes- iam pushing the into button. help!