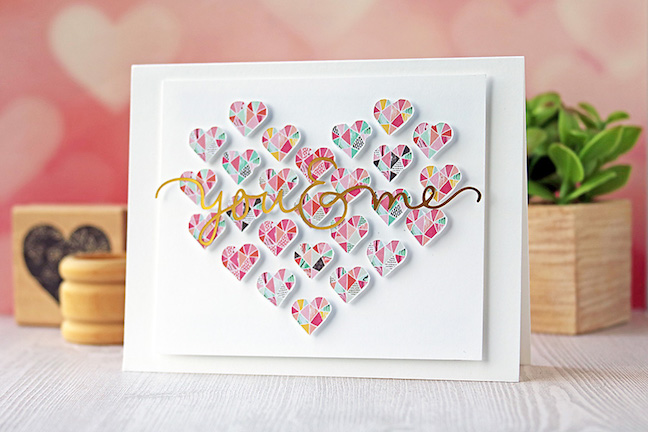
Did you know you can use PixScan™ to decorate handmade cards? Today, I’m going to tell you how you can “fussy-cut” patterned paper without even having to lift your detail scissors.
To be honest, I’ve had a PixScan™ mat since last Christmas when I received it with the CAMEO, but I had never tried it out. The great thing is the same PixScan™ mat that works with the previous model of the CAMEO will also work with the CAMEO 3—no need to purchase a new one. How cool is that? Want to see how it works? Let’s go!
Supplies needed:
- The CAMEO 3
- PixScan™ Mat for the CAMEO
- “You &Me” Design #54031
- heavy white cardstock and foam adhesive, available at your local craft store
- patterned scrapbook paper
- Transfer Paper
- Printable Gold Foil
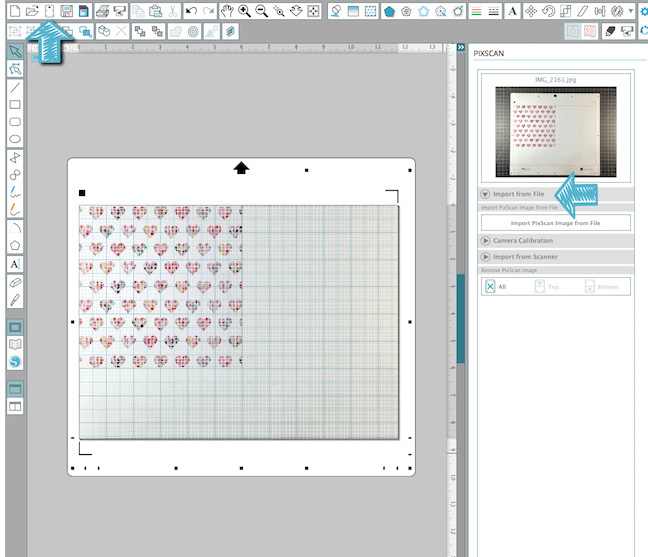
Step One: Importing the PixScan™ Image
Since this was my first time using my PixScan™ mat, I had to calibrate my smartphone’s camera. More information on that here.
Once I had everything ready, I took a picture of the scrapbook paper on my mat, transferred the image to my computer, and brought it into Silhouette Studio® using the Import option in the PixScan™ menu.
The PixScan™ button is located in the top left section of the toolbars in the Business Edition of the software. If you have Basic or Designer Edition, the button may be elsewhere in the toolbar. But, the icon still looks the same through all software versions.
Step Two: Trace and Cut
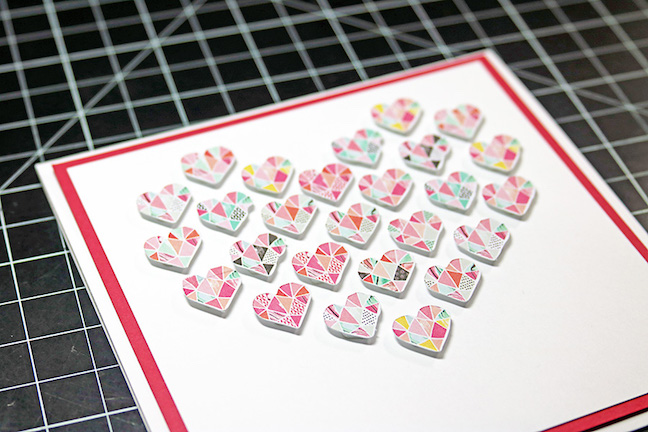
You can use any kind of patterned paper you want for this type of project, but you will always get a better trace by using a high-quality pattern with sharp lines. That’s why I picked out geometric hearts. I wanted all those little hearts cut out, so I tried to get as many as I could inside the trace area.
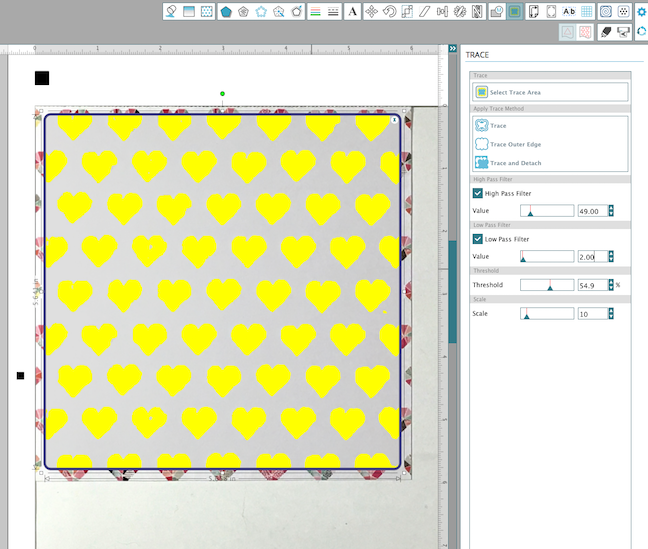
After adjusting the settings to “cover” the hearts, I clicked Trace to create the cut lines. You can use the Eraser tool to clean up any unwanted cut-line bits.
Next, go ahead and load your PixScan™ mat into the machine. Select the appropriate cut settings for your paper and hit Send to Silhouette.
A minute later you have perfectly “fussy-cut” pieces. Can you imagine how long it would have taken to cut those out by hand, especially since some of the edges aren’t straight? Silhouette machines and PixScan™ technology are a godsend, I tell ya.
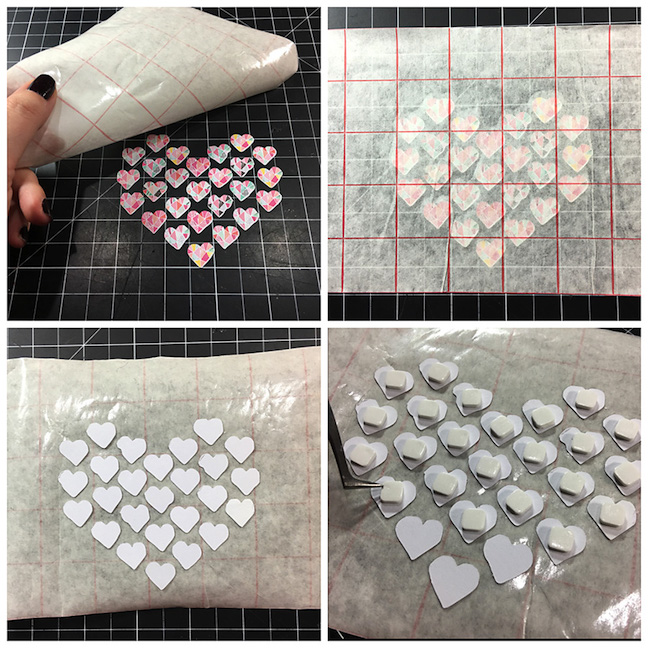
Step Three: Arranging Your Design
For my card, I decided to echo the cut-out pieces by arranging them into a heart-shaped design. If you aren’t using hearts, you can easily arrange a different shape – squares and circles work really well.
Make a 5.5 in. x 4.25 in. card base from the white cardstock, and set it aside. Cut a 4.5 in. x 3.75 in. from the scraps for your front panel.
The easiest way I have found to set up this kind of design is to use a craft mat to align the machine-cut pieces in the desired pattern, then move the whole thing to the card all at once.
This is where the transfer paper comes in handy. When you have the pieces just right and you are ready to transfer them to your card panel, use a piece of transfer paper to keep them in place as you move them. Press down firmly, pick them all up at once, flip over your transfer paper, and add the foam adhesive.
Step Four: Transferring Your Design
Adhering your design to your card panel works just like transferring vinyl; start by removing the release papers from half of the foam adhesive squares. Next, carefully align your design on the small rectangle you cut back in Step Three by centering the unpeeled side first. Then, carefully lay down the half with exposed adhesive. Fold your transfer paper up and remove the rest of the release papers and lay your design back down.
Carefully peel back the transfer paper from your project and check out the perfect alignment of your design pieces!
Step 5: Adhering the Sentiment and Finishing Up
Open the “You & Me” Design (#54031) in Silhouette Studio®. Adjust the width to 4.5 in., select the appropriate cut setting, and cut from Printable Gold Foil. It’s a pretty skinny font, so take care as you lift it from the release paper. You will want to avoid buckling the foil if possible – I used a pair of tweezers to help me separate it.
Lay your already-sticky sentiment (I love adhesive papers for applications like this) across your card design and gently press to adhere. Using some more foam adhesive, layer your completed card panel onto your card base.

Nasze Naturalne
September 3, 2025
Your authentic voice really shines through in everything you create and share
Naszenaturalne
September 2, 2025
Really love your style
Kelly Wayment
June 28, 2024
You can use it with vinyl as long as it is smooth and flat to allow the static charge to hold on to it. Rolled vinyl that wants to go back to its rolled shape will not necessarily work well, and it would need to be trimmed to fit the ES mat cutting area.
Kelly Wayment
June 28, 2024
Yes, you can use the heat pen while using the ES mat. 🙂
Yurii
March 2, 2024
Hello. May it be used with heat pen?
Thanks
Jerome
February 24, 2024
Hi, works this with the normal vinyl foils or only with printer papter etc?