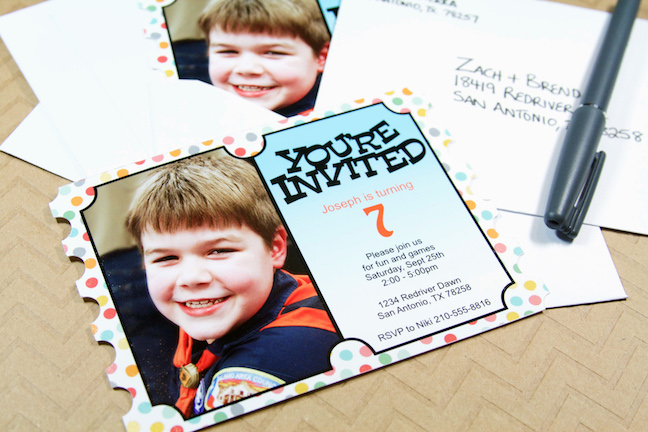
Hey y’all! Niki here and today I’m going to tell you about filling shapes in Silhouette Studio®, and how to use the fill tools (and the Print & Cut feature) to create a cute photo-style birthday invitation! These features save time by eliminating the need to change papers on your mat while you are cutting, and you don’t need to purchase tons of patterned papers for your projects.
You Will Need:
- Silhouette Portrait™, Curio, or the CAMEO
- Silhouette Studio®
- Semi-gloss photo paper, or white 80 lb. cardstock
- Design #25177, “3 x 4 Life Cards”
- Design #6668, “2 Phrase Set You’re Invited”
- Design #58589, “Spring Dot Pattern”
Step One: Edit Designs in Silhouette Studio®
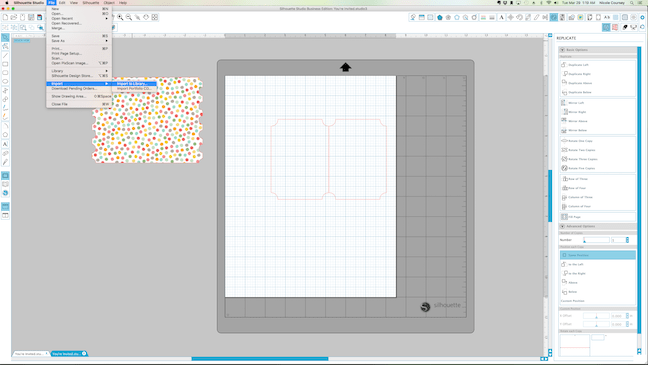
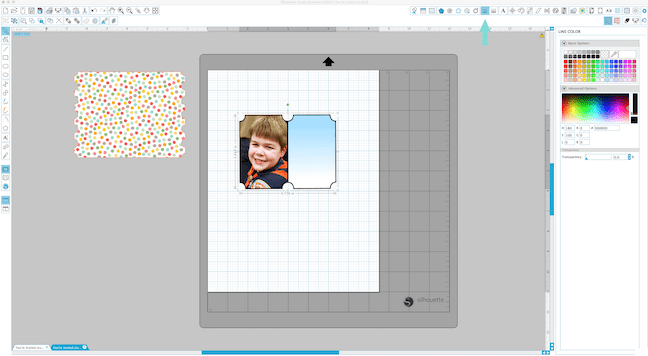
(1) Open the Life Cards design (#25177) and ungroup the shapes to get started.
(2) Delete the shapes marked 2 and 3 (since we’ll be using only 1 and 4 for our project).
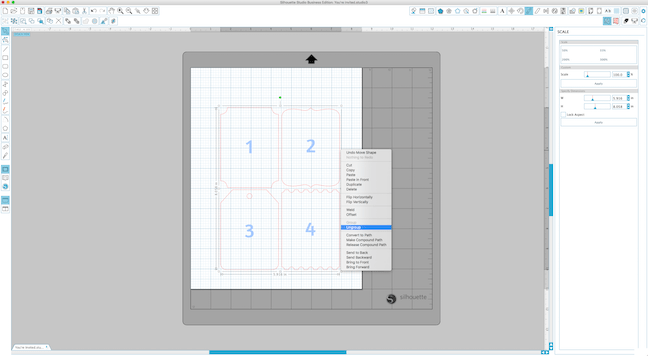
(3) Set shape 1 aside, and put shape 4 on your design area.
(4) Rotate shape 4 about 90 degrees and then use the Scale tool to resize it to 5.25 in. x 4.25 in.

Step Two: Fill Shape with Pattern
Did you know you can fill shapes in Silhouette Studio® with solid colors, patterns, gradients, and even your own photos? Yep, you can! And it is a fabulous time saver.
To fill a shape with a pattern:
(1) Click the ‘Fill Pattern’ button.
(2) Select the shape you want to fill by clicking on it, then select the pattern you want to use from the Fill Pattern window.
NOTE: Any patterns you downloaded from the Silhouette Design Store will be found in here, usually toward the bottom as you scroll through your collection.
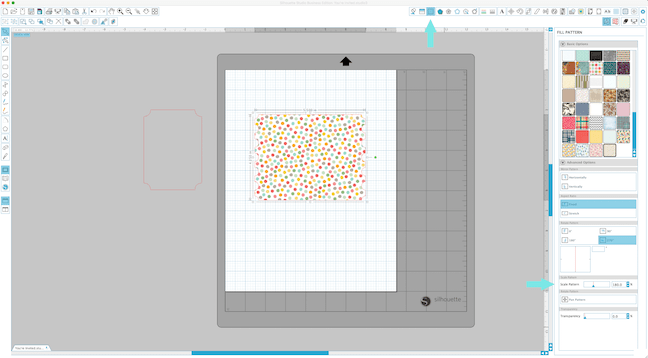
I’m going to use the ‘Spring Dot Pattern’ to fill this shape, then scale the pattern to 180% to make the dots a little bigger. The Scale Pattern slider is toward the bottom of the window.
As a side note, you can also pan your pattern around or adjust the transparency to make it just how you want it by using the tools in the Advanced section.
Step Three: Scale Shape and Replicate
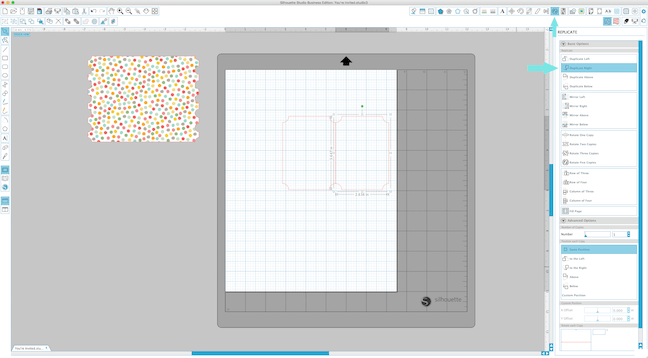
(1) Set the pattern-filled shape aside and bring the empty shape back on to the design space.
(2) Click the ‘Scale’ button and resize it to 3.647 in. x 2.372 in. to make our patterned shape fit our project.
NOTE: You’ll have to uncheck the Lock Aspect option to do this.
(3) Select the shape (if it isn’t selected already) and choose ‘Duplicate Right’ from the window.
Now we have two shapes 
Step Four: Add Gradient and Picture
Next up, we need to fill one of these shapes with a gradient and the other with our picture.
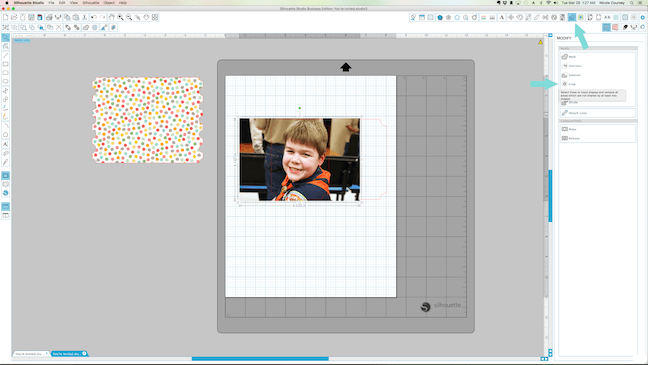
To get a photo into Silhouette Studio®:
(1) Select ‘File > Import > Import to Library’, then choose the photo you’d like to use. (For these invitations, I chose one of my favorite pictures of Joseph, my youngest, at a Cub Scout meeting.)
(2) Double click on your picture to bring it into the design space. (Your photo will show up under the “My Own Designs” section of your Library.)
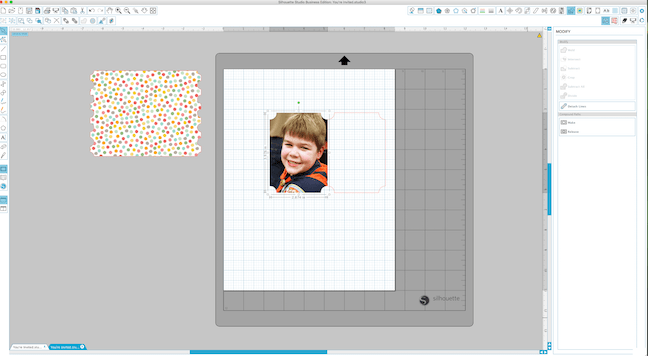
There are a few ways to fill a shape with a photo. The way I like is to use the Crop Tool.
To use the Crop Tool:
(1) Right-click the shape you want to fill and select ‘Bring to Front’ (this will allow your shape outline to stay visible over your photo).
(2) Move your photo over the shape so you can see where it will “cut out.” Resize if you need to.
(3) Click and drag your mouse pointer to select everything together and click Crop in the Modify panel.
Step Five: Fill with Gradient and Frame with Lines
For the duplicate empty shape, we are going to color it with a gradient. Repeat the process in Step Two and use the Advanced Options in the Gradient panel to adjust how your gradient looks.
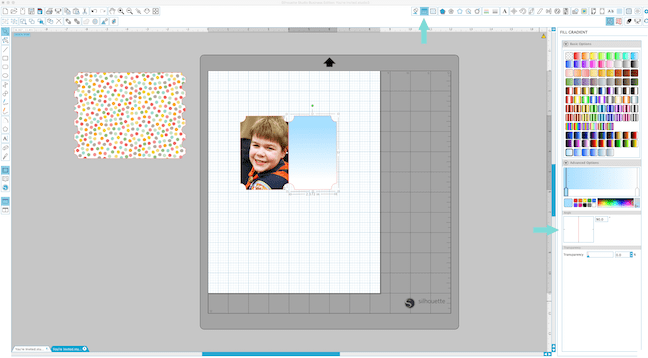
I chose to use the light blue gradient swatch, and I turned it 90 degrees so the gradient looks dark on top and fades to light toward the bottom. When you are choosing your colors, pick ones that match the photo you are using. They will always look best.
To finish the frame off, we need to add a black line around the shape. Here’s how:
(1) Select both shapes together.
(2) Click the Line Style icons and adjust the line width to 3pt.

(3) Click the Line Color icon (right next to the Line Style icon we just used).
(4) Change the line colors to black.
There we go, all framed!
Step Six: Insert Design and Text
Once you’ve finished the background for your invitation, it’s time to add the text!
To use your design from the design store:
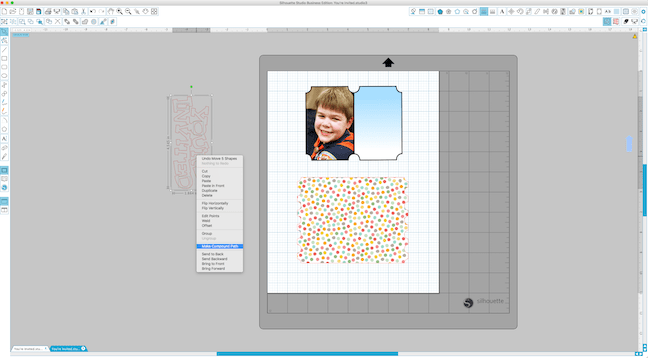
(1) Find the ‘2 Phrase Set You’re Invited’ design (#6668) and bring it into the design space.
(2) Ungroup and delete everything except for one of the word images.
NOTE: Make sure you select the entire design and make it a compound path before you move it around, so when we fill it the center of the letters will stay open.
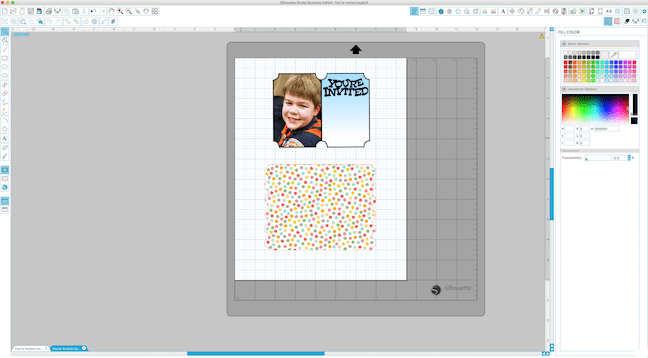
To fill your design with color:
(1) Open the Fill Color window with your design still selected.
(2) Choose the black swatch to fill the words in with color.
I also resized the words to 2.235 in. x 0.926 in. to fit the design and move it into place on the invitation. You may have to play with your design a bit until you get it exactly how you want it. Make sure you group any stray pieces so that they stay together if you move them.
Step Seven: Assemble Your Invitation in Silhouette Studio®
Time to build our invitation! Here’s how:
(1) Move your photo and info area piece over your patterned shape.
(2) Use the Align window to center them in place.

(3) Type your party information.
NOTE: You can use whichever font you like best, although a nice clean font like Arial in 11pt will be the easiest to read.
Once the invitation is assembled, we need to make sure that our Silhouette knows that it’s only supposed to cut around the outside of the invitation and not all of the little shapes we put together to make the invitation.
To cut around the OUTSIDE of your design only:
(1) Go to your Cut window. (You’ll notice everything will light up with red cut lines around it.)
(2) Select your whole project and choose “No Cut.”
(3) Ungroup everything and carefully select only the patterned background shape.
(4) Click the ‘Cut Edge’ option.
(5) Group everything again.
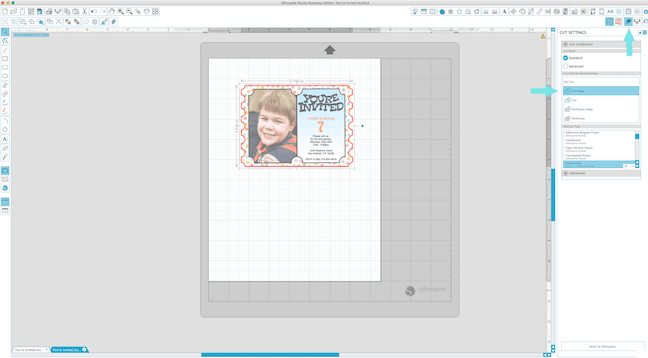
Step Eight: Print & Cut
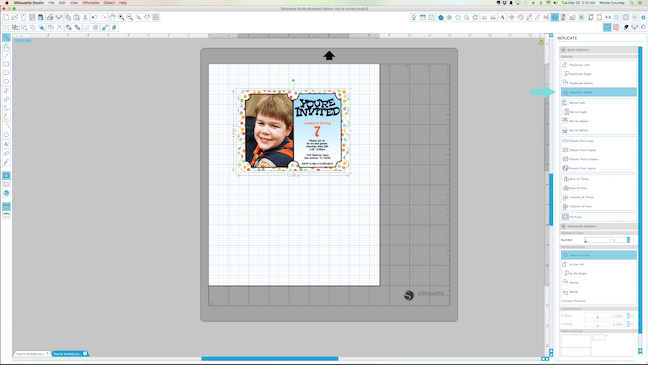
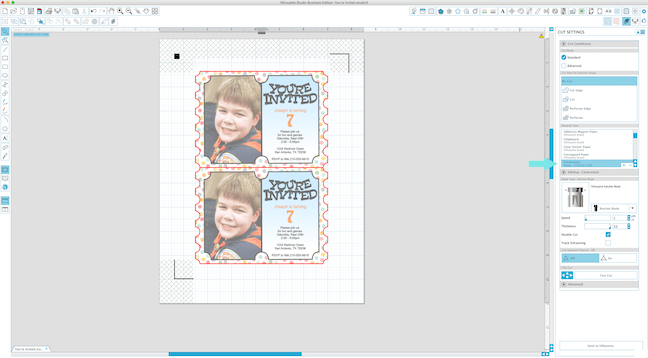
We’re almost ready to Print & Cut! To get the most out of your photo paper, don’t forget to duplicate your invitation one time (two will fit nicely on one 8.5 in. x 11 in. page).
To use the Print & Cut feature, you will need to turn on your registration marks before sending your design to the printer. To turn on registration marks:
(1) Go to your Registration marks window
(2) Select the type of marks that are right for the machine you are using. (For me, because I’m using a CAMEO, that’s the ‘Type 1’ option.)
NOTE: Make sure your invitations are inside the registration marks and not touching the crosshatch areas, otherwise the Print & Cut feature won’t work.
(3) Click ‘Send to Printer.’
Choose the print options for the paper you are going to use. I recommend a semi-gloss photo paper if you want the invitations to look like the photo, but if you don’t have any you can always use a nice cardstock or plain paper.
(4) Once your project is printed, mat it and send it through your Silhouette.
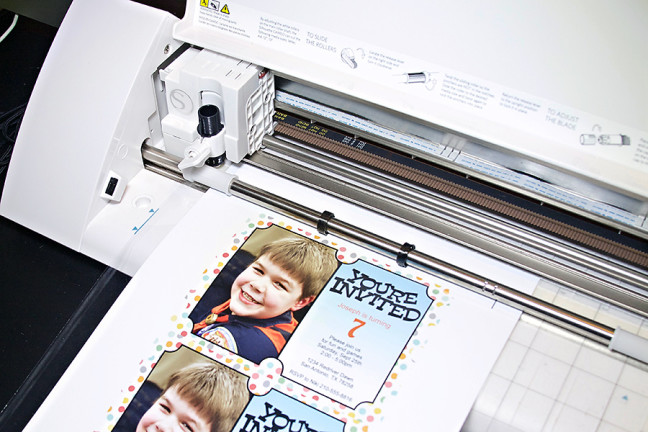
Don’t forget to match your cut settings to the paper you’re using! For my photo paper, I used the ‘Coverstock’ option with ‘Double Cut’ checked.
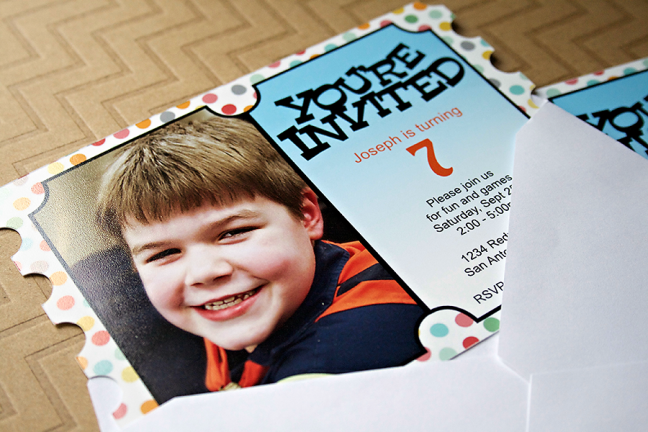
And there you have it! That’s how you fill shapes in Silhouette Studio®, and how to make a professional looking party invitation to boot!
Oh, and it’s a great way to make one layer cards and scrapbook pages without all the bulk.
I’m glad you stopped in today. Hopefully you learned something new! Feel free to ask any questions or leave comments below, I would love to hear about what y’all are making!
Kelly Wayment
June 28, 2024
You can use it with vinyl as long as it is smooth and flat to allow the static charge to hold on to it. Rolled vinyl that wants to go back to its rolled shape will not necessarily work well, and it would need to be trimmed to fit the ES mat cutting area.
Kelly Wayment
June 28, 2024
Yes, you can use the heat pen while using the ES mat.
Yurii
March 2, 2024
Hello. May it be used with heat pen?
Thanks
Jerome
February 24, 2024
Hi, works this with the normal vinyl foils or only with printer papter etc?
Kelly Wayment
February 16, 2024
Once you’ve pushed the mat up against the rollers, just press the “Load” arrow button (bottom right on the display). Does a regular sticky mat load into the machine for you?
Michelle a goodall
January 24, 2024
Hello! I just got my new electrostatic mat and have watched every video i can find on it. However, what i can t find is why it wont feed into my cameo 5/ it slides right up the rollers but wont go any further. and yes- iam pushing the into button. help!