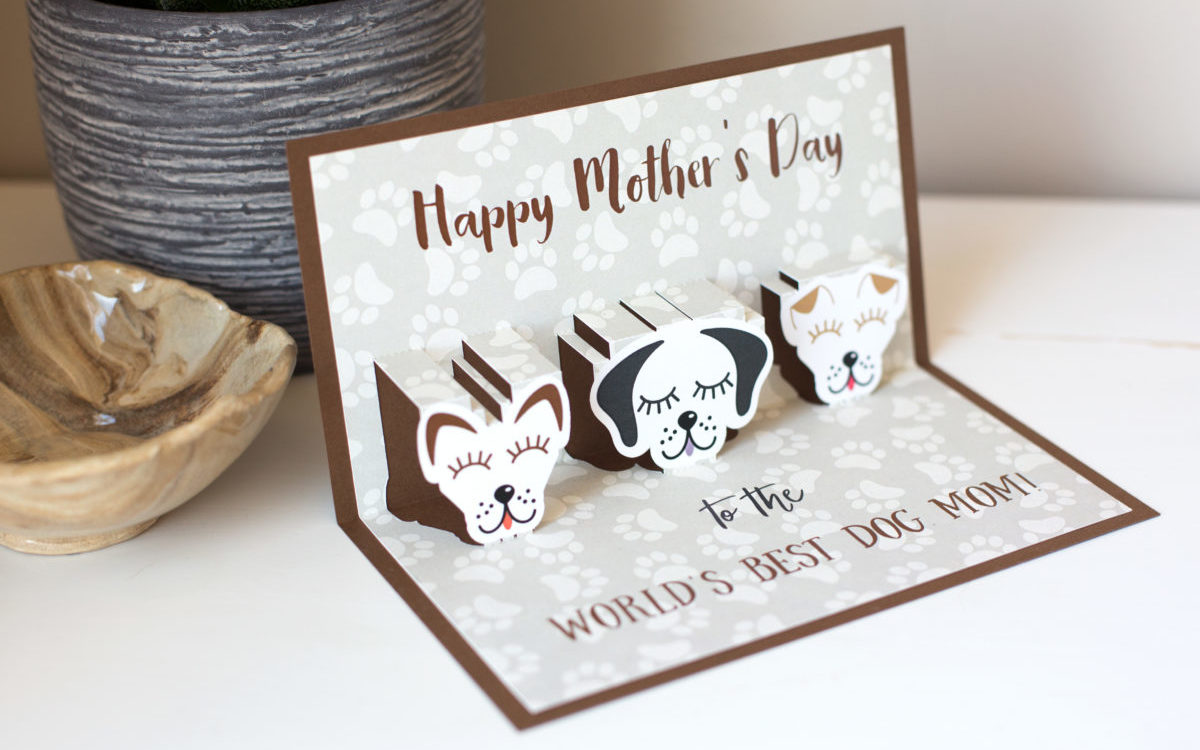
Mother’s Day is just around the corner, and what better way to celebrate all the mothers in your life than to make them something special. Today we want to show you how you can make this dog mom card for Mother’s Day because dog moms are mothers too! Follow along to see what you need to do.
For this tutorial, we are going to show you how to use the pop-up feature in the Designer, Designer +, and Business Editions of Silhouette Studio®. You can make a pop-up card without these editions of the software, but the process is a little bit different because you will have to insert the pop-up tabs yourself.
Supplies Needed:
- Silhouette CAMEO® or Silhouette Portrait® or Silhouette Curio™
- Silhouette Cutting Mat
- Silhouette Cutting Blade
- Silhouette Studio® 4.1 or higher (with Designer Edition or higher)
- Cardstock – white
- Printer
- Design ID#259757
- Design ID #156244
- Design ID #178417
- Design ID #181987
- Design ID #190735
Step One: Prepare the Designs
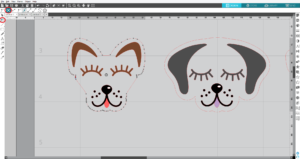
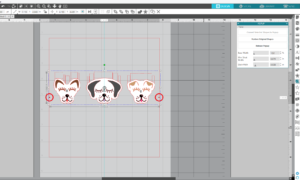
1. Open Design ID#259757 in Silhouette Studio® by locating it in your library. Ungroup the design. Move the puppy’s tongue up as shown on the image below.
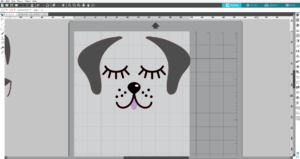
2. The puppy design has two more sets of ears, and we want to use them to make two more puppy images. You can change the color of the ears, the eyebrows, and the tongue using the Fill panel on the right-hand side of the screen.
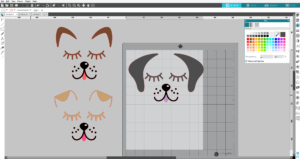
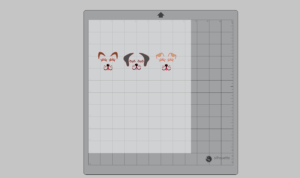
3. Select all three images and make them smaller by dragging in the outer corners. (Tip: If you drag the middle points you will warp the design. By selecting the outer corners you will keep the design proportionate.) As an option, you can flip the puppies’ eyelids vertically and move them up a little bit. In order to flip the design, go to the Object menu tab on the top of the screen. Click Mirror and then Flip vertically.
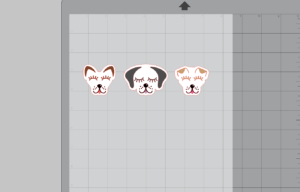
4. Add an offset line around each puppy design. In order to do so, go to the Offset panel. Select the design, adjust the offset distance by sliding a bar, and then click Apply. You can make the outer line smoother by deleting some edit points of the design. To do so, select an outer line of the design and click the Edit Point icon on the left-hand side panel of the screen. Select one of the edit points. Click the Point Delete icon on the top left panel, and delete some edit points of the design.
5. Select only the outer line of the design and fill it with white color. Group each of the puppy design elements together.
Step Two: Create the Pop-up Element
1. Draw a rectangle around your design that will be smaller than the outside card base so that it can be glued inside the base after you cut out the finished design. In the Designer Edition or higher of Silhouette Studio® we have option to use guides to set up guide lines for the vertical center of this rectangle and see where to position the fold line. You can pull blue guides from your top and right-hand side rulers onto your page.
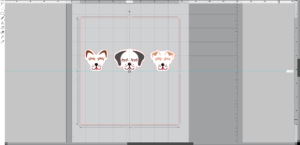
2. Select all three puppy designs, go to the Pop-up panel, which is located on the right-hand side of the screen, and click “Convert Selected Shapes to Popup.” You will notice that the Pop-up feature will add tabs on the top and bottom of your shape. This will allow the image to pop up from the card.
3. Drag the red points of the fold line to the edge of the card so that it will fold all the way across.
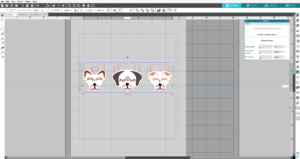
4. If you have Silhouette Studio® Designer Edition or above, you will be able to drag each of the objects to the different distance from the fold line or depth, which stands out from the card by dragging double-pointed arrow. Watch the base connector to see how far each object stands out from the fold line.

Tip: In the Silhouette Studio® Designer Edition or above, you can see multiple drag handles compared to single drag handle you will see in the Basic Edition. The drag handles work with text or with ungrouped designs in Designer Edition or higher. If you’ve got grouped objects or an object with a compound path, the object will behave the same way an object will in the Basic Edition because there is only one drag handle for the whole design.
5. In the Popup panel, you have the option to change the base width, which determines how much the bottom of the design is connected to the page. The Minimum Strut Width determines how many and how skinny the pop-up connections will be. Dash Pitch determines the width of the perforation cuts.
6. At any point you can choose to Restore Original Shapes, and they will go back to their original state. Or you can choose Release Popup to convert the lines to standard cut lines, which can be moved and manipulated individually.
Step Three: Add Text and Fill with Pattern
1. Now let’s add some text to our card. Using the Black Sheep Handbrushed font (Design ID #178417) type “Happy Mother’s Day”. Using the Funfetti font (Design ID #181987) type “to the” and using the Ladyfinger font (Design ID #190735) type “world’s best dog mom!” Fill the text with your desired colors.
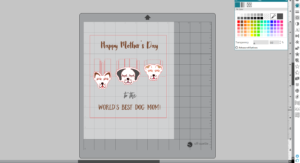
2. Select the outer line of our design and fill it with Dog Paws pattern (Design ID #156244). Watch this video to learn how to fill designs with pattern. Scale pattern to 238% and increase the transparency to 82%.
3. Turn on the registration marks (found in the Page Setup panel) and make sure your design is placed within the registration marks border.
Step Four: Assemble the Card
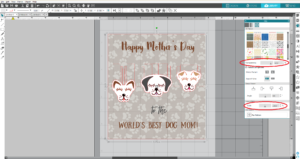
1. Print out your design on the white cardstock by selecting the printer icon.

2. Place the printed sheet on your mat and feed it into your Silhouette machine.
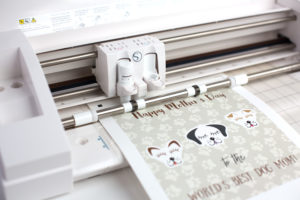
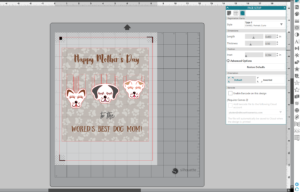
3. Select your whole design and go to the Send panel. Choose “Cardstock, plain” as your material type and choose the Cut Edge option. Adjust your blade if necessary and send your cut job to your Silhouette machine.

4. After cutting the designs, remove the designs from the cutting mat.
5. To create the outside of your card, select the rectangle shape you already created in Silhouette Studio® and open the Offset window. Offset the shape to your desired size and hit apply.
6. Select and move the other shapes out of the way, add fold line in the middle of the card base by drawing a line using Draw a Line tool and in the Line Style panel chose a perforated type of line. Cut out the outside of your card using the brown cardstock.
7. Carefully fold your card along all the perforated lines. Fold the brown cardstock you just cut in half.
8. Attach the puppies card to the brown rectangle. (Tip: When taping or gluing, make sure you get around all the edges but avoid getting anything on the tabs.)
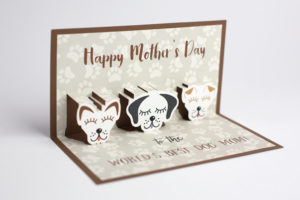
And that’s it!
Naszenaturalne
September 2, 2025
Really love your style
Kelly Wayment
June 28, 2024
You can use it with vinyl as long as it is smooth and flat to allow the static charge to hold on to it. Rolled vinyl that wants to go back to its rolled shape will not necessarily work well, and it would need to be trimmed to fit the ES mat cutting area.
Kelly Wayment
June 28, 2024
Yes, you can use the heat pen while using the ES mat. 🙂
Yurii
March 2, 2024
Hello. May it be used with heat pen?
Thanks
Jerome
February 24, 2024
Hi, works this with the normal vinyl foils or only with printer papter etc?
Kelly Wayment
February 16, 2024
Once you’ve pushed the mat up against the rollers, just press the “Load” arrow button (bottom right on the display). Does a regular sticky mat load into the machine for you?