One of my favorite things about summer as a kid was staying up late and stargazing, especially during a meteor shower. There’s something spectacular about looking up into the dark skies and seeing glittering stars and planets, some brighter than others, and some you don’t see until you stare long enough and a little faint twinkling dot appears. Do you have a little Galileo at home? This easy-peasy project will surely excite those curious minds and make stargazing a fun family activity this summer!
Supplies Needed:
- Silhouette CAMEO® or Portrait®
- Cutting Mat 12in x 12in.
- Printer
- 8.5in x 11in light-colored cardstock
- Paper slicer or scissors
- Silhouette Printable Glow-In-The-Dark sticker paper
Step One: Create Constellation Cards
Constellations are slightly different based on time of year and your hemisphere. On an internet search website, use the keywords “kids star map” and you will find websites created with kids in mind that provide helpful stargazing information and ready-made star maps.
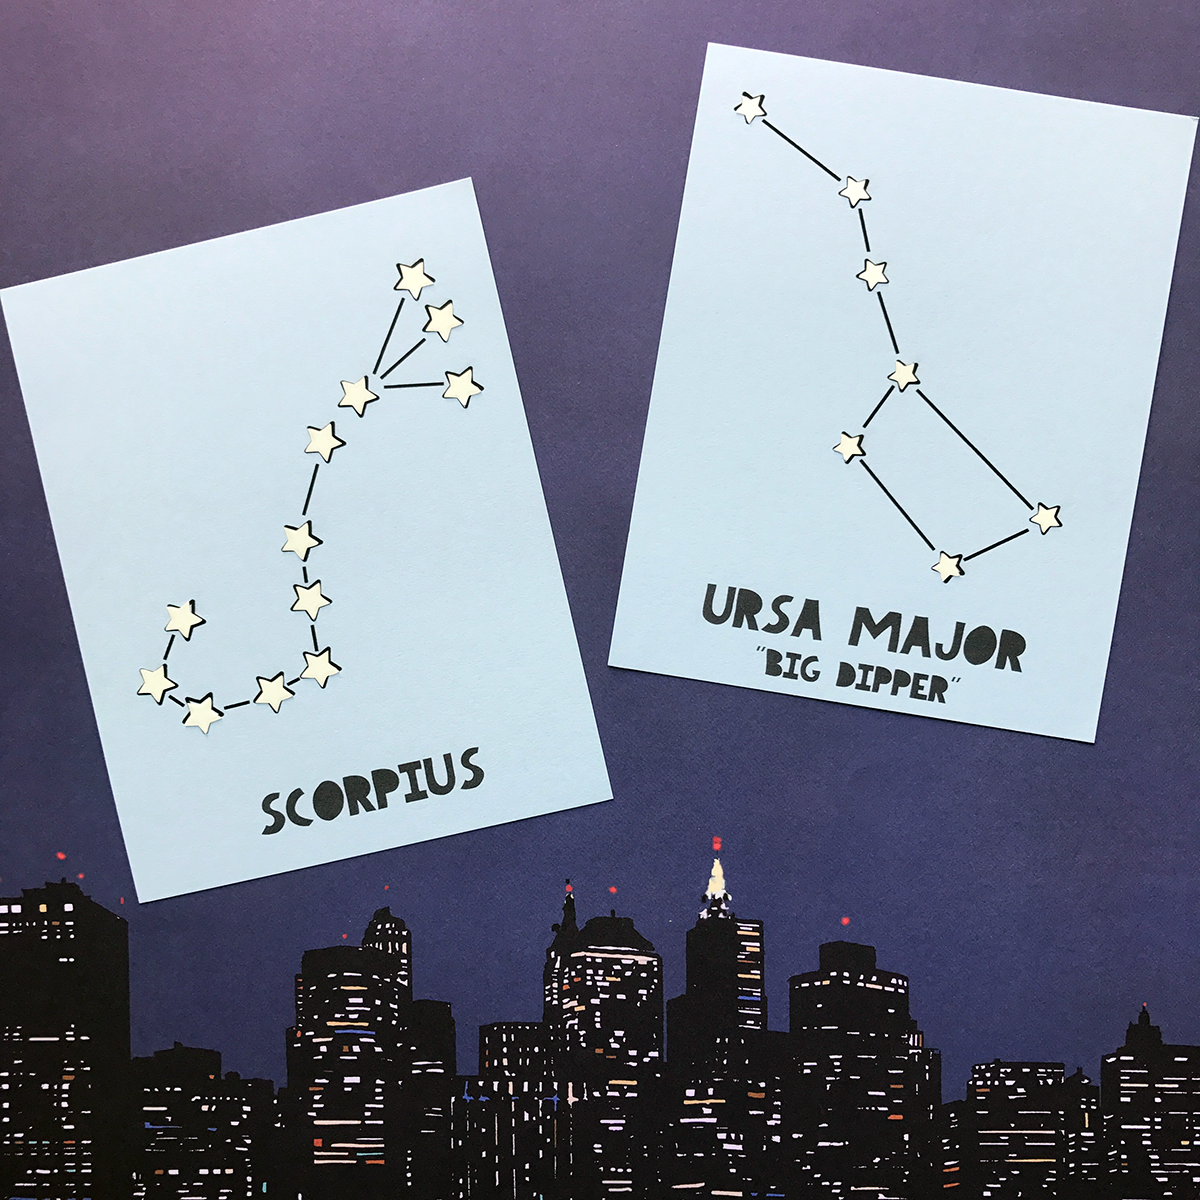
For this project, I used the following four constellations: Ursa Major (Big Dipper), Ursa Minor (Little Dipper), Scorpius, and Cassiopeia. TIP: Pick popular, easy-to-find constellations for the little ones!
Open up a blank 8.5in x 11in file in Silhouette Studio®.
Now, let’s create constellation cards in Silhouette Studio®, starting with the card shapes.
- Start with a blank 8.5in x 11in file
- Draw a vertical line that is 11in long. Click on the line and center it to the page by using the Center Align button in the Transform Window. See screenshot below.
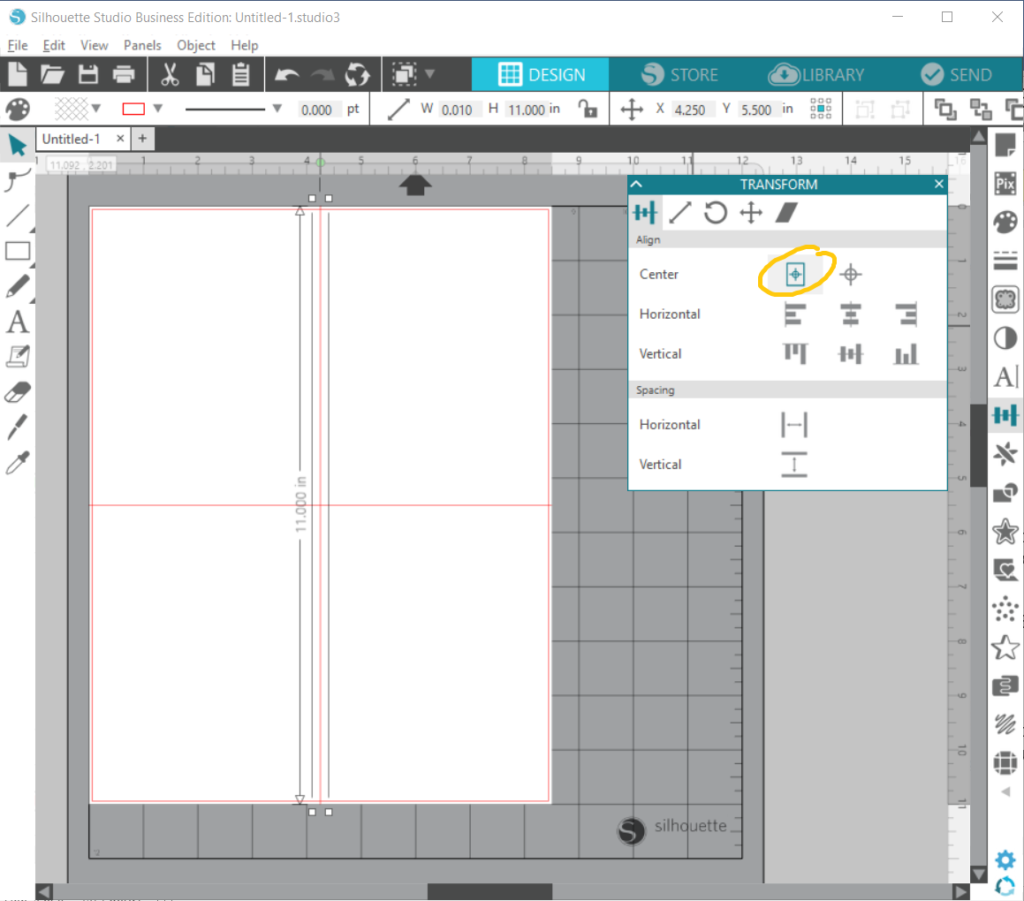
- Draw a horizontal line that is 8.5in long and center it to the page.
- Select both lines, change line color to black with a thickness of 1.00pt.
- You should now see four rectangles which will become your constellation cards when cut.
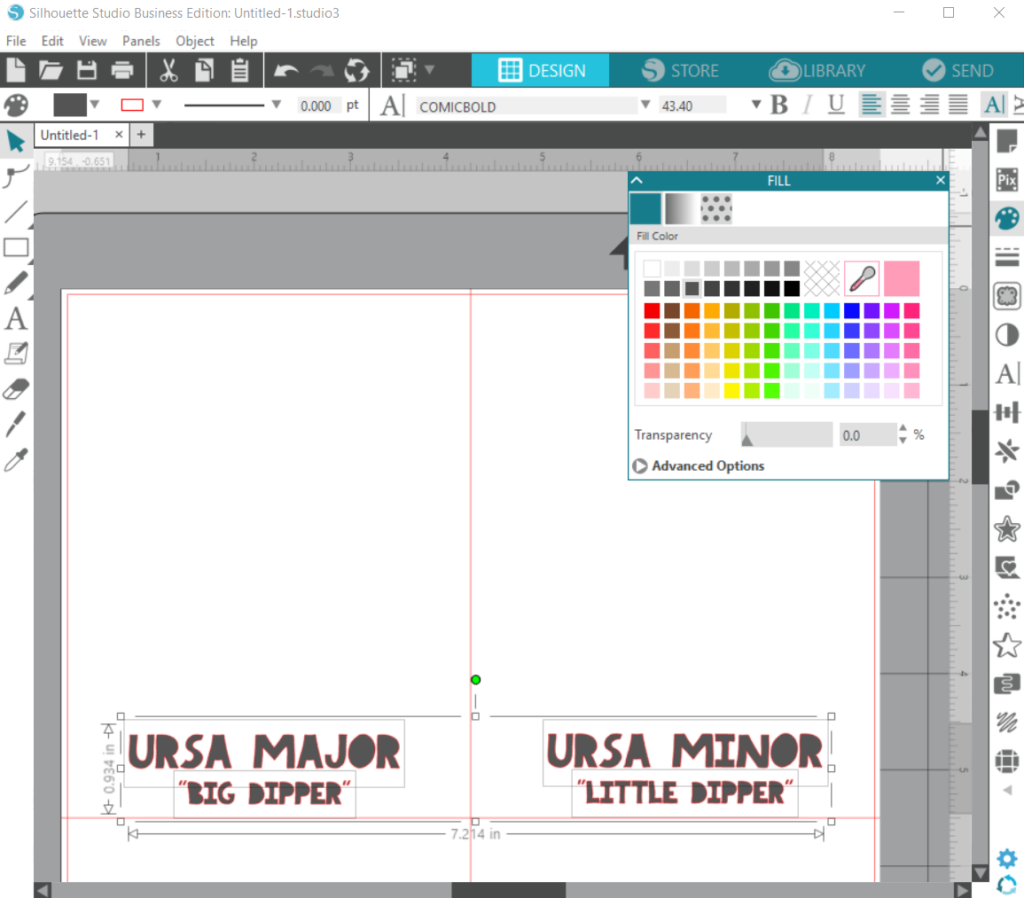
Next, add the constellation names:
- On the bottom of each card, type the name of the constellation.
- Fill in the color of your text by choosing a fill color in the Fill Window.
Finally, add the constellation designs in the open space above the constellation names:
- Again, using our friend The Internet, search for clip art of your selected constellations. Save the image files.
- Import your saved files into your Silhouette Cloud Library and then drop the imported files into your current stargazing file.
- Recreate the constellation by drawing lines and adding stars on top of your imported constellation image file. For the star shape, I used Design ID #61255 from the Silhouette Design Store.
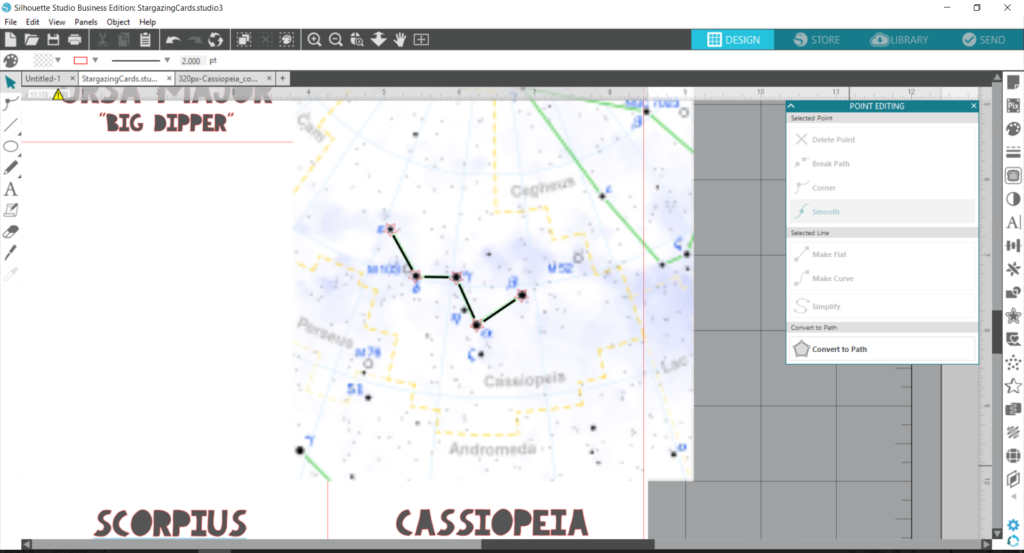
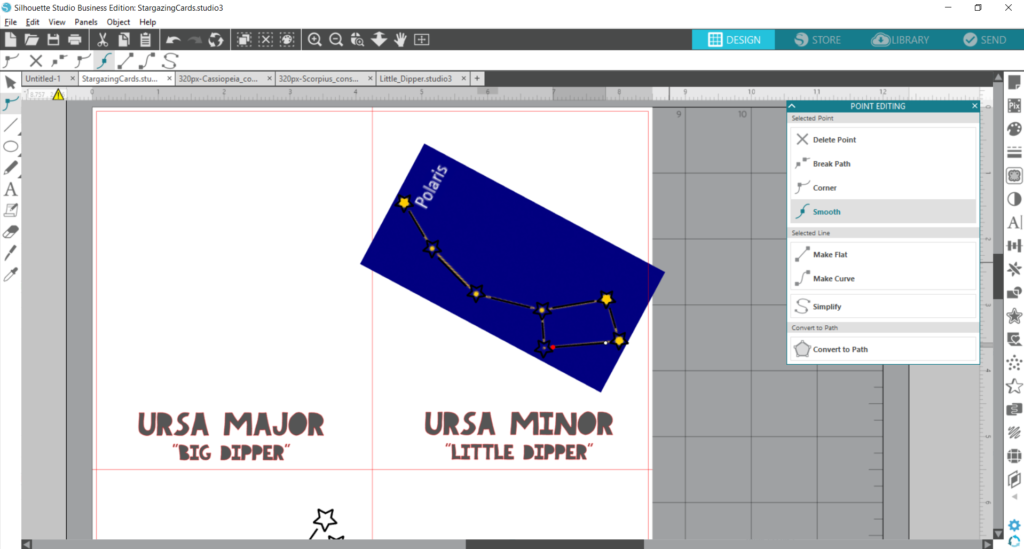
- Next, delete the image file and you should now see your constellation design.
- Select all lines and stars of your constellation and group them (TIP: know your hotkeys to save time by using CTRL+G to group all selected items).
- In the Line Style Panel, increase line thickness as desired. I made mine 2.00pt thick.
- In the Line Color Panel, choose black.
- Scale your constellation so that it fills the open space as much as possible.
- Repeat steps 2-8 for remaining constellations.
Lastly, select all and choose No Cut in the Action panel of the Send Window. This means nothing will be cut. We are simply creating cards to be printed.
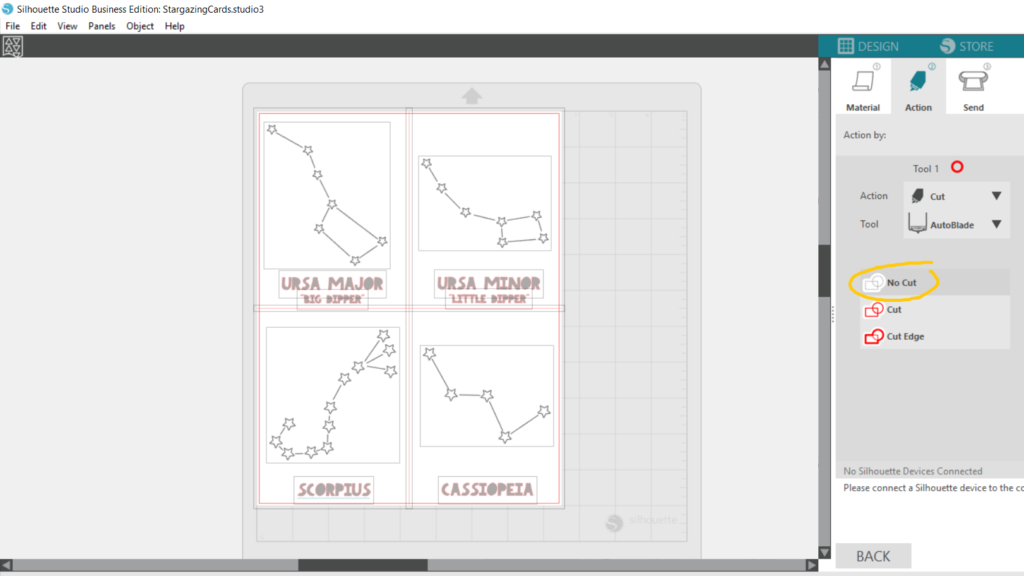
Step Two: Print Constellation Cards
One of the neat things about Silhouette Studio® is that you can even use it for just printing. It works like a graphic design software!
With the four constellation cards we created, insert your cardstock and send it to print on your home printer.
Then, using a paper slicer or scissors, cut along the vertical and horizontal lines you created in Step one.
Step Three: Cut Glow-in-the-Dark Stars
Copy and paste your four constellation designs on a new file in Silhouette Studio®. Ungroup everything and then delete the black lines. What’s left should just be the stars, which we will cut with your Silhouette cutting machine.
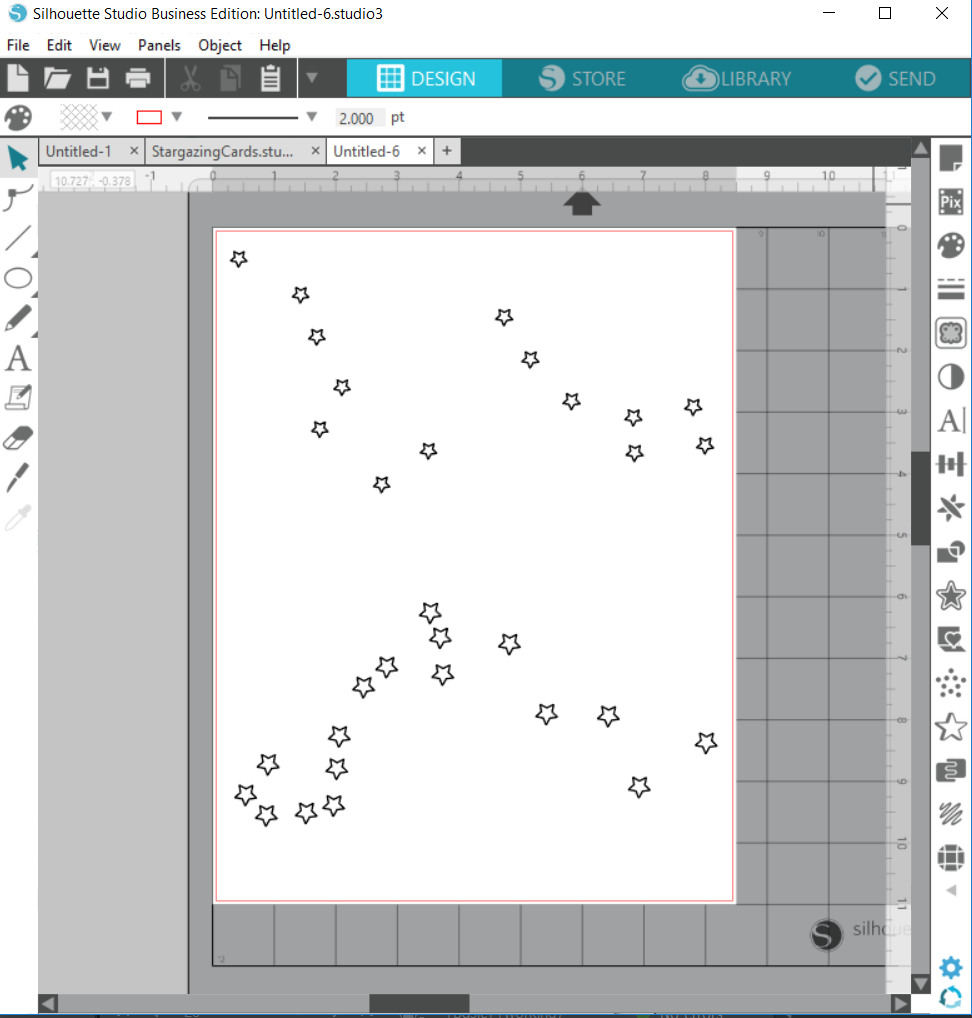
To save your glow-in-the-dark sticker paper (I’m all about being practical!), move the stars in each constellation into tighter groups. Be sure to keep some sort of visible divider so you know which stars are for which constellation. You may want to group each bunch to keep the stars organized.
Select all and choose Cut in the Action panel of the Send Window. Place one sheet of the Glow-In-The-Dark Sticker Paper on your cutting mat. With the correct cut settings, send to Silhouette!
Step Four: Finalize Constellation Cards
Hooray, we are on the final and easiest step! Simply peel your glow-in-the-dark stars and adhere them to their corresponding spots on the constellation cards. That’s it! I told you this was the easiest step!

Next time you find yourself with the kids under an open night sky, shine a flashlight onto your constellation cards for two reasons: 1) to get a preview of what to look for, but mostly 2) to “charge” the glow-in-the-dark material so that you can hold up the cards to the sky to locate your constellation. And if you happen to see a shooting star while stargazing, make a wish!
Which constellations are you looking for in the night sky this summer?
Nasze Naturalne
September 3, 2025
Your authentic voice really shines through in everything you create and share
Naszenaturalne
September 2, 2025
Really love your style
Kelly Wayment
June 28, 2024
You can use it with vinyl as long as it is smooth and flat to allow the static charge to hold on to it. Rolled vinyl that wants to go back to its rolled shape will not necessarily work well, and it would need to be trimmed to fit the ES mat cutting area.
Kelly Wayment
June 28, 2024
Yes, you can use the heat pen while using the ES mat. 🙂
Yurii
March 2, 2024
Hello. May it be used with heat pen?
Thanks
Jerome
February 24, 2024
Hi, works this with the normal vinyl foils or only with printer papter etc?