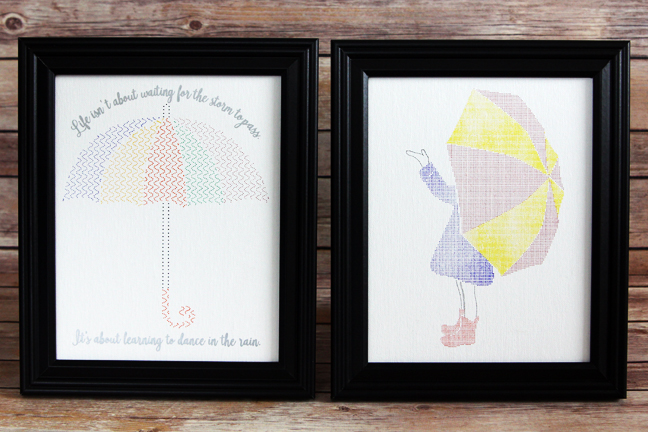
Happy Spring! (Or happy fall to our southern-hemisphere friends.) Either way, both seasons often mean it’s time to keep an umbrella handy, which is my inspiration for this project. I have been working my Curio pretty hard lately with all kinds of experiments, and I want to share how to create this multi-color stipple art with you.
Tools/supplies I used for this project:
- Silhouette Curio™
- Large Curio base and cut mat
- Sketch pens OR
- Markers or other pens with the adjustable pen holder *
- Silver smooth heat transfer
- 8 in. x 10 in. canvas art panel
- 8 in. x 10 in. frame
- Multi color umbrella design (ID #41041)
- Aubrey font (ID #122828)
Are you ready? Let’s get started!
1- Arrange the Design in Silhouette Studio®
First, we need to put the design together and alter a few things so we only have one layer of stippling. Ungroup the umbrella design and delete the wider offset piece, as we won’t be using it. Then use the thinner umbrella’s full outline as a guide to moving the various umbrella sections into place.
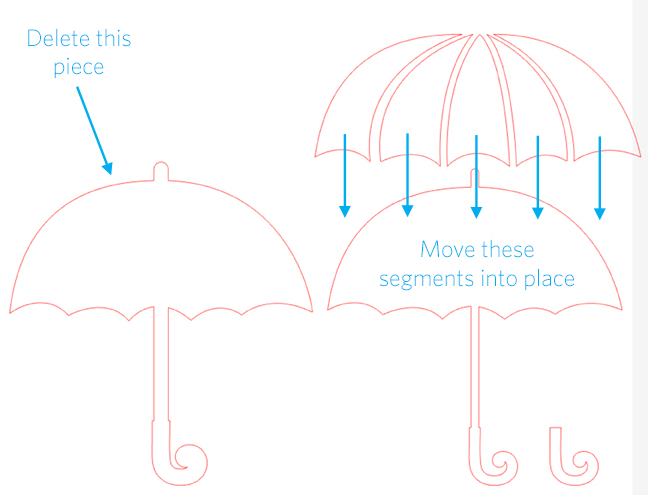
Change the line or fill colors as necessary to help you “grab” and move the pieces. Use your arrow keys on your keyboard to move a selected piece just a little bit at a time. (Absolute perfection in lining up the shapes is not a necessity here.)
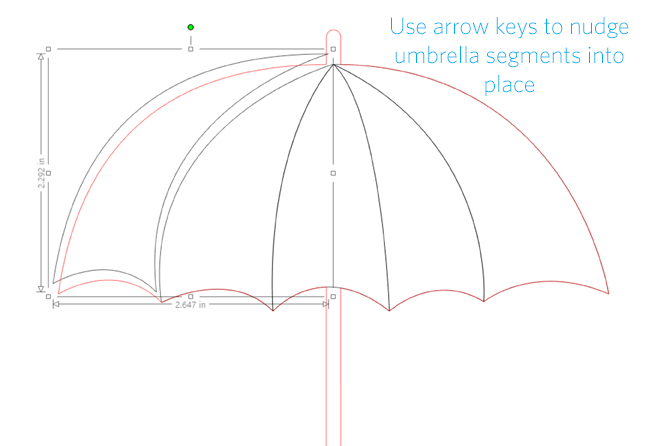
Once your umbrella segments are aligned, select all of the umbrella pieces (outline, segments, and handle) and resize to about 7 in. wide to fit our 8 x 10 canvas. Then select and move the umbrella outline off to the side and save it for later.
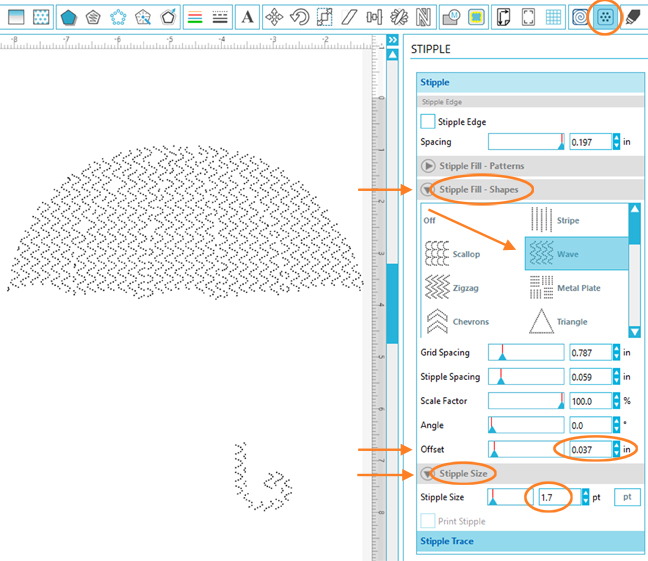
2- Apply Stipple
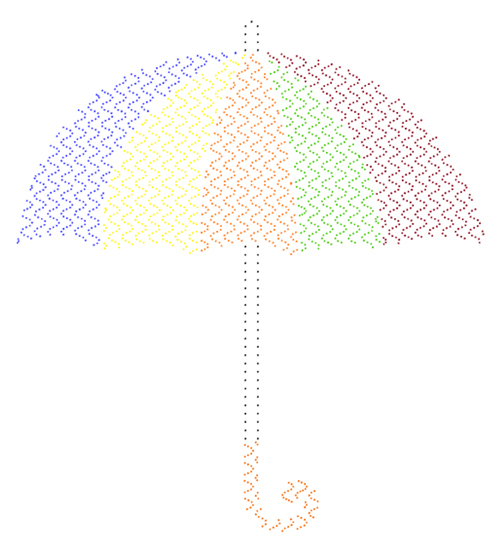
Now we’re ready to apply a stipple fill to the umbrella pieces. Go to the Stipple Window and select the five umbrella segments and the umbrella handle piece.
- Click on the Stipple Fill – Shapes arrow, then choose the Wave fill.
- Click on the Stipple Size arrow, and reduce Stipple Size to 1.7 pt. This will better visually represent the size of dots a fine marker or pen will produce.
- Back in the Stipple Fill – Shapes section, reduce the Offset to about 0.037.
- Feel free to adjust any of the sliders to see if you like the effect better.
We want to apply just an edge stipple to the umbrella tip and post, rather than filling it. To keep it clean, I used my knife tool to eliminate everything from the umbrella outline except the post and tip.
- With the Knife tool, choose Treat Unfilled Shapes As > Outline.
- Use the knife tool to slice the post tip where it meets the top and the bottom of the umbrella, and also slice off the handle.
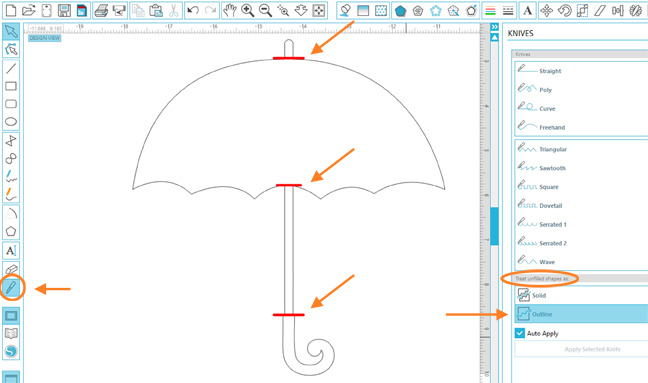
- Select just the post tip and the two lines of the umbrella post (hold Shift while clicking on the pieces), and Group them. You can delete the other line segments.
- In the Stipple Window with the umbrella-post lines selected, check the box for Stipple Edge.
- Set Spacing at 0.126 in., and reduce Stipple Size to 1.7 pt.
3- Color and Arrange
Now that all the pieces are converted for stippling, it’s time to finish off the design. Make sure your 8 in. x 10 in. page size and large Curio cutting mat are set in the Design Page Settings Window.
Change the color for each umbrella segment and the handle piece by selecting them one at a time and using the Line Color Window to choose a color that represents your pen or marker.
Move the post outline and the handle into place.
Select all of the umbrella pieces and Group them so you can move everything at the same time while positioning it to the center of your page. (To select multiple stipple pieces you may need to hold Shift while selecting individual parts, or use Select All, if that’s easier. A drag box doesn’t always work to select stipple designs.)
4- Stipple with Curio
We are ready to load our canvas panel and start stippling! My canvas is 3 mm thick, so I used platforms 2 + the cut mat to bring it up to the optimum 6 mm total height.
There are various ways to set up the cut settings, but this is my preferred setup for stippling or sketching with different colors.
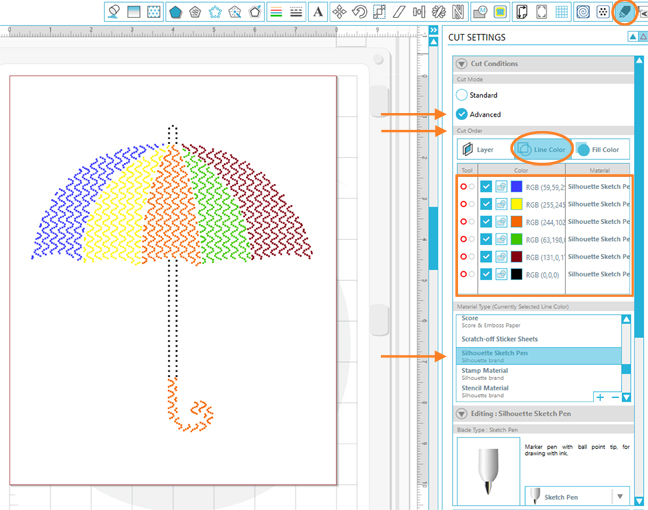
Because we set up a different line color for each color of pen or marker we want to use, let’s use the Advanced Cut Mode in the Cut Settings Window. Choose Cut Order > Line Color. (See image below.)
You’ll see that every line color on the page has a check mark. You can change the order of actual stippling by dragging on the RGB code to move that color up or down in the queue. You can also change which tool is used for each color. (I’m only using the left tool holder and stippling one color at a time because I have so many colors and am using markers that I don’t want to dry out while waiting their turn.)
The colors with a check mark are “turned on”, which you can see by their bold colors on the design page. Make sure Silhouette Sketch Pen is the Material Type for each color, and adjust the speed/thickness as necessary. (I set mine to Speed 10, Thickness 15-18, Double Cut – just to make sure each mark shows up completely.)
I am only going to stipple one color at a time, so I will uncheck every color except the color I want to use. I’ll start at the top and go down the line. I know which marker to put in my pen holder because I colored the lines to match my desired marker colors.
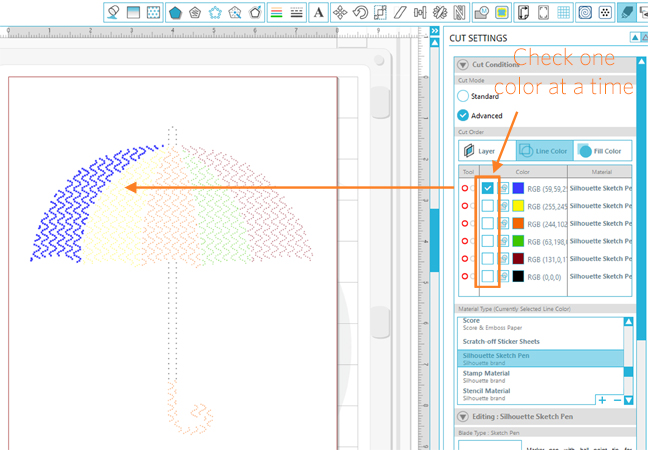
When each color is finished stippling, I’ll uncheck its box, remove the marker, replace it with the next color, check the box for that color, and click Send to Silhouette each time. (Leave the base loaded the entire time.) Stippling isn’t necessarily fast with a big design and lots of colors, but it’s worth the time and effort!
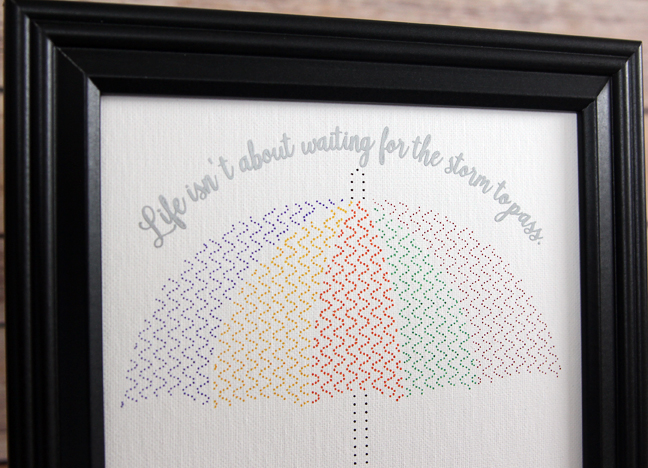
I chose to add text with smooth heat transfer material that wouldn’t overpower the stippled design. You could also sketch your text. You can see a text-to-path tutorial here. I used the Arc tool in Studio to give my text a nice curve for its path. The font is Aubrey.
One warning: once you start stippling, you may not want to stop! I created this other umbrella piece with a similar process as described above.

If you don’t want to create this project exactly, here are some general tips for working with stippling in multiple colors.
- Don’t overlap objects with stipple fills. Even if you can’t the see the color underneath while designing, it will show up when actually performing the stipple. (You’ll see it in the Cut Settings Window preview.)
- If you can’t select objects by enclosing them in a drag box once a stipple effect is applied, hold your Shift key while clicking to select the various pieces at the same time.
- Changing the Stipple Size in the Stipple Window has no effect on the actual stippling. That will depend on your pen or marker choice.
- To change an object’s color on the screen once a stippling effect is applied, use the Line Color Window.
- If you create a stipple design using Stipple Trace, you must release the compound path in order to change individual points’ colors. You can then select individual dots and use the Line Color Window to change their color.
Now you can be a multi-color stippling pro! Let’s see what you create!
* Don’t use markers with paper that bleeds. The final stipple point rests with the blade holder in the “down” position, causing a darker mark. Using a prepared canvas panel instead of paper solved that problem with markers. On these pieces I used skinny ultra-fine-point Sharpies with the medium pen adapter and regular-size fine-point Sharpies with the large pen adapter.
 Free Class - Father's Day Apron Set
  Free Class - Custom Graduation Tumbler
Nasze Naturalne
September 3, 2025
Your authentic voice really shines through in everything you create and share
Naszenaturalne
September 2, 2025
Really love your style
Kelly Wayment
June 28, 2024
You can use it with vinyl as long as it is smooth and flat to allow the static charge to hold on to it. Rolled vinyl that wants to go back to its rolled shape will not necessarily work well, and it would need to be trimmed to fit the ES mat cutting area.
Kelly Wayment
June 28, 2024
Yes, you can use the heat pen while using the ES mat. 🙂
Yurii
March 2, 2024
Hello. May it be used with heat pen?
Thanks
Jerome
February 24, 2024
Hi, works this with the normal vinyl foils or only with printer papter etc?