
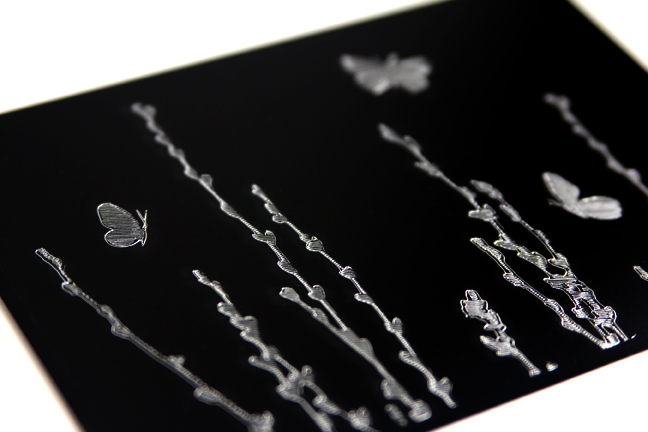
How are your Silhouette Curio™ creations coming? Are you ready for another metal etching tutorial? I tried my most recent etching project on a black metal etching sheet, and I love how the exposed silver metal really pops. I’ll show you how I did it.
Here is what you’ll need to create this project:
- Silhouette Curio™
- Silhouette Curio™ basic base and cutting mat (8.5 in. x 6 in.)
- Curio 5 in. x 7 in. metal etching sheets
- Curio stippling & etching tool
- 5 in. x 7 in. frame
- Butterfly field design (ID #42668)
1- PREPARE YOUR DESIGN
In the Design Page Settings Window, set the Page Size to 7 in. wide and 5 in. high to match your metal etching sheet. Make sure your Cutting Mat is also set to Curio (cut) 8.5 x 6 in.
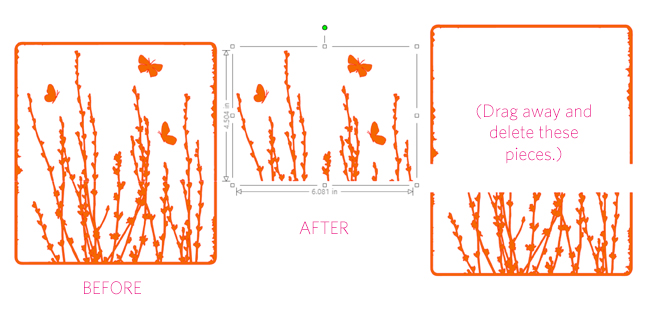
Choose a design you wish to etch. I chose butterfly field.
Because the design is a different shape than the metal sheet, I resized it to approximately the correct 7-inch width, then used my knife tool to cut away the bottom portion. (It’s best to make your design is a compound path before slicing. Select the design, right click, choose Make Compound Path.)
- Click on your Knife tool on the left toolbar.
- Set it to Straight and Treat Unfilled Shapes as Solid. (Designer Edition and Basic Edition both have these two important options, but Designer Edition has a few more knife features.) Your designs must be closed shapes to use the emboss fill, which is why we chose the Solid option.
- Click and drag your knife tool across the design to cut off the unneeded portion. (Hold the Shift key while dragging for a perfectly horizontal line.)

Drag away and delete the extra pieces. Group the remaining design you wish to etch. (See below.)
2- CHOOSE AN EMBOSS EFFECT
To etch out the design, choose an Emboss effect. In the Emboss Window, under Emboss/Deboss, choose an Effect. I chose Parallel Lines, reduced my Spacing to 0.010 in. (you can type the numbers in if your slider doesn’t go as small as you wish), and on this design I also adjusted my Angle to 20.8°. (These effect settings are all personal preference, so don’t be afraid to change them to what works for you.)

3- CHOOSE CUT SETTINGS
In your Cut Settings Window, set Tool 1 material type to metal etching sheets.
You will need to place platforms 2 + 2 + cutting mat onto your base, with the metal etching sheet placed on the mat exactly as you see on your work page, and insert the blue stippling/etching tool into the Curio’s Tool 1 holder (look for the red circle).
TIP: You should use a sticky mat, or the metal could slip on your mat while etching.
4- SEND TO SILHOUETTE
Load the base into the Curio, click Send to Silhouette, and watch it etch!
TIP: Gently blow away the bits of metal, and if you choose to brush away the metal “burrs” off the finished design, please make sure you don’t rub them against the uncut surface or you might scratch yourself.
Add the etched metal piece to a frame and admire your beautiful artwork!
If you have any metal etching questions, please ask! We’re happy to help. 🙂
 Free Class - Father's Day Apron Set
  Free Class - Custom Graduation Tumbler
Nasze Naturalne
September 3, 2025
Your authentic voice really shines through in everything you create and share
Naszenaturalne
September 2, 2025
Really love your style
Kelly Wayment
June 28, 2024
You can use it with vinyl as long as it is smooth and flat to allow the static charge to hold on to it. Rolled vinyl that wants to go back to its rolled shape will not necessarily work well, and it would need to be trimmed to fit the ES mat cutting area.
Kelly Wayment
June 28, 2024
Yes, you can use the heat pen while using the ES mat. 🙂
Yurii
March 2, 2024
Hello. May it be used with heat pen?
Thanks
Jerome
February 24, 2024
Hi, works this with the normal vinyl foils or only with printer papter etc?