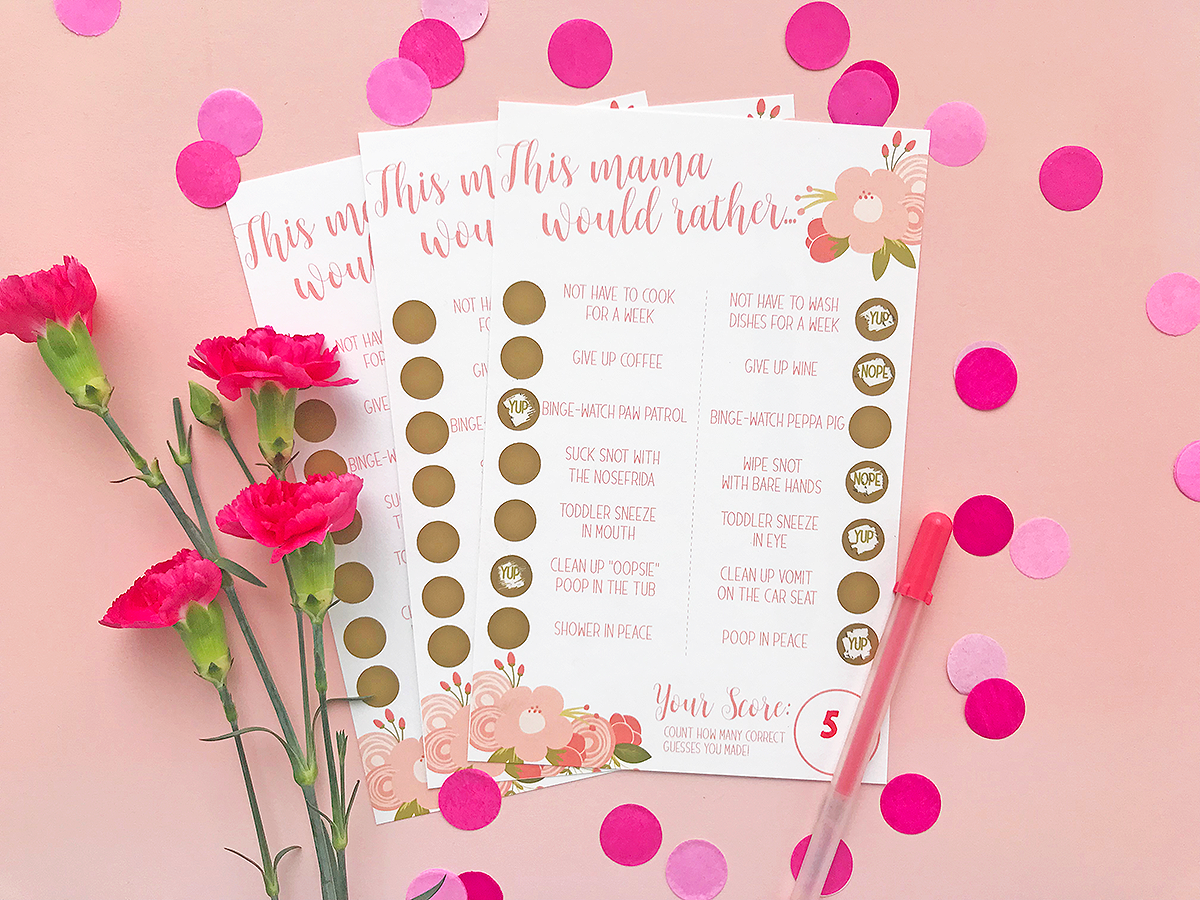
Call me a game geek, but I love playing board or card games! So when I had the opportunity to help create a fun game for my friend’s baby shower, I was all in! #puntotallyintended
One of Silhouette’s specialty media products is their scratch-off stickers, which come in gold, silver, and even printable! There’s something exciting about scratch-off cards, so why not mix the best of both worlds and create a baby shower scratch-off game! To make these fun and pretty game cards, follow along with the tutorial below!

Supplies Needed:
- Silhouette CAMEO® or Silhouette Portrait®
- Silhouette Studio®
- Silhouette Cutting Mat
- Silhouette Cutting Blade
- Silhouette Scratch-off Stickers – Gold
- 8.5 inch x 11 inch White Cardstock
- Scissors or Paper Slicer
- Design ID #58726
- Design ID #58728
- Design ID #272767
- Design ID #273833
Step One: Prepare the Game Card Design
1. In Silhouette Studio®, under the Page setup panel, choose Letter (8.5 inches x 11 inches) Paper Size with landscape orientation.
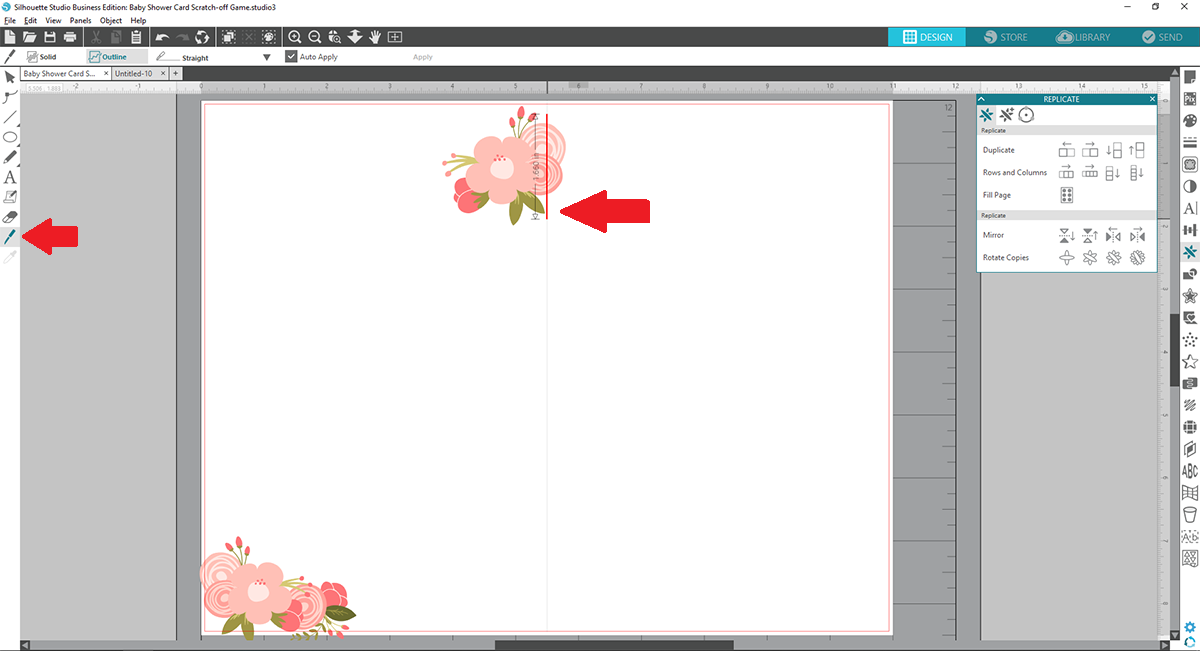
2. Draw a 0.25 pt vertical grey line that is 8.5 inches long. Under the Move Window, set its x-axis coordinate to 5.5 so that it is vertically centered on page. The purpose of this line is to visually split the letter-size paper into two game cards. We will first create the game card inside the left card space.
3. Insert Design ID # 58726. Ungroup and delete as necessary so that only one design remains (no cut lines). Next, lock aspect ratio and resize as needed to fit your card design. For this project, I resized the design with a width of 2.5 inches and placed it in the bottom left corner.
4. Insert Design ID #58728. Ungroup and delete pieces as necessary so that only one design remains (no cut lines). Next, lock aspect ratio and resize as needed. For this project, I resized the design with a width of 2 inches.
5. Select the knife tool and slice where Design ID#58728 crosses over to the right card space. TIP: Hold down the Shift Key while using the Knife Tool, and it will automatically make your slice line straight. The design is now sliced into two separate pieces. Delete the unwanted sliced piece.
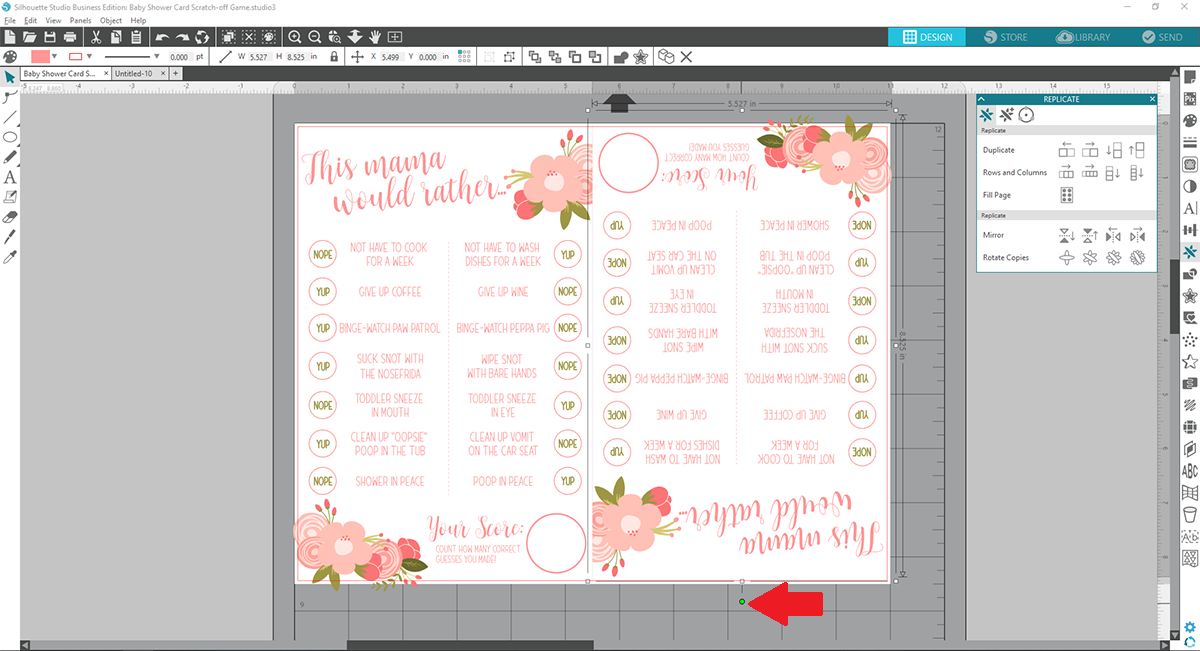
6. Using 64 pt Nightstar Font (Design ID #273833), add the game title, “This mama would rather…” and then resize as necessary. I also slightly rotated the text box for a fun visual effect. Fill text color with color of your choice.
7. Using 18 pt Riverhead Font (Design ID #272767), add the game questions with 90% line spacing and center alignment. Fill text color with color of your choice.
8. Next, add 0.5-inch circles on the end of each game question.
9. Within each circle, add text to indicate correct/incorrect answer. Fill text color with color of your choice.
10. Delete left and right circles now that we know the correct/incorrect answer fits within that space.
11. Now let’s center align all the things! For each of the following groups, select and center align (under the Transform Panel): Left answers, Left questions, Right questions, Right answers.
Step Two: Prepare the “Your Score” Section
1. The last part of the game is adding a “Your Score” section. I used the same fonts and text fill color for design consistency. Within the large circle, the partygoer will add up their correct answers and hopefully be the lucky winner!
2. Draw a line along the middle of the card to separate game questions. Be sure to select a line thickness. For this project, I created a 0.5 pt dashed line.

3. Select all items and group together. Copy and paste into right card space. Rotate grouped piece 180 degrees by clicking and spinning the green circle.
4. Insert white letter-size cardstock in your color printer.
5. Send to your color printer with proper print settings. TIP: I suggest using your printer’s “best” print quality mode.
6. With scissors or a paper slicer, cut along the grey divider line (from Step 2) to separate the two game cards.
7. Depending on how many game cards you need, repeat steps 15–17 as necessary.
Step Three: Prepare Scratch-off Stickers and Assemble
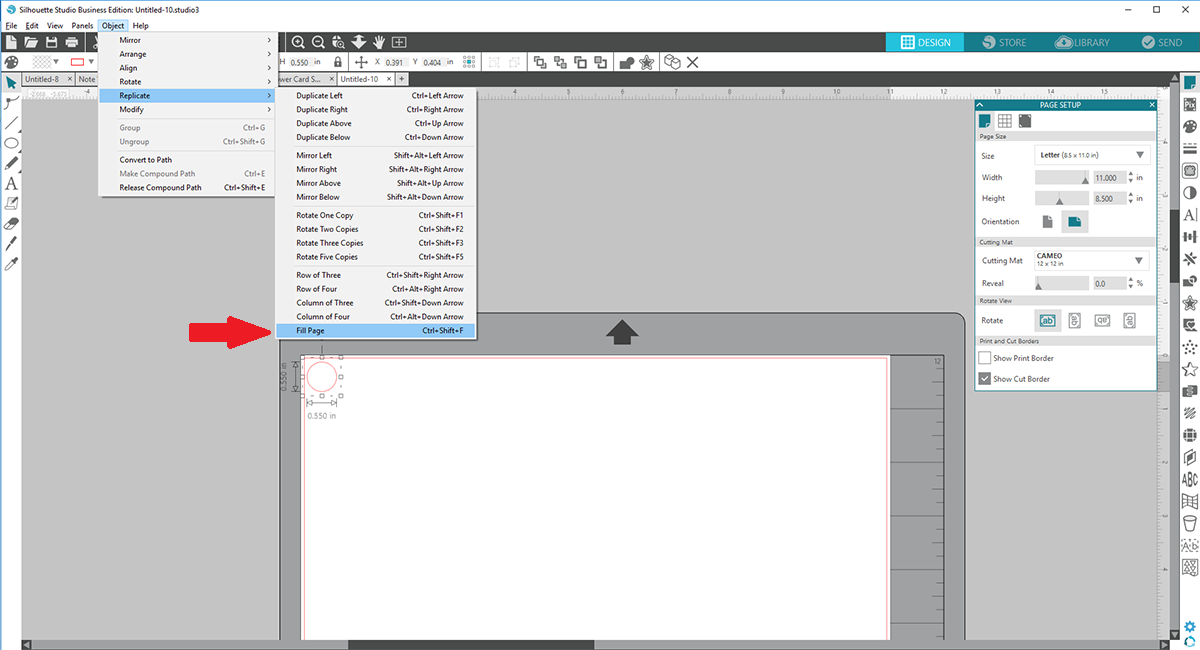
1. On a new file in Silhouette Studio, draw a 0.55-inch circle and replicate throughout page. To easily replicate in one click, simply on the top menu bar, go to Object > Replicate > Fill Page. These circles are large enough to cover up the correct/incorrect answer.
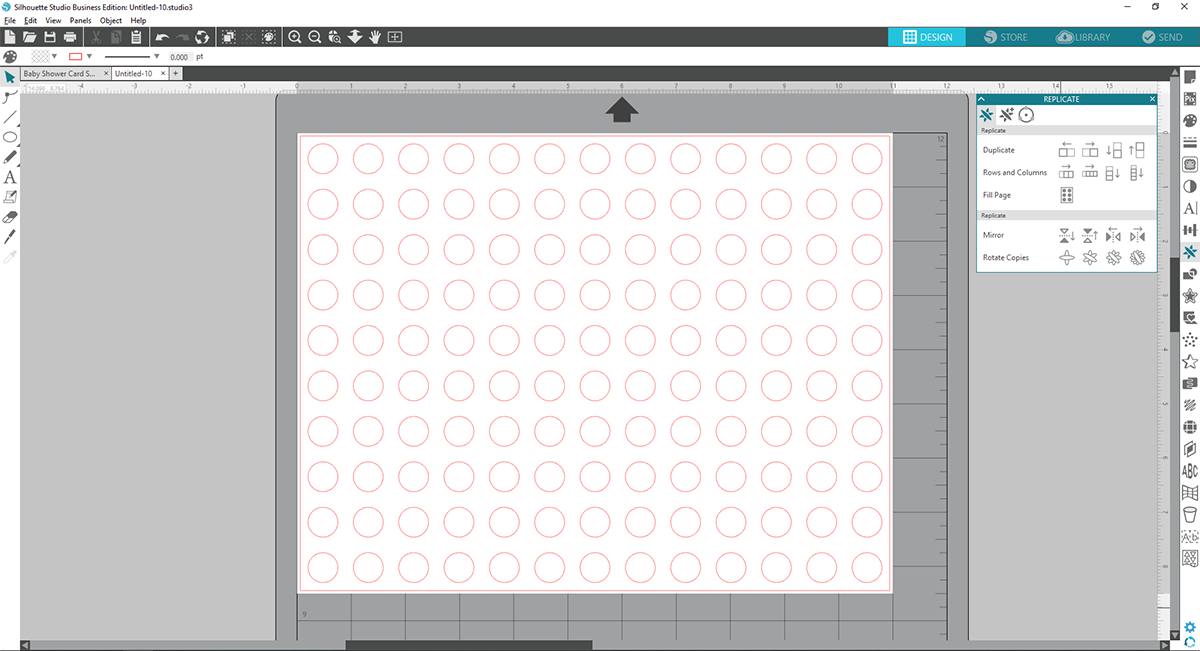
2. Place a scratch-off sticker sheet on the Silhouette cutting mat.
3. Send to Silhouette using proper cut settings.
4. Repeat steps 2–3 as necessary.
5. Peel off scratch-off stickers and place over the game card circles to conceal the answers.
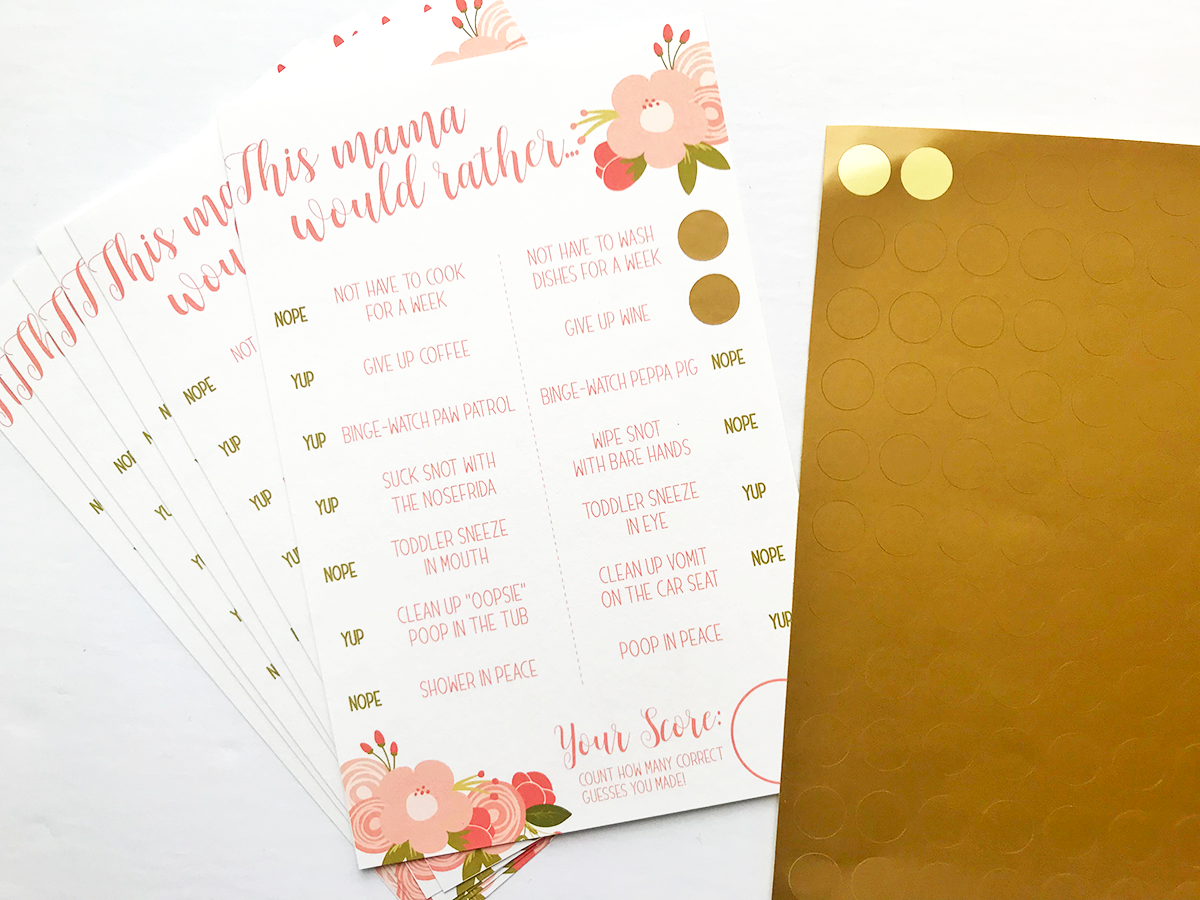
These cards are sure to be a hit and the questions can easily be modified to fit another party’s theme like a bridal shower or milestone birthday. The hardest part will be limiting the number of hilarious questions to fit on the card! Any mamas out there want to play along and tell us your answers to the questions on this card?!
 Bandana Baby Bibs