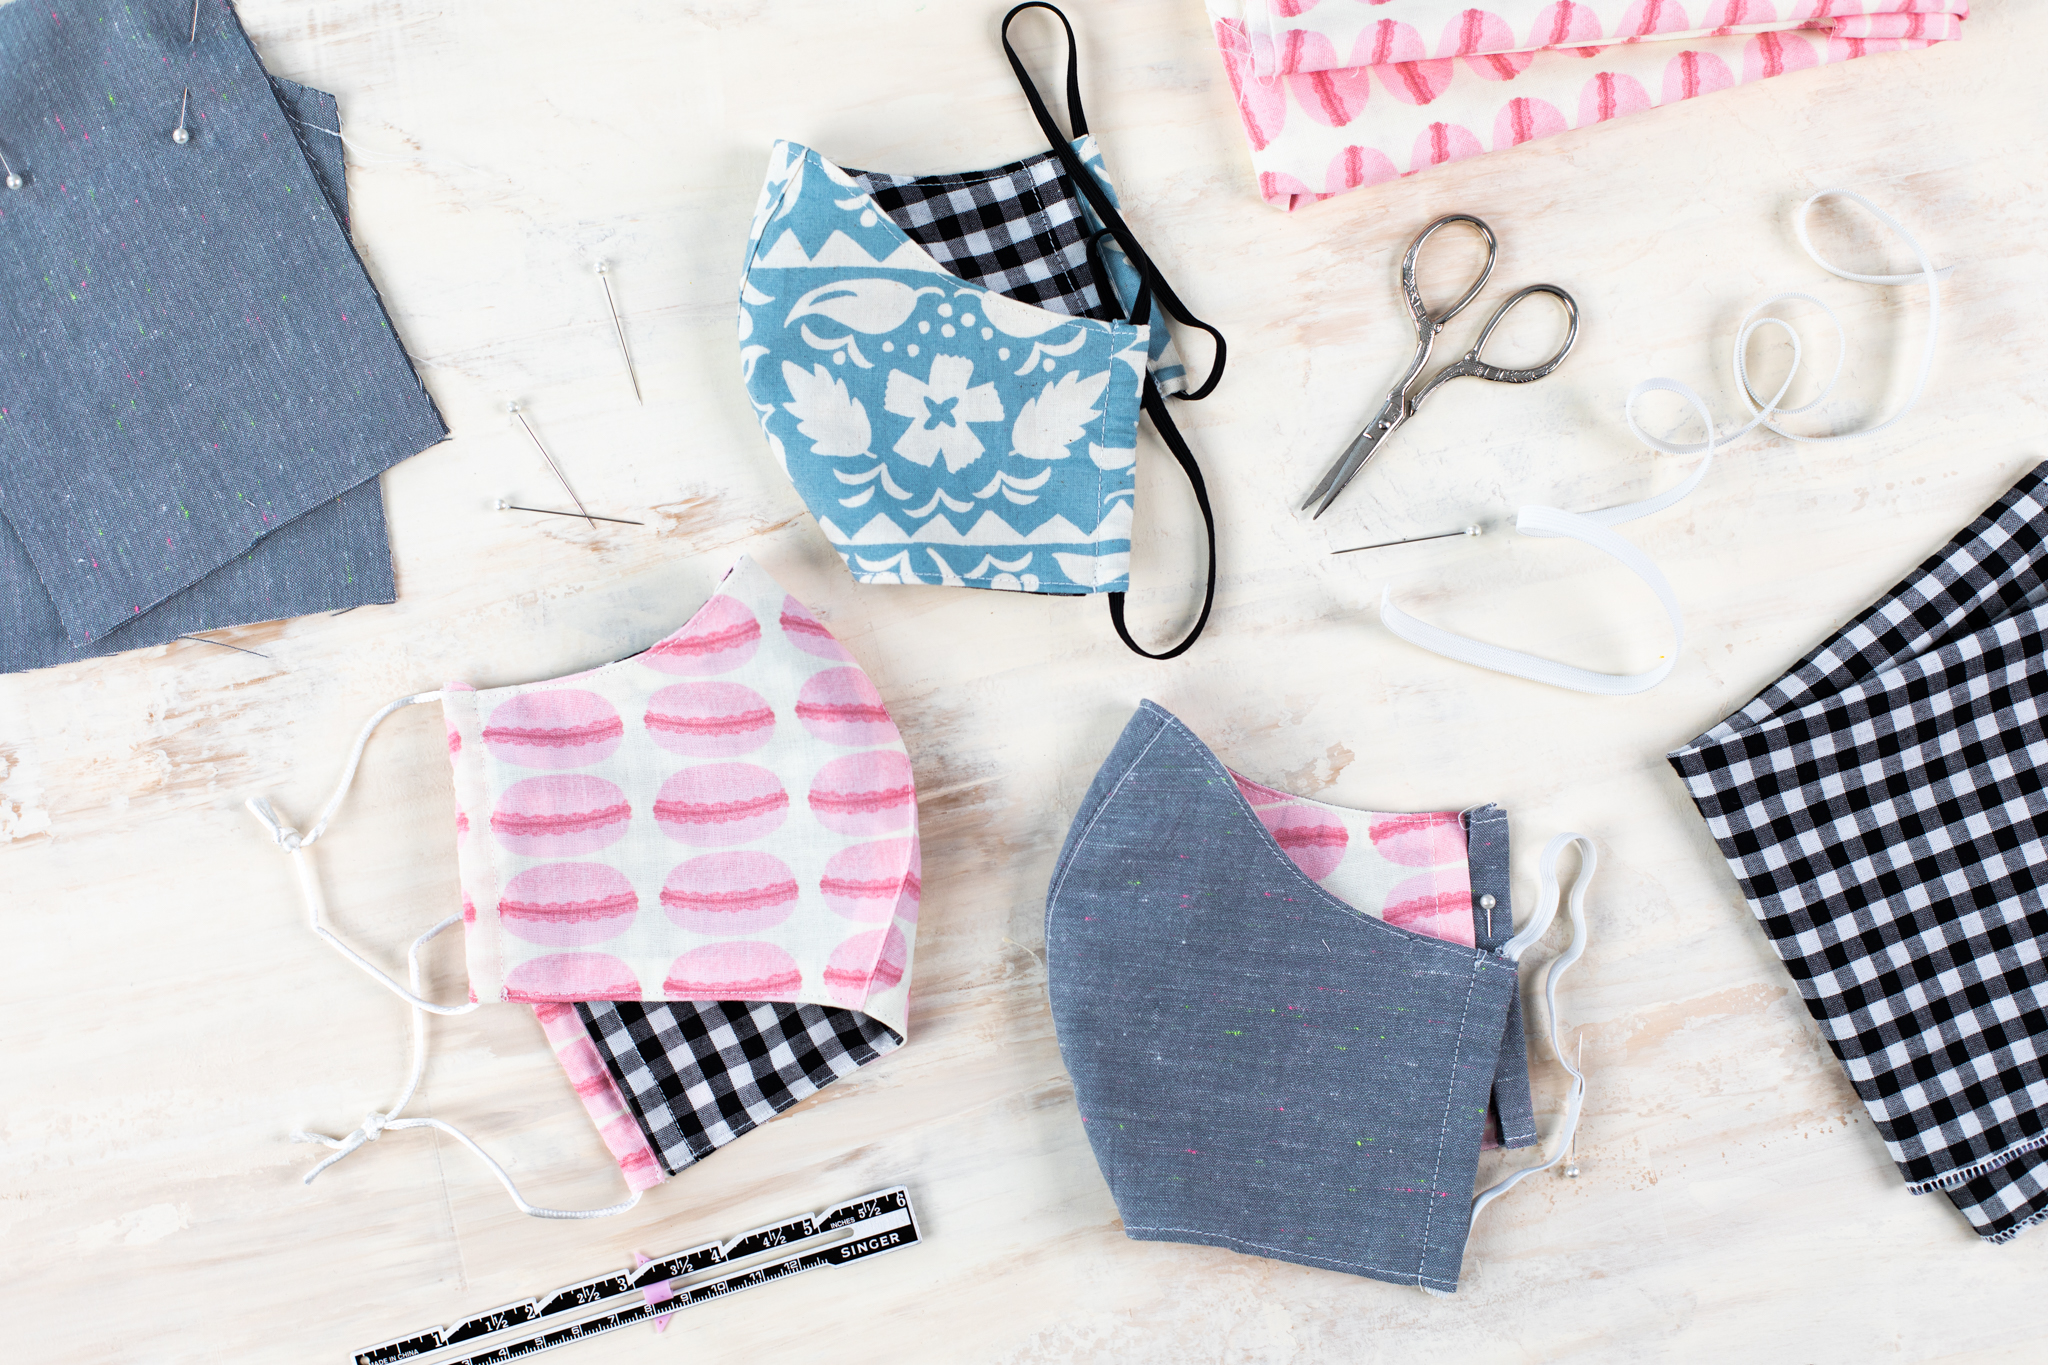
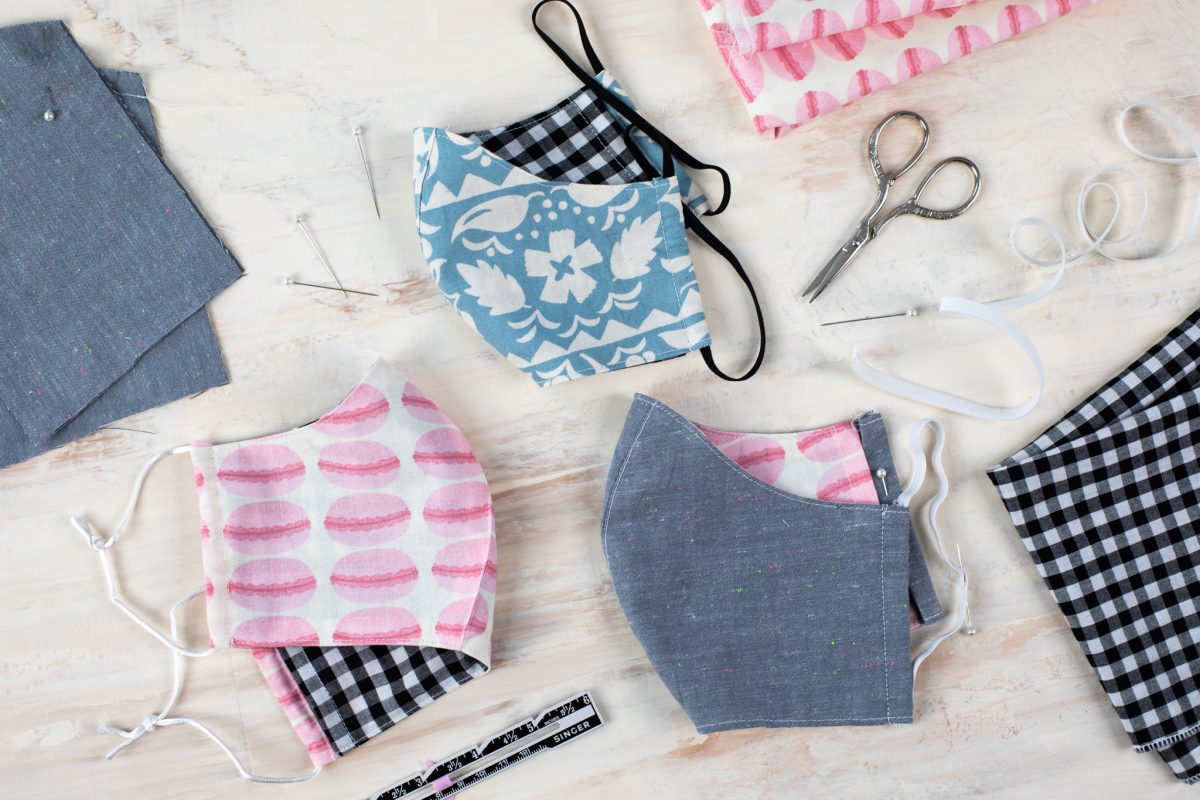
Amidst the COVID-19 outbreak, many of you have inquired about a pattern to create face masks to relieve the desperate need for masks some areas are facing. Although these aren’t the same as medical-grade masks, they can still help you avoid touching your face! This specific pattern also features a pocket where you can insert filtration fabric. We’re using our Rotary Blade for Cameo 4 to cut out our fabric pieces to make this a super simple project. We encourage you to reach out to your local communities to find where you can donate!
Supplies Needed:
- Silhouette Cameo® 4 Plus or Silhouette Cameo® 4
- Silhouette Studio®
- Silhouette Cutting Mat—Use a high-tack or extra sticky mat
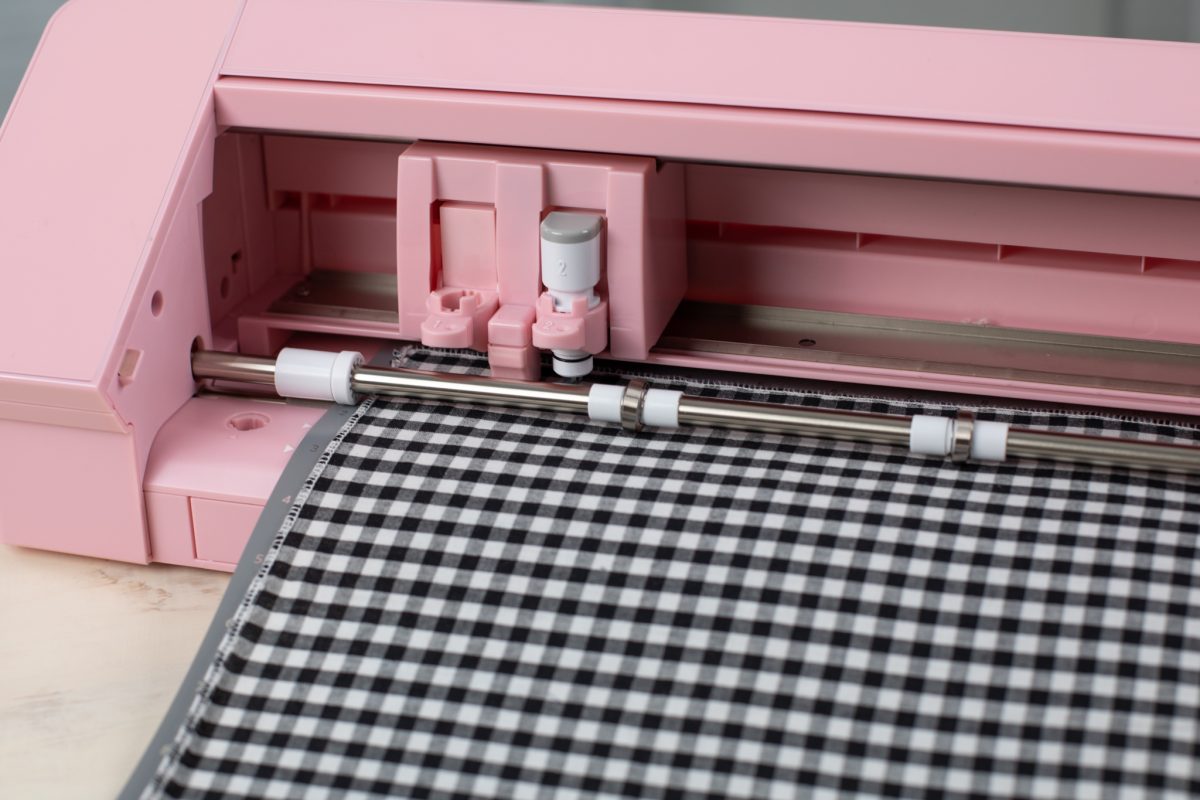
- Silhouette Rotary Blade for Cameo 4
- Cotton Fabric—Here is a resource for the best fabrics to use for DIY face masks
- Scissors
- Sewing machine
- Straight pins
- Iron
- Safety pin
- 16 inches of 1/4-inch to 1/8-inch elastic. If you can’t find elastic, you can use paracord, ribbon, etc., but you’ll want around 44 inches in length to be able to tie around the head.
- Design ID #317969
Step One: Format Your Face Mask to the Correct Size
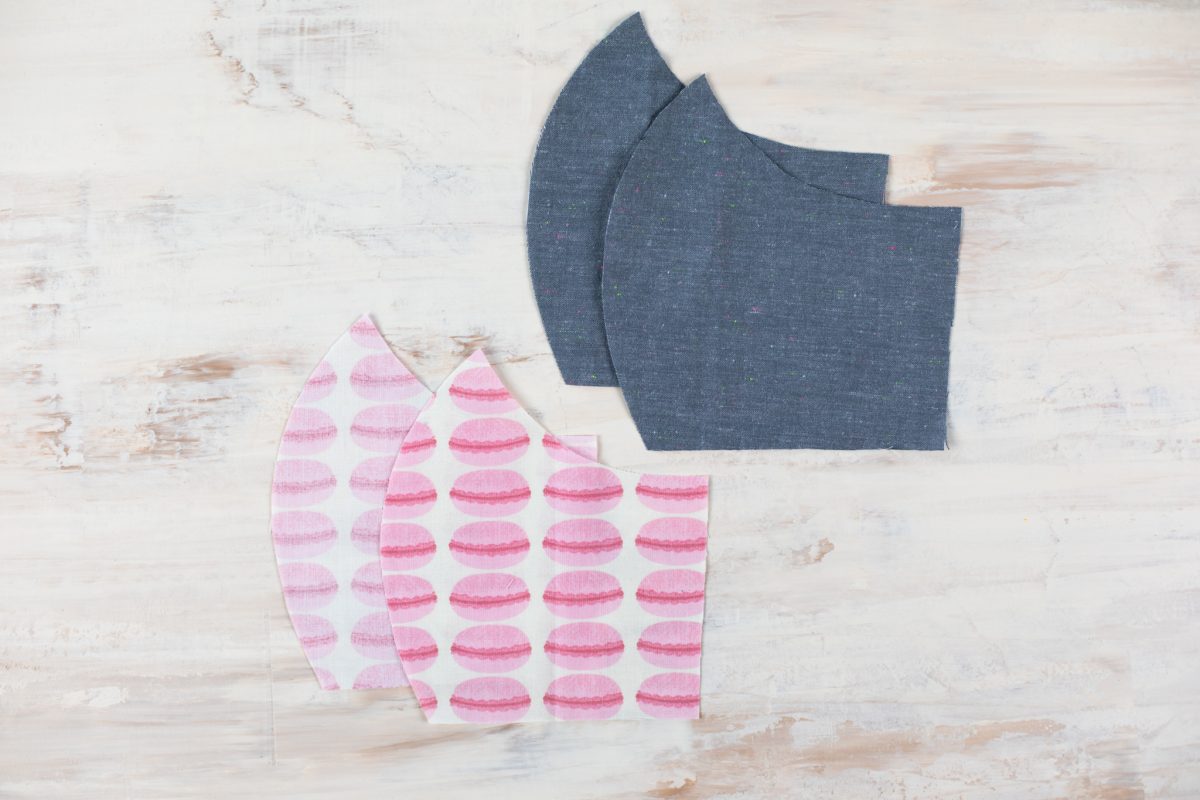
1. Insert the face mask file into Silhouette Studio®. You’ll notice the file comes with two outer fabric pieces and two liner pieces.

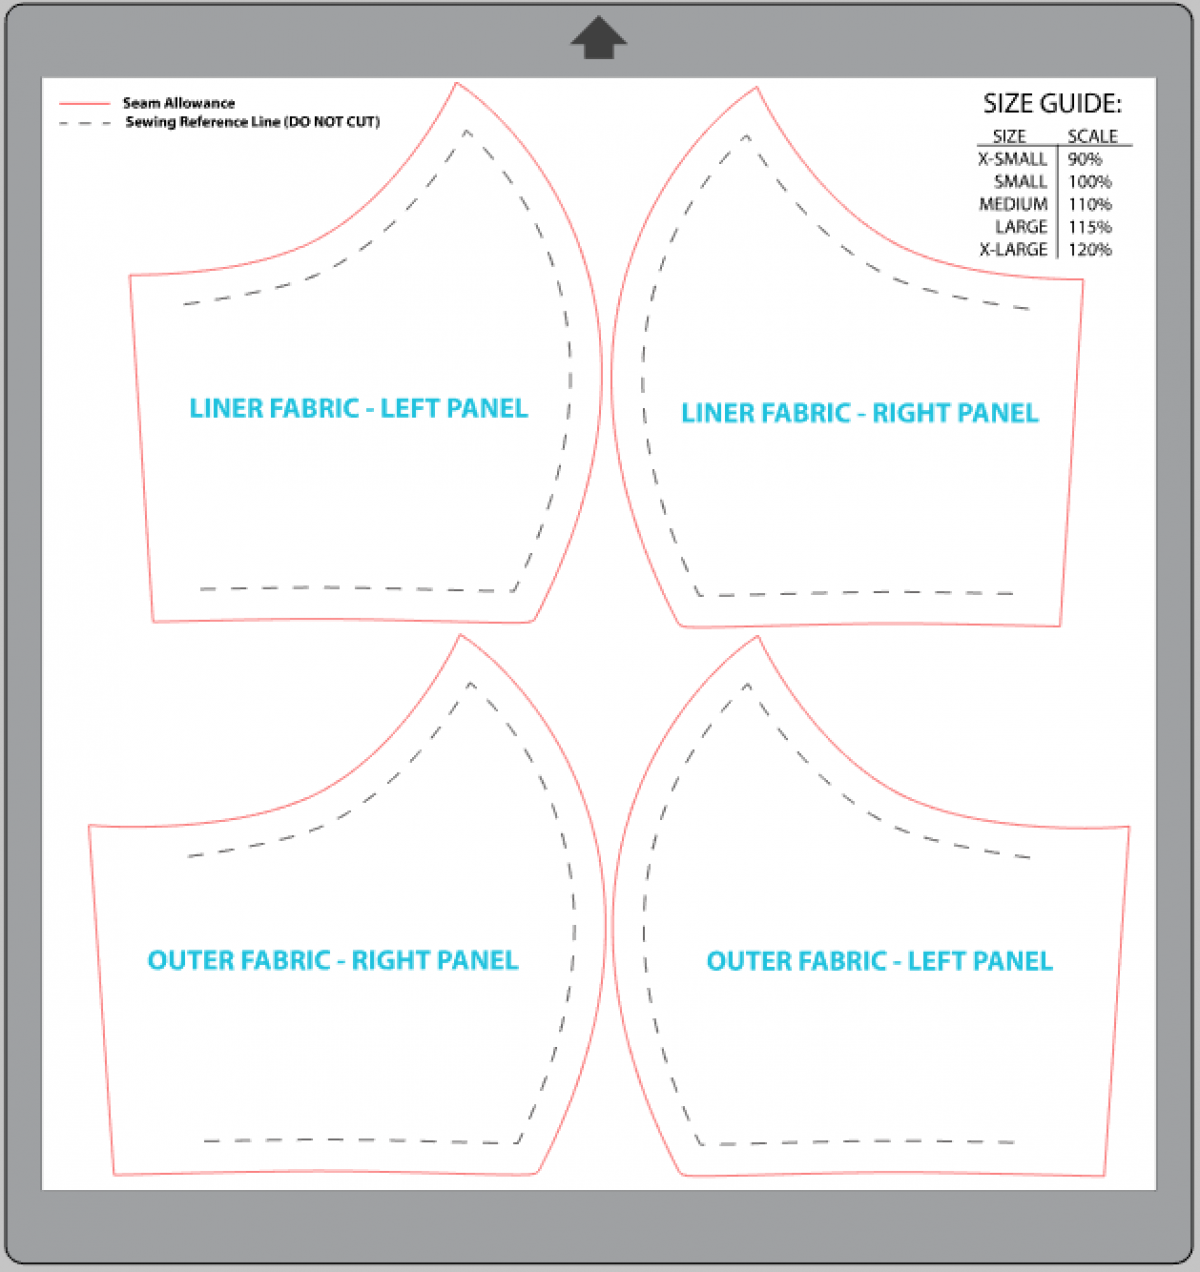
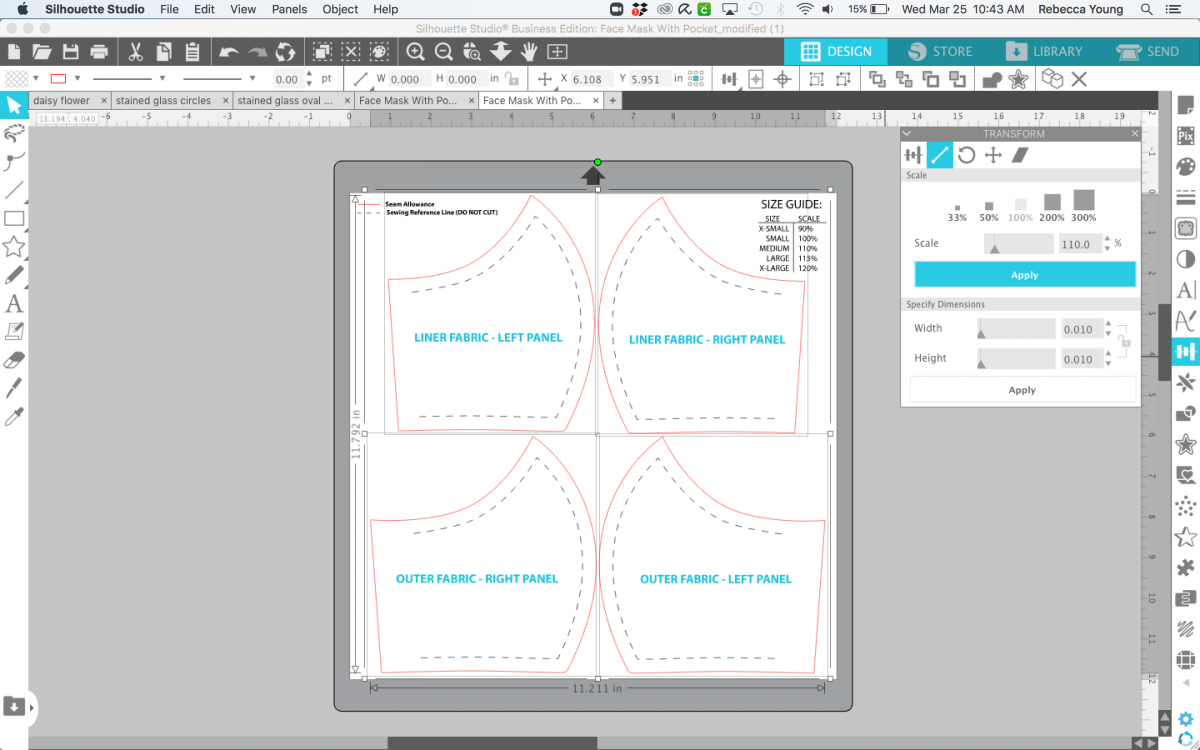
2. Reference the chart in the design file and note which size you’d like to create. To scale the mask accordingly, open the Transform panel and then the Scale tab. Adjust the percentage to suit your needs and select Apply.

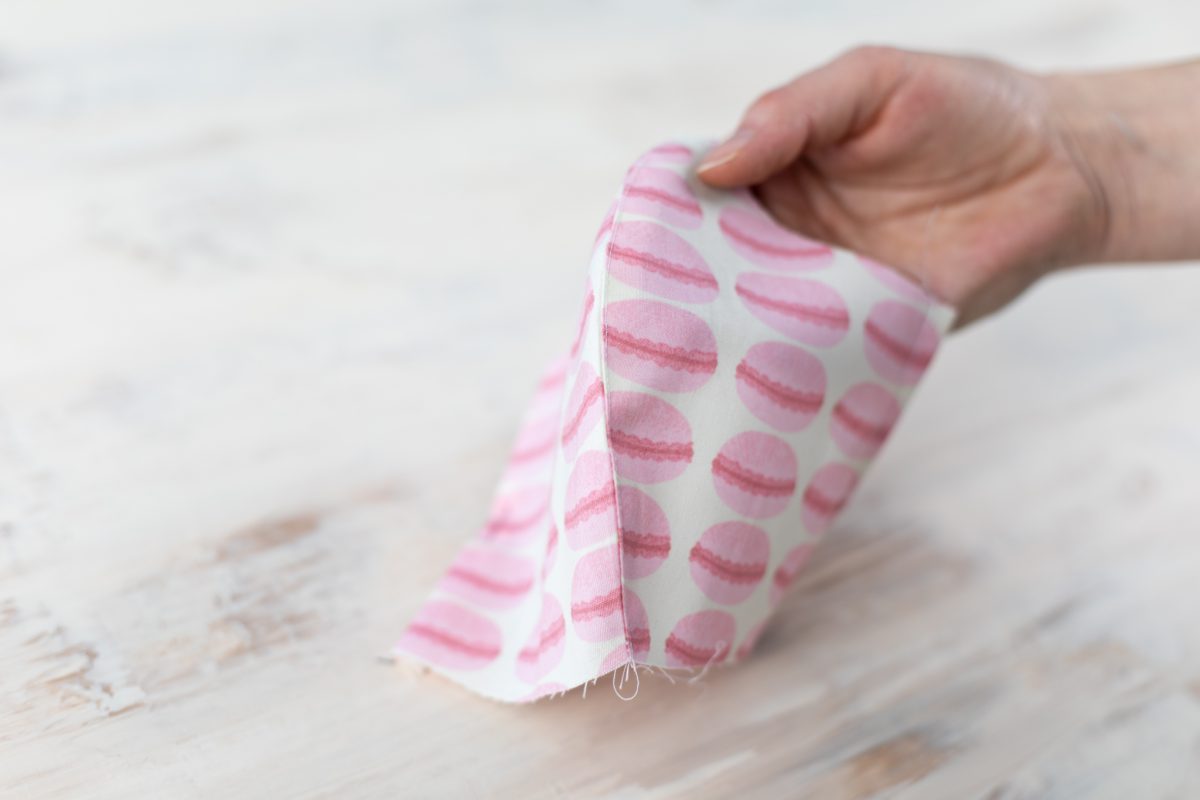
3. Once your templates are scaled correctly, you are ready to cut out your fabric pieces. We’re using different fabrics for the liner pieces and for the outer pieces, so you’ll want to cut those separately.
4. Open the Send panel and set Tool 2 to Rotary Blade and the Material to “Fabric, Thin (Cotton Print).” Your file should only cut around the edges of the face mask pieces.

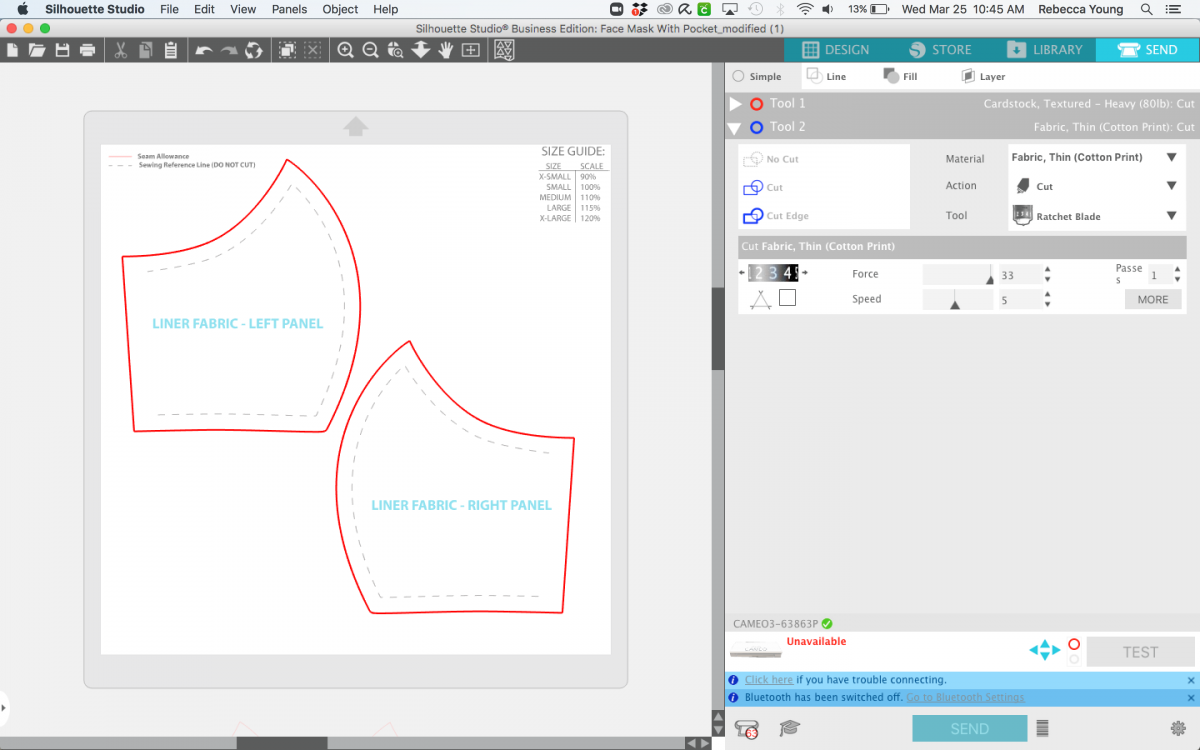
5. Place your fabric onto a Strong Tack (or extra sticky) cutting mat and load the mat into your cutting machine to cut the fabric.

Step Two: Sewing Your Face Mask
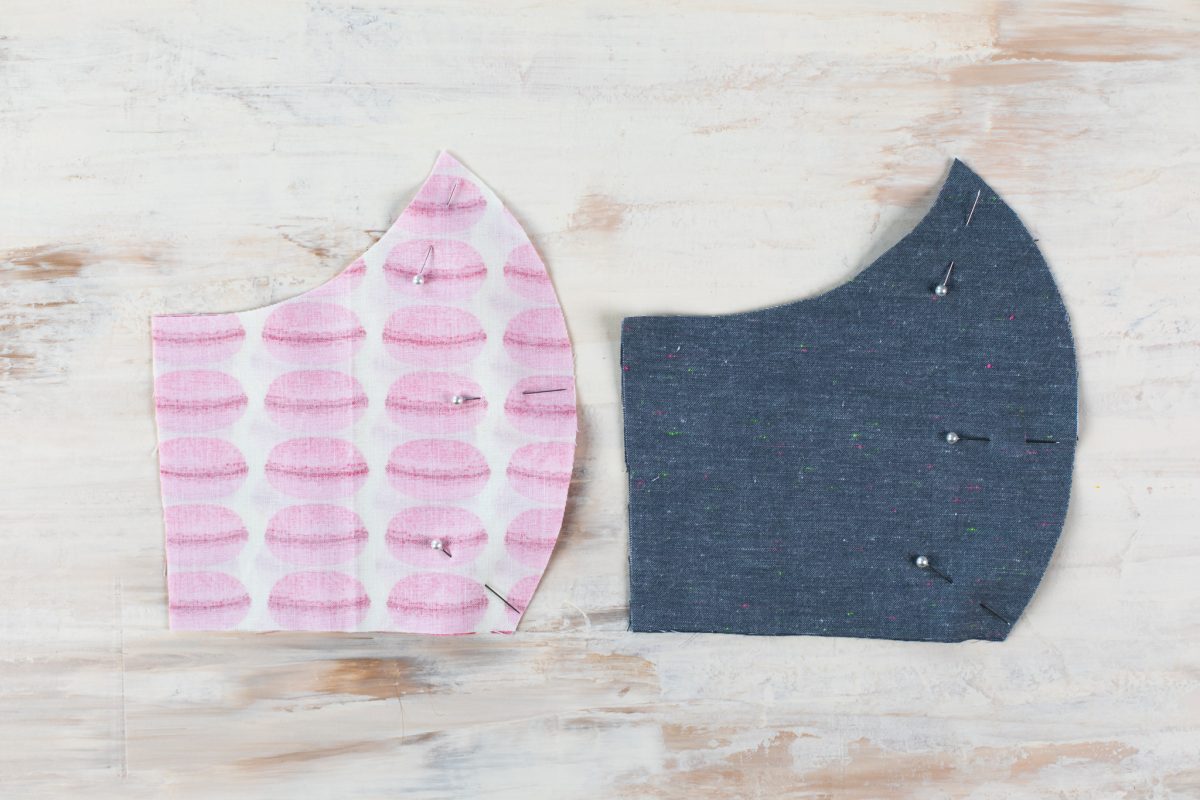
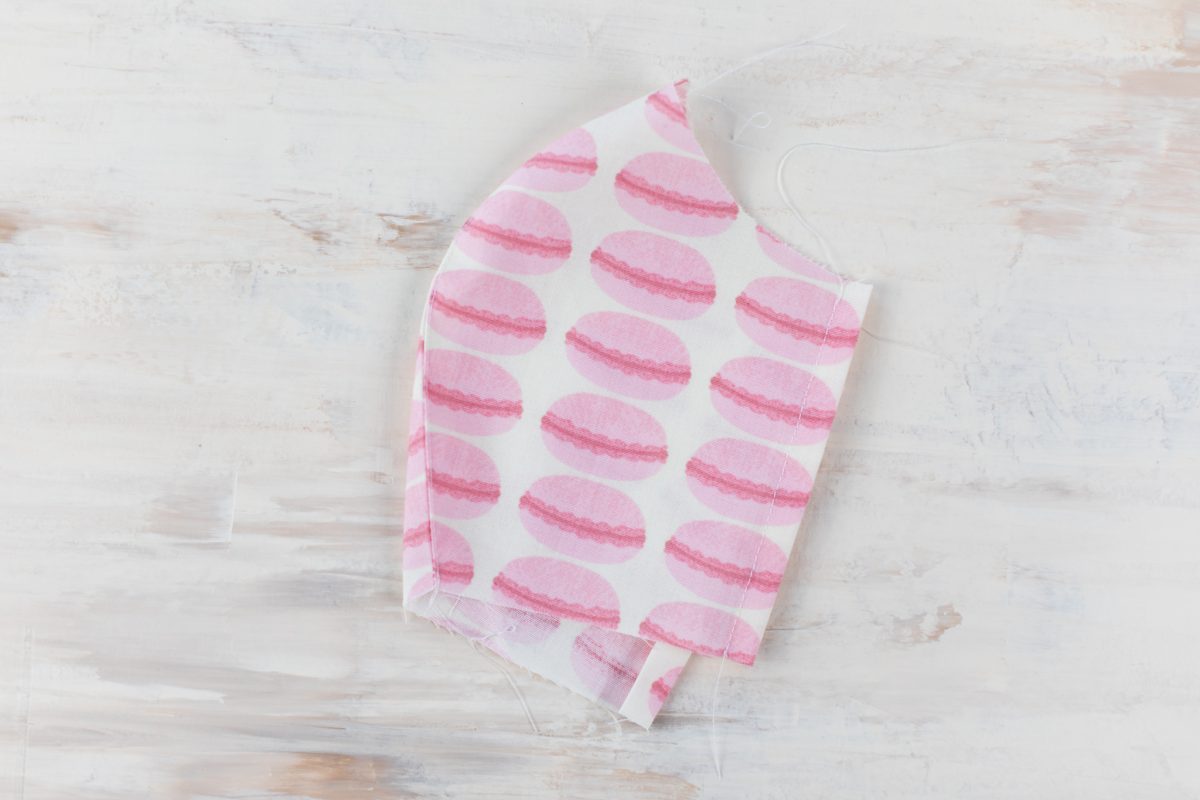
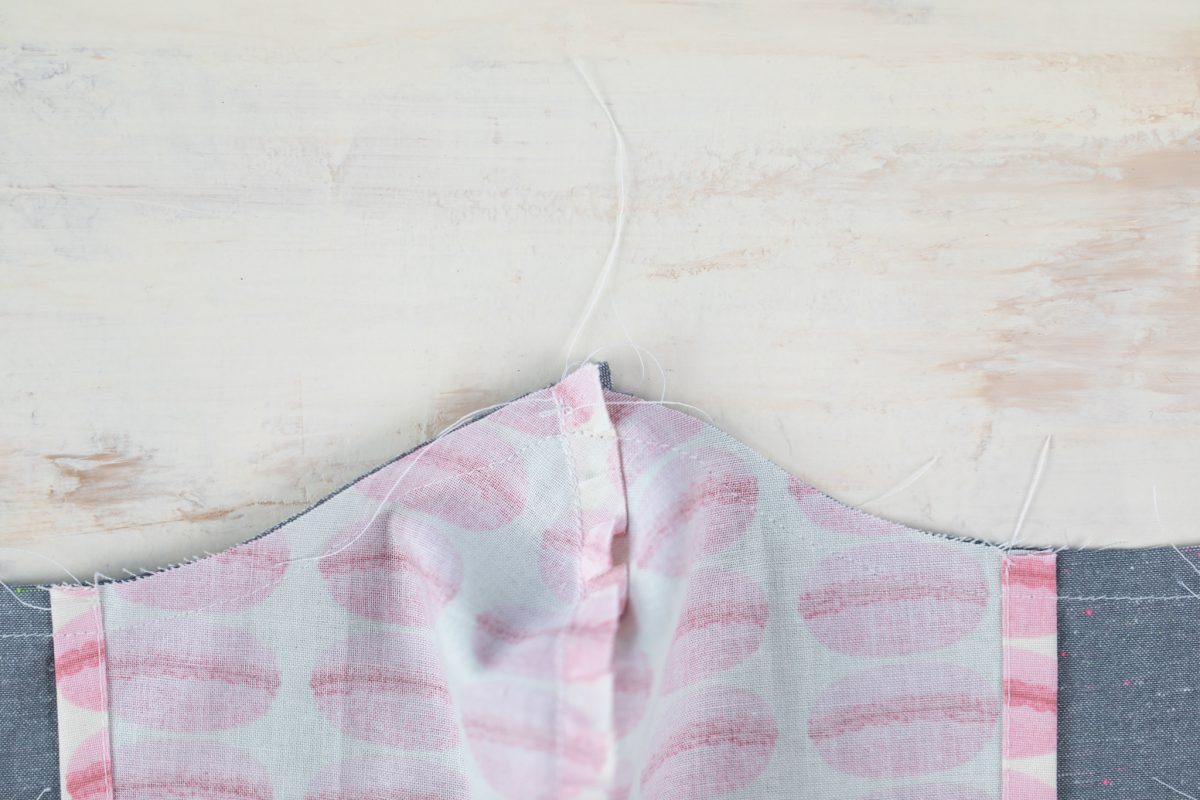
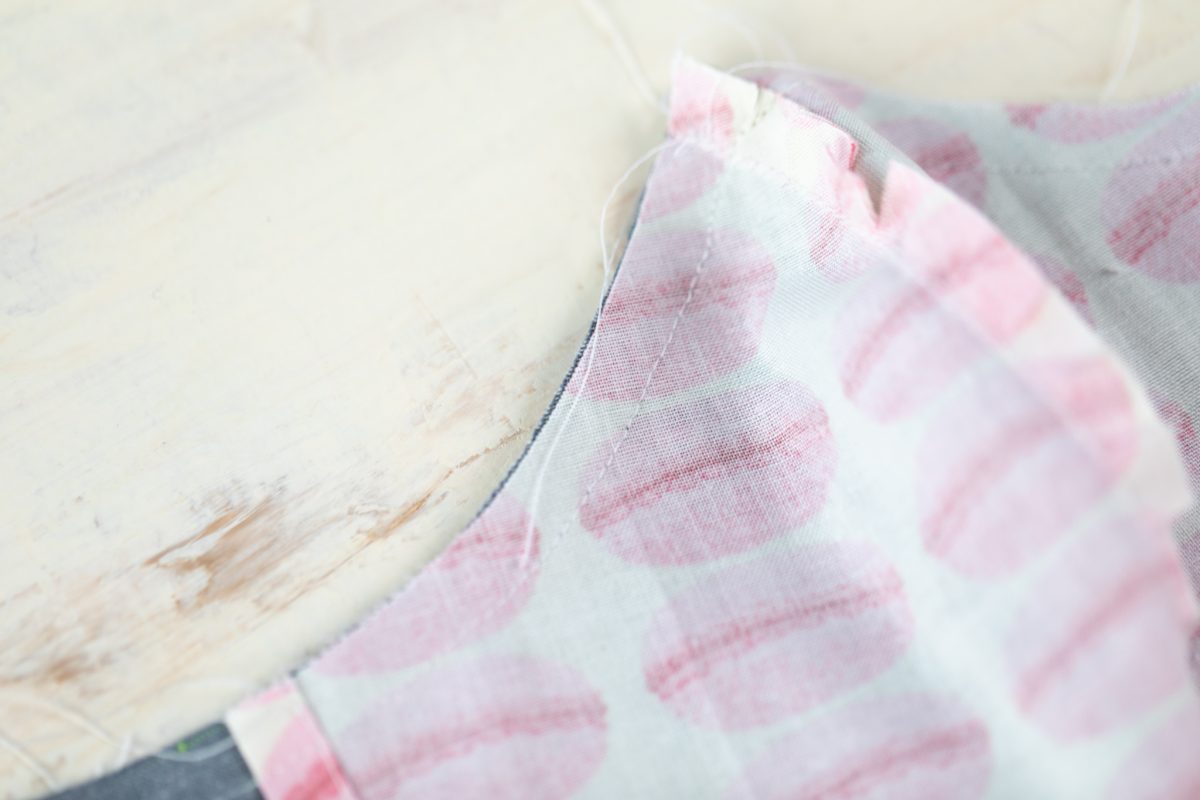
1. Place the right sides together of the two outer fabric pieces and the two liner fabric pieces and sew along the curved edge with 3/8-inch seam allowance.


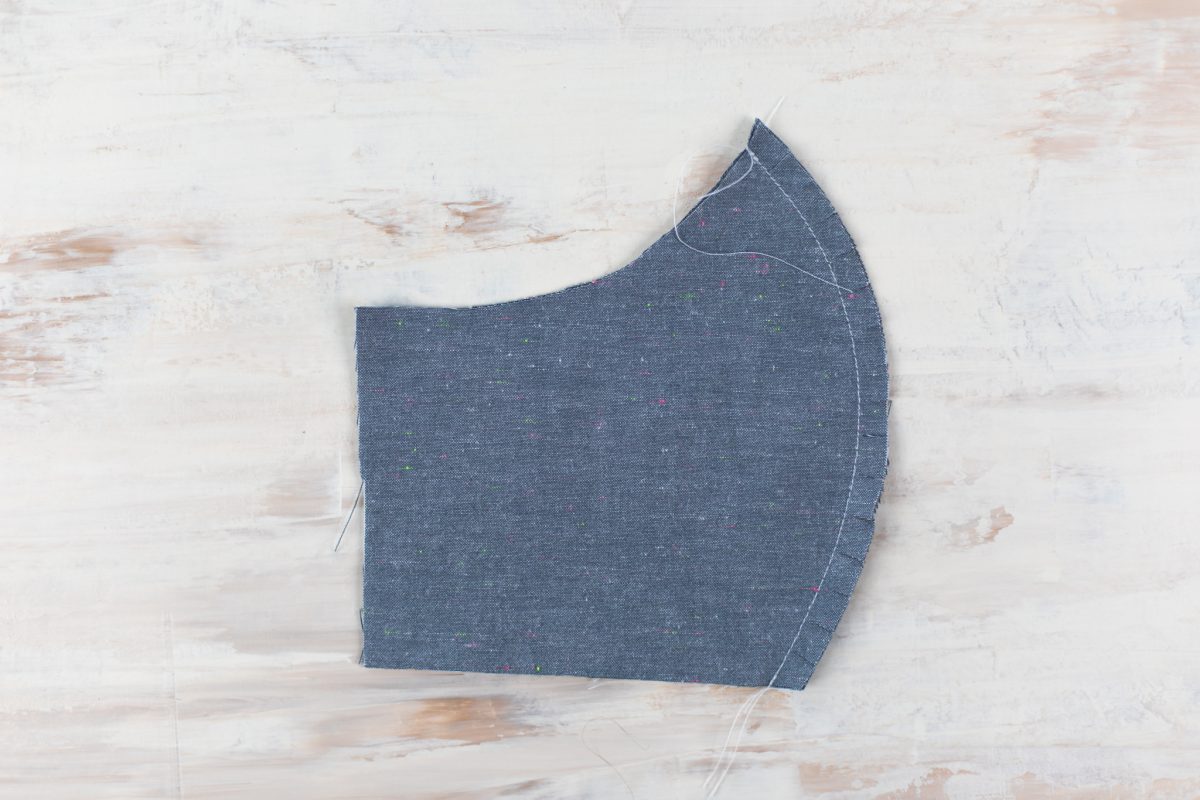
2. Clip seam allowance (that is, cut pieces perpendicular to the seam you created), iron to one side, and topstitch along the clipped seam allowance. Do this for both the outer and inner fabric pieces.


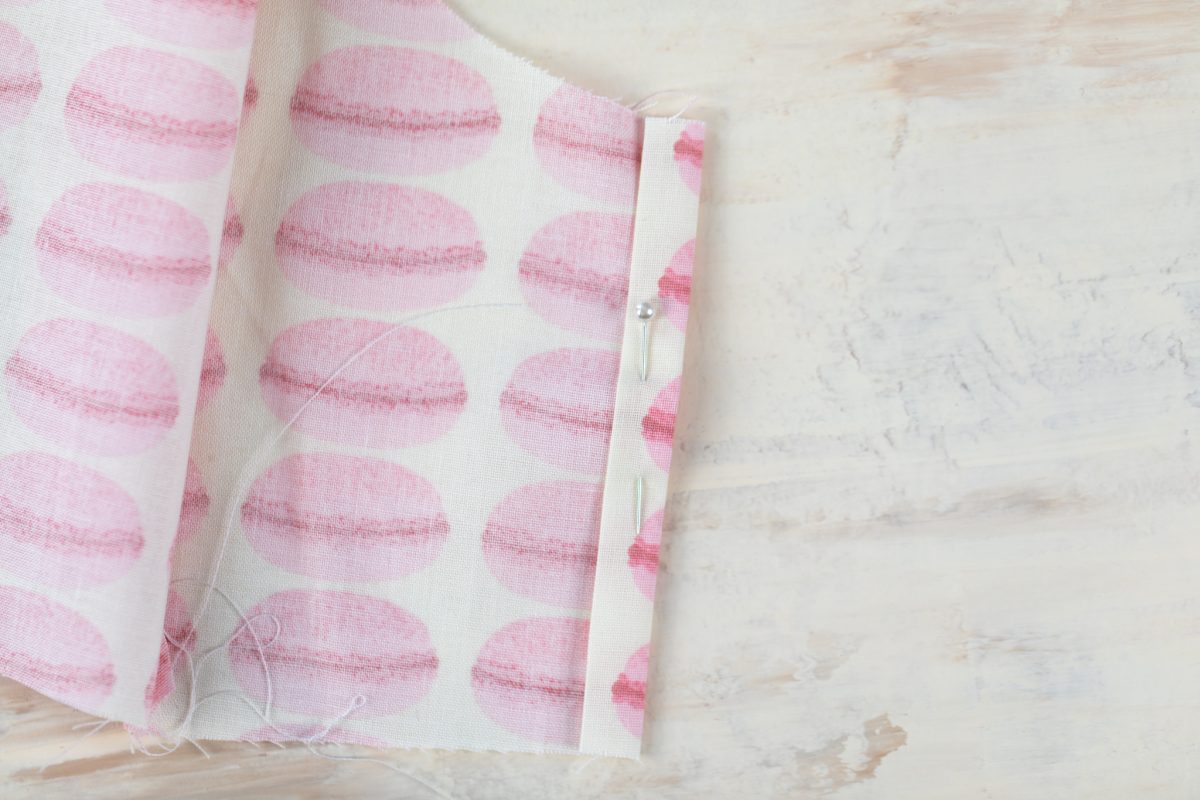
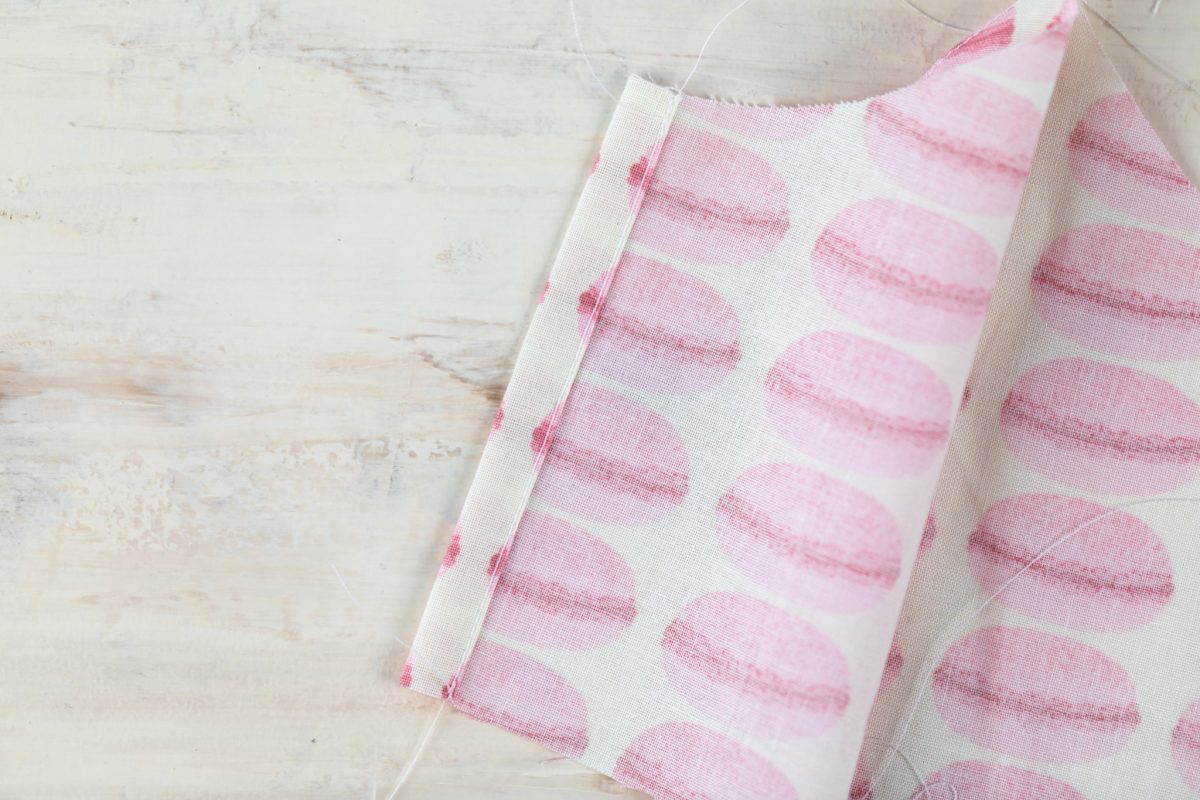
3. On the inner fabric piece, fold 3/8 inches under twice on both edges, iron and add an edge stitch.


4. Place the inner layer on top of the outer layer, with the right sides facing each other. Align the center seams. Sew the top and bottom edges of the mask together, again with 3/8-inch seam allowance.


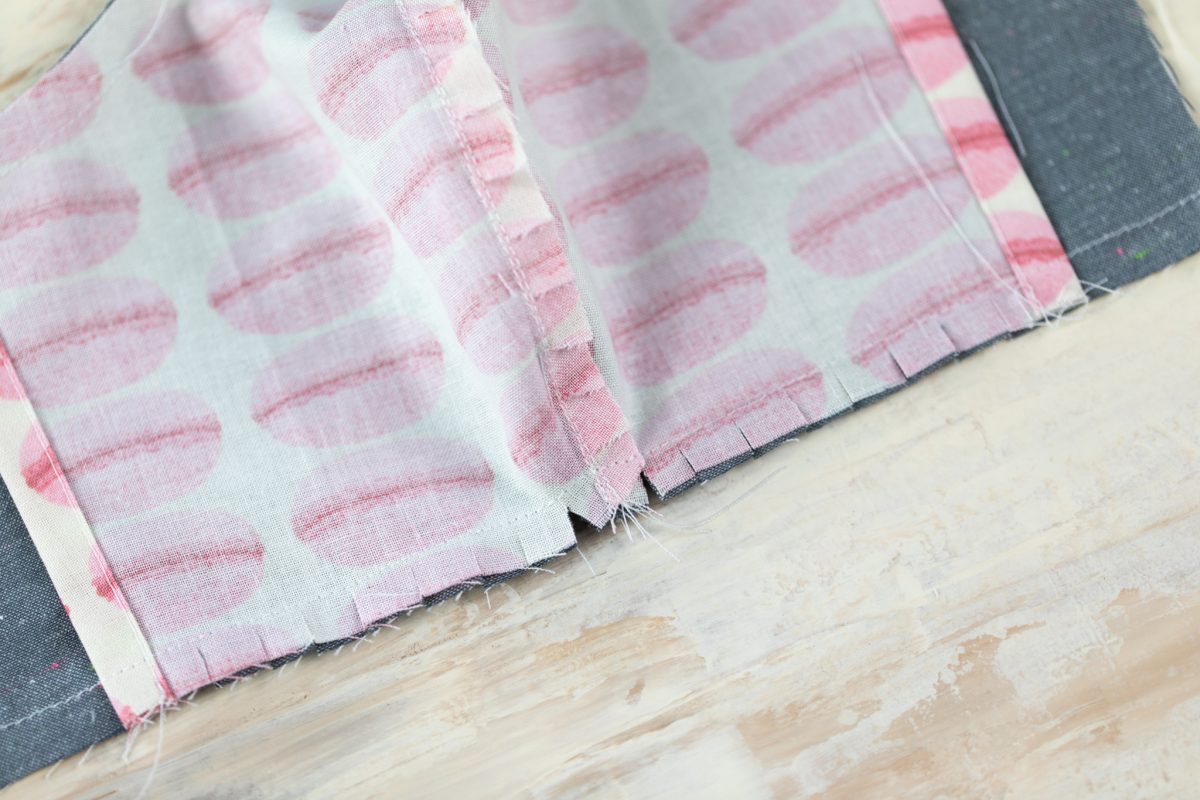
5. Clip the curve on the top and bottom seam allowances we just sewed. Leave about 1/2 inch from the ends unclipped.

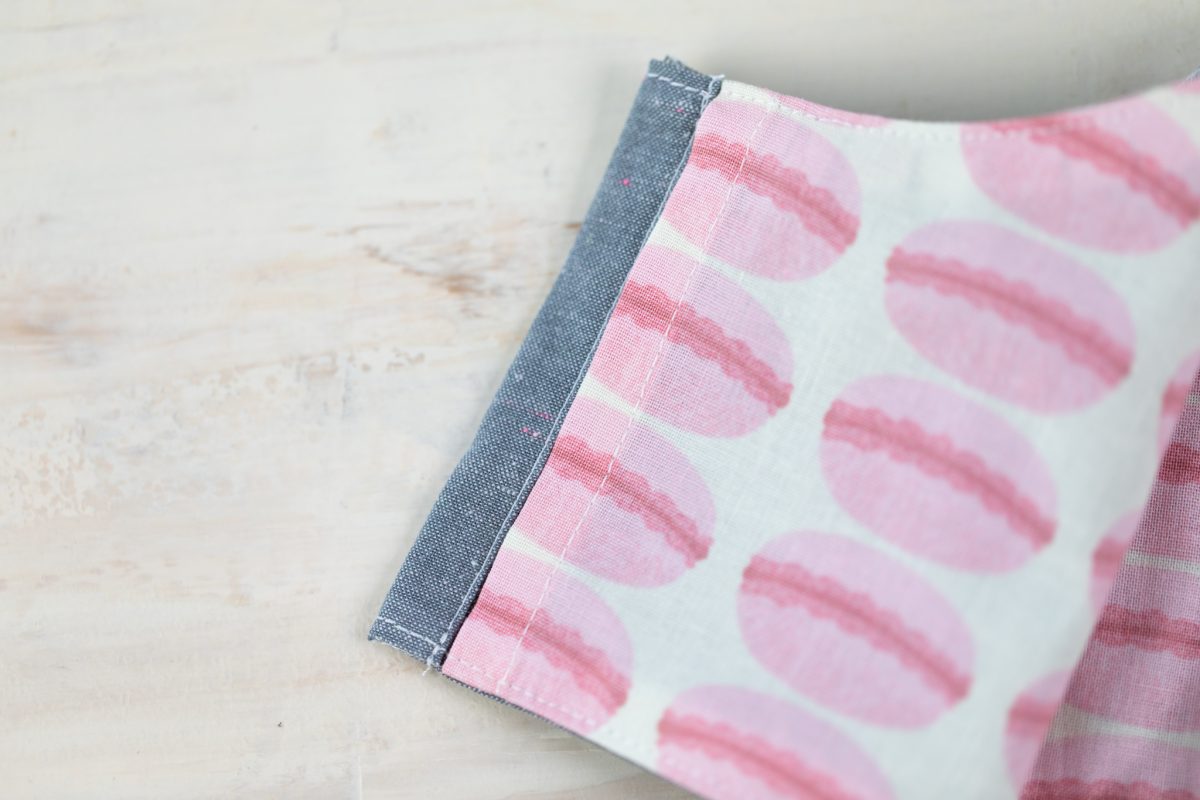
6. Turn the face mask right side out. Iron the seams flat. Double fold the top and bottom raw edges on the outer layer. Topstitch the entire top and bottom edges.

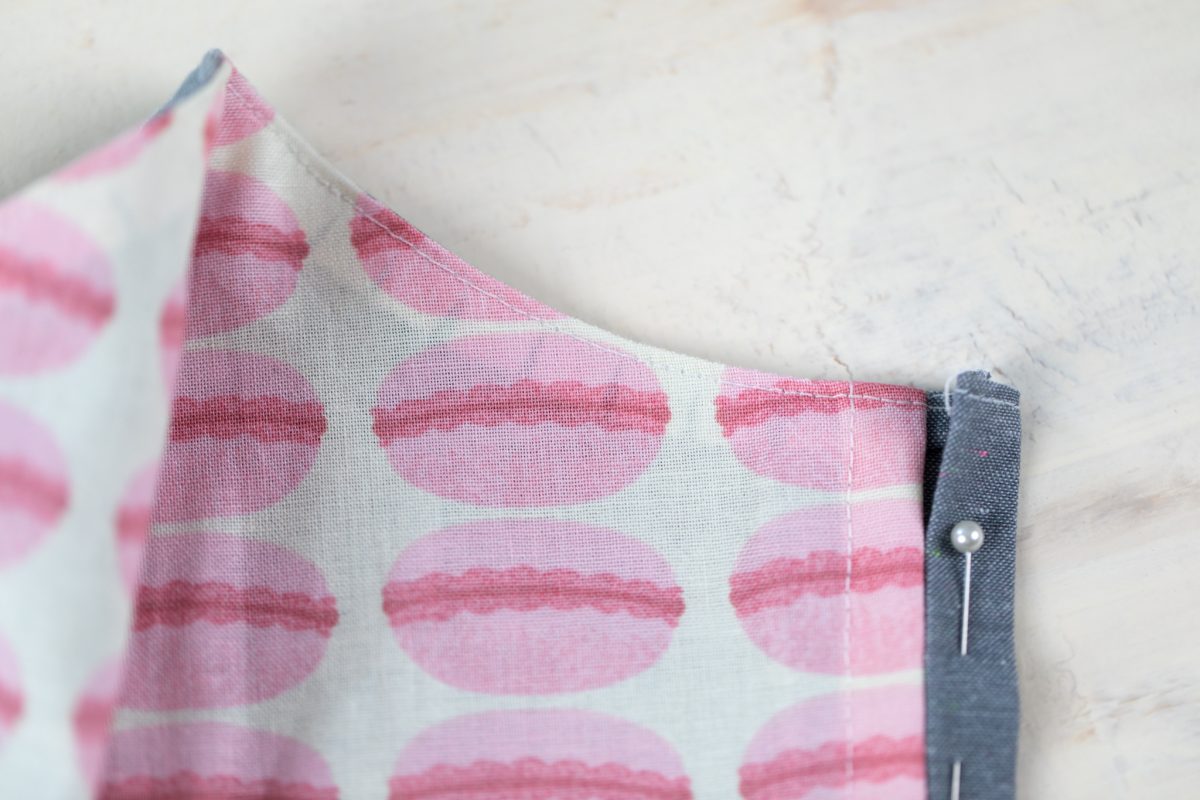
7. Fold the raw edges of the outer layer under twice so that the edge meets the edge of the inner layer. Topstitch to form a casing for the elastic.


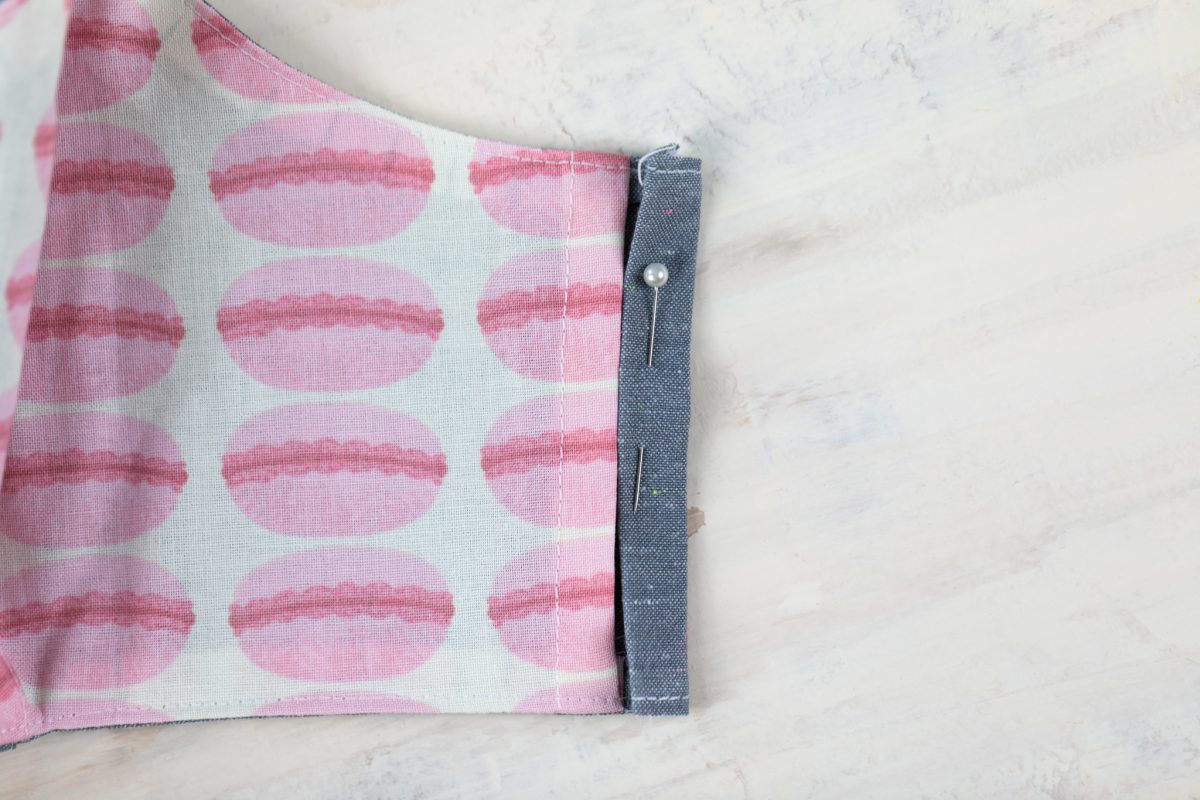
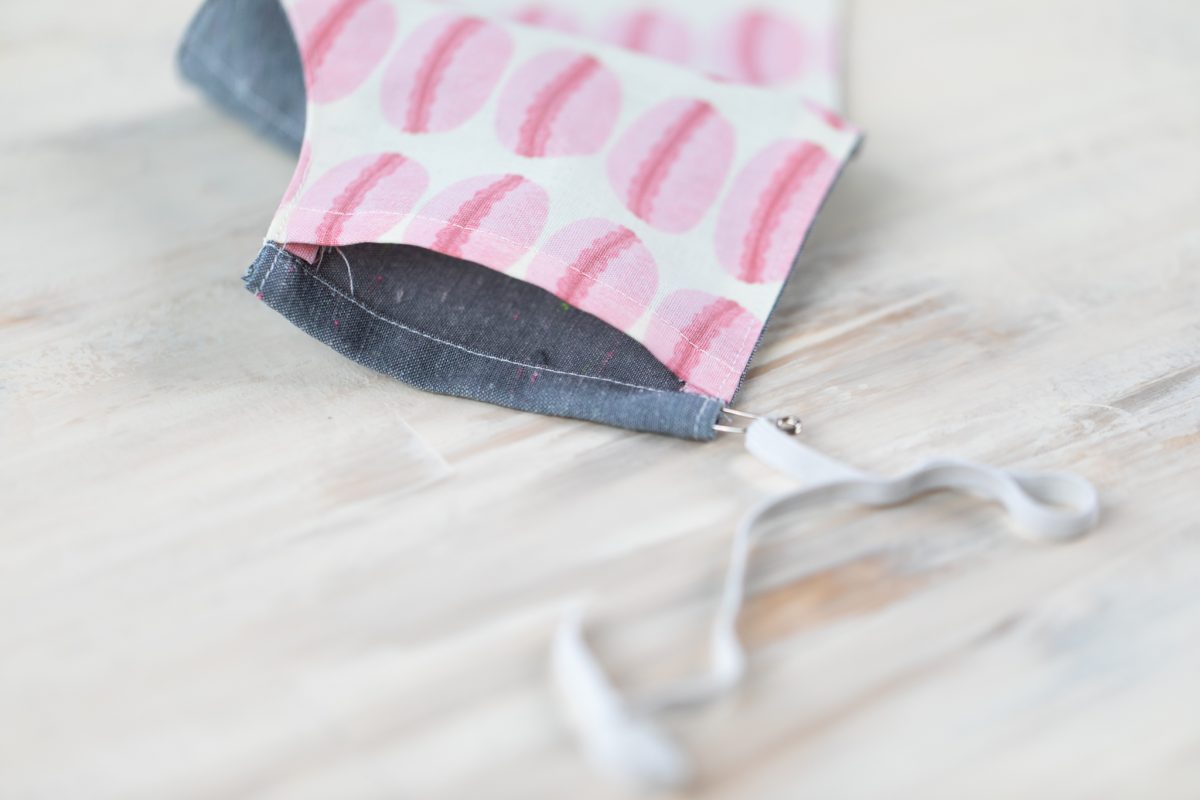
8. Now you can insert your elastic pieces through the casing with the help of a safety pin. Cut your elastic into two 8-inch pieces. Attach a safety pin to the end of the elastic and thread through the casing. Overlap the ends of the elastic by 1 inch and sew to create a continuous loop. Repeat for both sides. If you don’t have access to elastic, you can use longer lengths of cord, ribbon, or fabric strips, which you can wrap around your head and tie to secure the mask.

9. Insert your filter or filter fabric into the pocket you’ve created in the mask. View this link for resources on what materials to use.

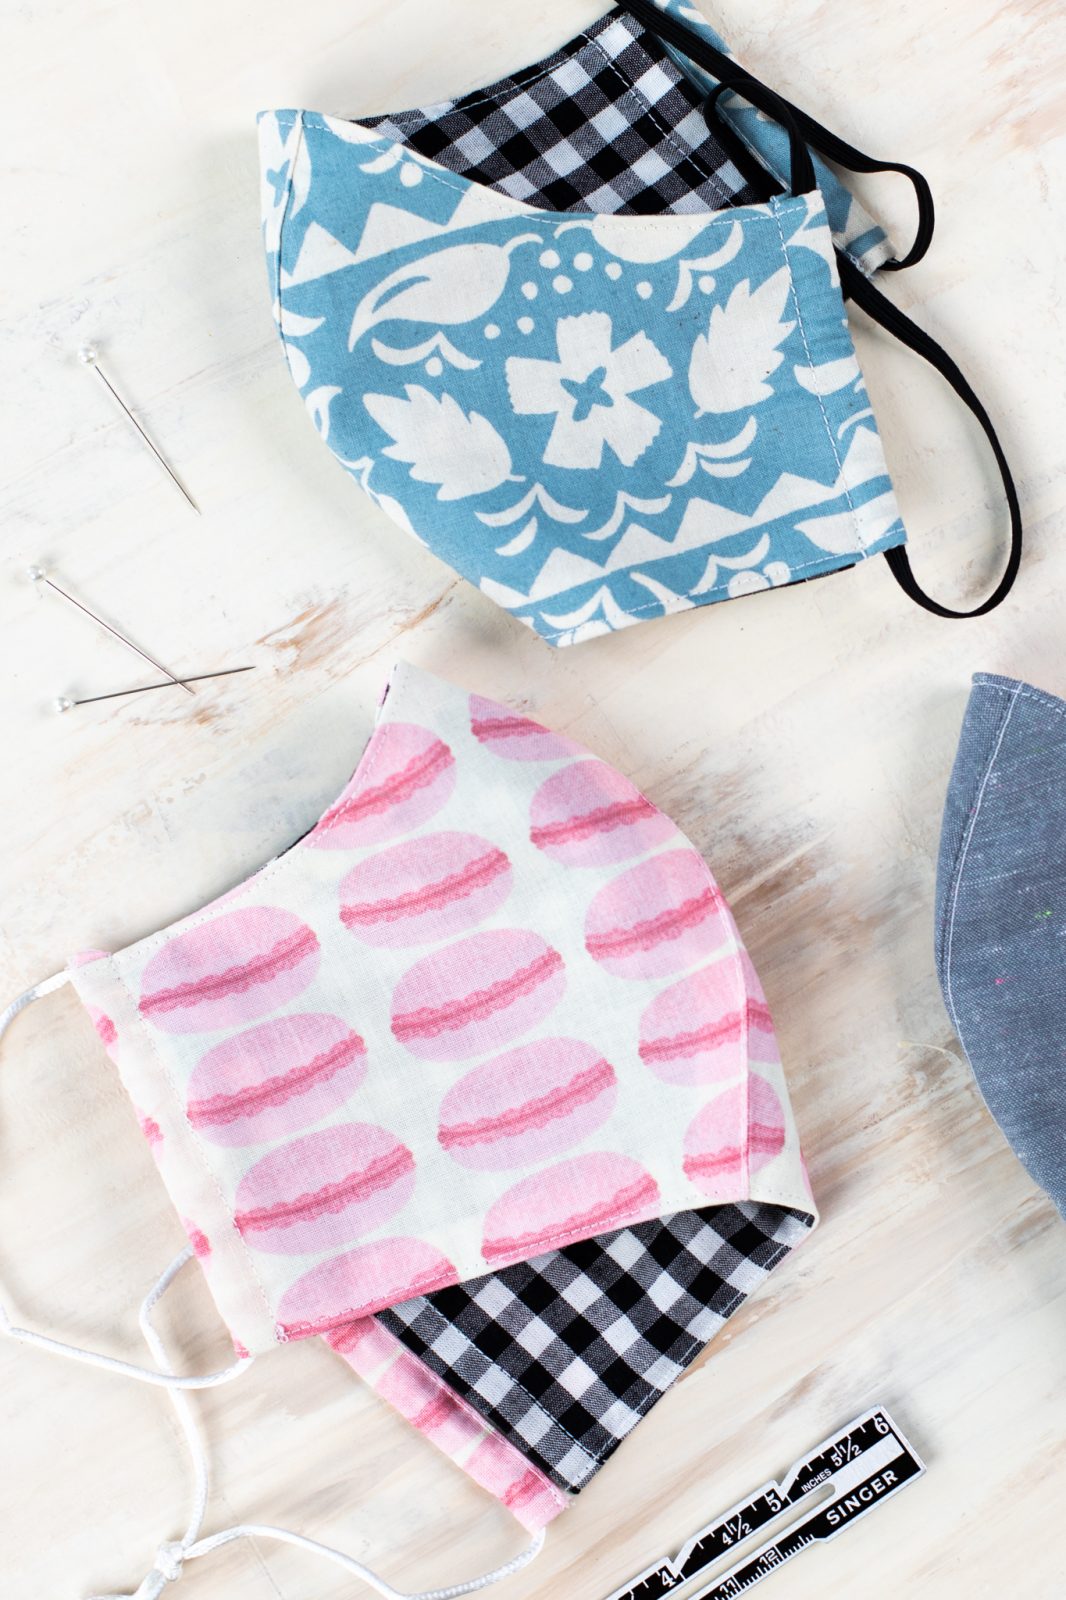
Hopefully this is helpful not only for you but for your community! Stay safe!

Marianella Acosta
March 26, 2020
ENORMEMENTE AGRADECIDA , EN ESTOS MOMENTOS SON IMPRESCINDIBLES.
MUCHAS GRACIAS
Carlene Coakelin
March 27, 2020
Hi, when I open the cut file it is only 11,624cm (high) x 11,398cm (wide). So when I resize to 110% it’s tiny. What size is the grouped object meant be at before resizing, to get the proper size?
Silhouette
March 27, 2020
Hello Carlene! We would be happy to help you! Please email in at support@silhouetteamerica.com with SM320 in the subject!
Amy
April 14, 2020
Sharing the info here would be most convenient. In the time it takes to email regarding this question and get a return email we could have the answer already. Just a thought.
mcdevroc
May 19, 2020
When the whole file is grouped to scale together starting measurements are:
Width 11.562″
Height 11.743″
Kristina
May 6, 2020
Yes, I would like to see the answer to the question, too. Why not just post the answer here?
Silhouette
May 8, 2020
Hello Kristina! We have found that with issues requiring longer steps it is easier to follow the steps when they are sent via email.
Janet Ramirez
March 28, 2020
Hola Si, tengo el mismo problema de tamaño, como me puede ayudar para llegar al tamaño adecuado? …mil gracias
Silhouette
March 30, 2020
Hello Janet! Please email in at support@silhouetteamerica.com with SM320 in the subject, we would be happy to help you!
Angel Bell
March 29, 2020
Thank you
Kim Goss
March 29, 2020
I dont have a 4 can this be done on any of the others? I have a 2
Silhouette
March 30, 2020
Hello Kim! For this project on fabric, we would suggest using the Rotary Blade which is only compatible with the Cameo 4.
K M
April 2, 2020
It would be great to get these settings for a Cameo 2/3 since those have fabric blades, too. Why limit folks who want to help just to try to get us to buy a Cameo 4?
Silhouette
April 3, 2020
Hell K M! You can use the Cameo 2 or Cameo 3, you would just need to use a Ratchet blade, because the Rotary Blade isn’t compatible.
Melody Chang
April 12, 2020
Where else can I find a rotary blade for the 4? It says it’s sold out on your site.
Silhouette
April 13, 2020
Hello Melody! We would recommend pursuing purchase with one of our retail partners at http://www.amazon.com, http://www.overstock.com, or http://www.silhouetteamerica.com/find-a-store
heh
April 16, 2020
Hi, Silhouette team. I’m having the same problem. I’m a newbie and cannot get the rotary or a fabric blade. I just received my Cameo 4. How do I make this work with just the auto blade? Please help! (Blades are not available for sale and didn’t come with our C4). Thanks!
Silhouette
April 17, 2020
Hello! Please email in at support@silhouetteamerica.com with SM420 in the subject, we would be happy to help!
Tarah Giroux
April 19, 2020
I am using the Cameo 3 with Auto Blade and it worked great for me.
Barbara Smith
April 28, 2020
What set to did you use?
Hope Dean
April 14, 2020
or cut this out onto card stock and use as a pattern and cut your fabric with scissors.
Angela
March 30, 2020
You could always make a pattern on paper and use that to cut your fabric.
Tina
April 4, 2020
how do you get yours to print? Mine wont print the red cut lines. I only get the dotted seam line. Beating my head up against the wall.
Silhouette
April 6, 2020
Hey Tina, Please select the designs and then increase the line thickness. This should allow the red lines to print!
Billie
April 4, 2020
That’s what I did. Worked out great.
Nancy Bailey
April 1, 2020
You can cut it out on freezer paper and iron it on fabric for a template.
Adriann
April 19, 2020
Iron your fabric between freezer paper (glossy sides together) and it becomes like cardstock. You can the. Put it on the mat and cut!
Paula Schiavitti
April 2, 2020
I only have a cameo 3 but I used that to cut the pattern pieces out of paper and will just hand cut them.
Nora Fasano
April 4, 2020
Yes you can use any cameo by using an iron on fabric such as wonder under then cutting on
a mat. You DO NOT need a Cameo 4
Samantha Beck
May 20, 2020
I would not suggest using wonder under on the fabric as it’s treated and will make it very hard to breathe through.
Julie Stevens
April 6, 2020
Hi Kim, you could cut on your machine I n paper and use as a pattern on your fabric to cut by hand. I have an original machine and this is how I’ll be doing it
Hope Dean
April 18, 2020
i have a two and just used it to make a pattern and cut my fabric like that.
Evie Connor
March 30, 2020
I have a Cameo 3, so I resized the pattern & cut it on paper. Then I’m pinning to my fabric & cutting by hand. Just a suggestion for those who don’t have the Cameo 4.
Silhouette
March 31, 2020
That’s a great idea! Thanks for sharing!
Carla
April 3, 2020
Hi what measurements are you using for the pattern to cut the material by hand
Bonnie
April 3, 2020
Evie, how do you get the seam allowance lines to print. Mine is only printing the sewing reference lines. Thanks!
Silhouette
April 6, 2020
Hi Bonnie, try selecting the mask designs and increasing the line thickness. This should allow the seam allowance lines to print.
Evie
April 7, 2020
My seam allowance lines didn’t print but I use the guide on my sewing machine for the seam allowance, so I didn’t need to see it on the pattern.
MontanaMomma
April 3, 2020
You can use the 2 & 3 as well, you just have to select the fabric
Jan McKenzie
April 3, 2020
Hi Evie, I’m trying to print the pattern on my regular printer too but the outer red lines of the pattern are not printing, I’m only getting the dotted lines. Did you have that problem? How did you overcome it? Thank you.
Silhouette
April 6, 2020
Hi Jan! Try selecting your designs and then increasing the line thickness. This should solve the problem when you go to print! You can always do a print preview as well to double-check.
Evie
April 7, 2020
I didn’t have a problem cutting on the red lines. I don’t know if it makes a difference, but I started by resizing to 110%, then I ungrouped everything & put 1 copy of the outer layer & 1 copy of the liner on the page & cut. I then used the pattern on my fabric, folding the fabric so I cut 2 pieces. This worked perfectly, as I made about 100 masks.
Crissy
April 4, 2020
I tried to print on paper but it only gives me the inside sew lines and not the outside lines to cut. I resized it to the size I needed. Can you tell me if I have to trace it our anything first before sending it to my printer. Thanks
Silhouette
April 6, 2020
Hi Crissy, Try to increase the thickness of your lines, but selecting the design and increasing the thickness. This seems to do the trick!
Lisa Serovy
April 4, 2020
How did you get the red line to print?
Silhouette
April 6, 2020
Hi Lisa! Please select the face mask designs and then increase the line thickness. This should allow the red line to print!
Tammy Zabenko
April 5, 2020
I put outdoor fabric on my sticky Matt which I sprayed adhesive to a old Matt before I cut out this pattern.
I made ten masks today from another pattern but this one seems to look easy and nicer looking.
Sandra Ward
March 31, 2020
Thanks so much for the pattern. It sews up nicely.
Gina
April 1, 2020
Can you do this on a curio?
Elizabeth Doll
April 1, 2020
Did I miss the sizing chart?
amy
April 1, 2020
I have a regular cameo and used the fabric blade set to 2 and cut twice. Just to help the person who commented and did not have a cameo 4 above –
Sally Naone
April 1, 2020
Just wanted to say “Mahalo” (thank you) for sharing your “mana’o” (thoughts), it made me to go out and get supplies so I can teach myself “HOW” to sew, with the help of some family and youtube of course!
Kathy
April 2, 2020
Thank you so very much for this pattern. I have been trying to find something like this so that I could make mask that have a better fit then the ones I have made so far. My Silhouette is the 2nd generation so I am going to cut out 3 of each size using freezer paper and then ironing them one on top of the other to make a strong stencil. Once the stencil is made the the waxy side can be pressed on to the fabric and it will stay when cutting the pattern out.I have done this several times and it works well.
AshleyAnne
April 2, 2020
I don’t understand why you cant keep the front fabric and back fabric as one piece and then sew the two pieces together.
Kris Howard
April 3, 2020
IF you have a Cameo 1-3 you can use the Fabric blade (Same as the rachet blade but a different color Blue). If you don’t have a fabric blade, use a new rachet blade. Same directions as above.
Angie Taylor
April 7, 2020
is the rachet blade the same as CB09?
LauraK
April 3, 2020
This can be done using the Curio, correct?
Connie
April 30, 2020
I would like to know as well. Is there anything special I would need to do?
ellen
April 3, 2020
Yay! been looking for this! thank you!
Candace
April 4, 2020
I would love suggestion on how to add a wire for the nose
Candace
April 4, 2020
Does the x-small work for a child (ages 3-5) or would I need to go smaller?
Silhouette
April 6, 2020
The X-small should work great for most kids ages 3-6!
Paule-Marie
April 4, 2020
Will this design also work with the original Cameo and a ratchet blade. If so, what settings?
Thank you.
Marika
April 6, 2020
The SVG file is not at 100% scale? I’d suggest you to add a check sqaure to measure that the pattern are at scale!
Silhouette
April 6, 2020
Hi Marika, the file should be at 100% scale when you import it into Silhouette Studio. Then you can adjust the scale for the other size options.
Kathleen Skou
April 6, 2020
I have to say, this is one of them most well constructed items! I just made 6 for family to wear if the must go out. The pattern is fabulous thank you!
Silhouette
April 7, 2020
We’re so happy you like it! Glad it’s serving you well and keeping you all safe!
Print Ear Saver Hooks on Your Silhouette Alta — Free 3D File!
April 6, 2020
[…] The mask I used in these pictures is from the Silhouette Design Store – Design 317969. The full tutorial on making the mask can be found at the Silhouette Blog! […]
holly case
April 6, 2020
I cut out the pattern on vinyl sticker paper. Transferred the stickers to plexiglass, my husband cut out the plexiglass. Now i have a hard template to cut the fabric.
Olga Castro
April 7, 2020
do you happen to have the sizes for each mask ? ex is the medium for a child or adult? thanks
Silhouette
April 7, 2020
The Medium is for an average adult, the small would be a child, ages 8 and up, the X-Small is for children 3-7. Of course, these are just averages so you may need to adjust for your needs!
Michelle
April 7, 2020
Can you show a video focusing on aligning the inner and outer layer right side to right side? I’m having issues here.
german
April 9, 2020
I have been having issues with finding the best mask for me. After reading this article, my issues have come to an end. I really love the information you provided here as it has helped me a lot. merely looking at the article, I can see that it is written by a PRO. please check my article on Facebook Marketplace Settings and give me valuable feedback. Thanks for the good write-up.
Aracelis Caraballo
April 9, 2020
Gracias. quedaron hermosas Dios bendiga el talento
Deborah Bain
April 9, 2020
Hello. I just purchased my Cameo 4 but the rotary blade did not come included. Would the auto blade work on cotton fabric?
heh
April 16, 2020
Deborah, I’m a newbie and don’t have an answer. I’m wondering if you found a solution. I can’t figure this out with just having the autoblade – the fabric and rotary blades are not available with purchase and didn’t come with the machine. Did you have any luck? Thanks! 🙂
Suzette
April 11, 2020
I am going to cut the pattern out and pin to fabric to cut and placing the center on the fold instead of having a seam in the middle.
Joanie Lewis
April 13, 2020
I don’t have a silhouette cutter but would like to make this pattern. I tried downloading your free software and pattern but it says they aren’t compatible. Is there any other way to get the pattern?
Joanie Lewis
April 13, 2020
Nevermind… I tried a third time and dragged and dropped the pattern and it opened. Thank you for providing this pattern! I love it!!
Jacky Hollins
April 13, 2020
I still only have the cameo 2, so what i did is scaled to correct size, and used my 12 x 24 mat with an a3 paper on it, and just cut the pattern pieces on paper, and pinned these onto my fabric and cut. i dont have a fabric blade or blade to use exclusively for fabric, but this worked a treat 🙂
heh
April 16, 2020
Can anyone help with how to “cut” this with the Cameo 4 but WITHOUT a “fabric” or “rotary blade?” I only have the auto-blade and had all kinds of issues, including having it cut THROUGH my cutting mat. Thank you for making this available for free – I’m a newbie. Any help is appreciated. 🙂
Tina Ford Hunt
April 18, 2020
Anyone have any ideas on how to add the metal at the nose? I bought pipe cleaners but can’t figure out how to place them.
Patty
April 24, 2020
After you see the top and bottom pieces together, you can place a pipe cleaner at the top, fold over the 3/8” seam allowance and see. This would replace your top stitch on the top. Wish I could send a picture.
Patty
April 24, 2020
Not exactly replacing the top stitch but doing this before the top stitch while the fabric is still inside out.
Robin
April 21, 2020
Thank you for this great tutorial and design for masks.
Michelle Heilman
April 23, 2020
Is it necessary to spray the fabric with a stabilizer before cutting? Or is safe to use a super sticky mat for the fabric?
Jessica Hess
April 23, 2020
I wish these sewing instructions were a printable. Then I would not need to have my computer or phone open to this blog as I sew.
Rieanna lyda
April 28, 2020
Thank you…I had my cameo 3 draw these patterns on card stalk….then used them as a pattern and cut them myself worked great.
Laurie
May 1, 2020
I have an older Silhouette Cameo that no longer gets upgrades. I do not know how to adjust to the different sizes. Can someone help me please ?
Silhouette
May 4, 2020
Hello Laurie! Please email in at support@silhouetteamerica.com with SM520 in the subject, we would be happy to help!
Laurie
May 1, 2020
I found the answer to the sizing question in the instructions !! Imagine that . Sorry to bother
unilag change of course
May 10, 2020
A round of applause for your blog post. Much thanks again. Want more!.
Gina Brito
May 11, 2020
hola buenas tardes esto se puede hacer con la curio?
Shashi Kaushik
May 13, 2020
Hey, Great explanation, it would be wonderful if you please share the sizes as well. Also can we also sandwich felt (non woven) between 2 normal fabric layers.
Alysia Fishburn
May 16, 2020
i frequent hair salons because i always want to keep my hair in top shape::
Denise R Cosby
June 1, 2020
starrcosby8@gmail.com
Please contact me regarding this face mask design because I need your assistance . I have a question about whether the silhouette will cut this design or do I cut it first and then place it on the silhouette for designs?
618 5671030
starrcosby8@gmail.com
Silhouette
June 2, 2020
Hello Denise! Please email in at support@silhouetteamerica.com with SM620 in the subject, we would be happy to help!
Mel
June 12, 2020
How do you cut fabric on the Cameo?
Silhouette
June 16, 2020
Hello Mel! We would be happy to help you! Please email in at support@silhouetteamerica.com with SM620 in the subject!
ivannia melendez
June 28, 2020
hola me podria enviar el archivo porfavor
Silhouette
June 30, 2020
Hello! You can download this file here: https://www.silhouettedesignstore.com/designs/317969?search=%23317969&sortby=relevance&submitted_search=true
Desiree Wray
July 2, 2020
Let me know if there is a place where I can go for training. Bought the cameo 4 but knows nothing about the machine.
Would love to master this machine and get proper training before I start exploring.
Please help. I do hope there is a support in South africa. I am based in Cape Town.
My machine is arriving on Monday 6 July.
Thankin You.
Regards
Des
Silhouette
July 2, 2020
Hello Desiree! You may find an International Distributor here: https://www.silhouetteamerica.com/international-distributors. We would suggest contacting one near you to see if they offer any in person training!